background image

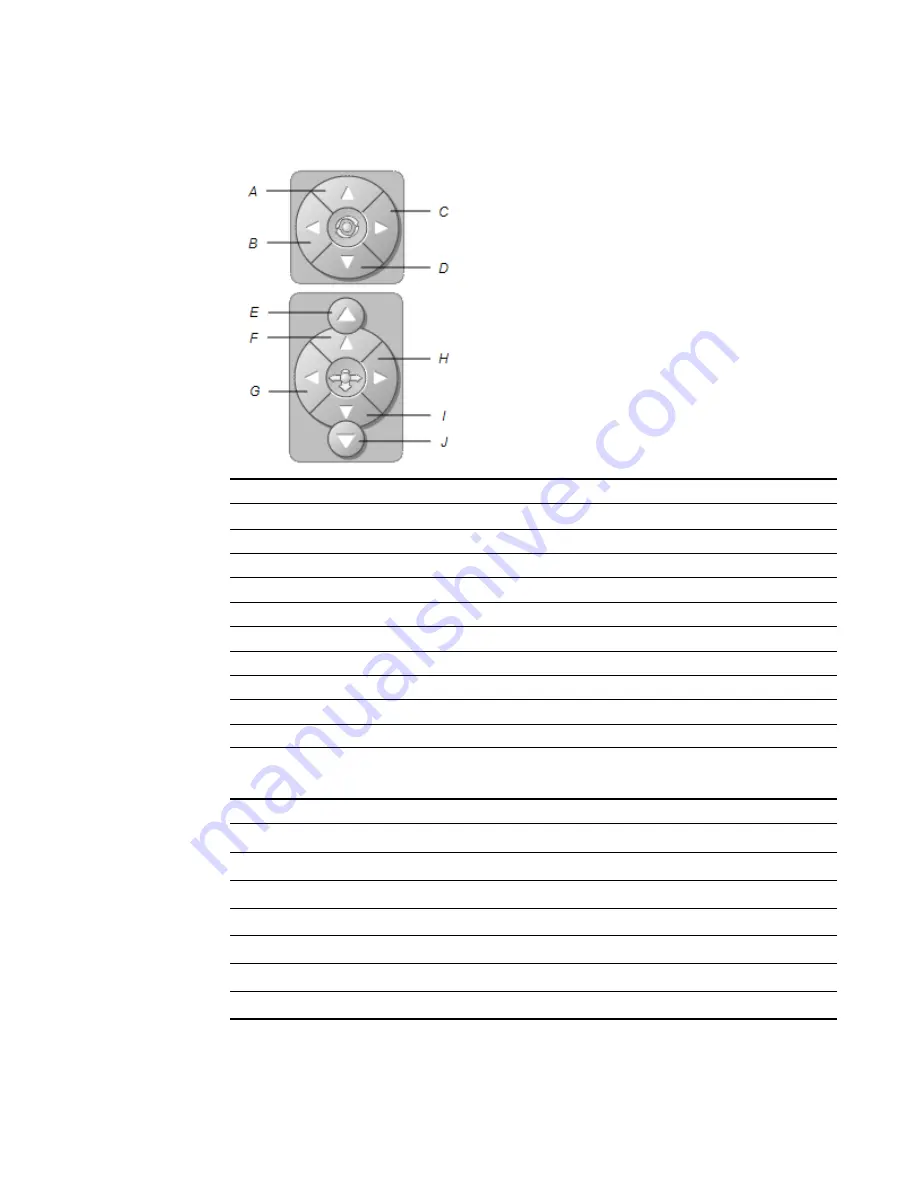
3. Navigate the 3D scene using the navigation controls.

Button

Use to:

A

Change your orientation upward.

B

Change your orientation to the left.

C

Change your orientation to the right.

D

Change your orientation downward.

E

Raise elevation.

F

Move forward in the scene.

G

Move to the left in the scene.

H

Move to the right in the scene.

I

Move backward in the scene.

J

Lower elevation.

Alternatively, keyboard buttons can be used to navigate the 3D scene.

Keyboard button

Use to:

W

Change your orientation upward.

A

Change your orientation to the left.

D

Change your orientation to the right.

S

Change your orientation downward.

PAGE UP

Raise elevation.

UP ARROW

Move forward in the scene.

LEFT ARROW

Move to the left in the scene.

C H A P T E R 2

Inserting and manipulating 3D models

11

Содержание Smart Notebook 3D Tools

Страница 1: ...SMART Notebook 3D Tools User s guide...

Страница 2: ...sta are either registered trademarks or trademarks of Microsoft Corporation in the U S and or other countries All other third party product and company names may be trademarks of their respective owne...

Страница 3: ...nserting and manipulating 3D models 5 Inserting 3D models 5 Manipulating 3D models 6 Navigating 3D scenes 9 Disguising 3D models before presenting them 12 Using Google SketchUp and 3D Warehouse with S...

Страница 4: ......

Страница 5: ...r s guide provides the information you need to begin using SMART Notebook 3D Tools as well as Google SketchUp sketching software and 3D Warehouse Activating SMART Notebook 3D Tools g To activate SMART...

Страница 6: ...If you re teaching an English lesson insert a 3D model of a city that is referenced in a novel the class is reading Enter the 3D scene to navigate streets and interiors of buildings l If you re teach...

Страница 7: ...GB of free hard disk space for minimum installation 2 GB for full installation with Gallery collections l Mac OS X 10 6 operating system software or later C H A P T E R 1 Using SMART Notebook 3D Tool...

Страница 8: ......

Страница 9: ...er you insert a 3D model you can manipulate it in the same way you manipulate other objects in SMART Notebook software N N OTE You can insert 2D images and 3D models on the same page and manipulate th...

Страница 10: ...s After inserting a 3D model you can manipulate it in the same way you manipulate other objects in SMART Notebook software In particular you can do the following l Cut copy and paste l Clone l Move l...

Страница 11: ...axes 1 Select the 3D model 2 Press and hold the center rotation handle 3 Drag your finger in the direction you want to rotate the 3D model and then release your finger when done g To reset a 3D model...

Страница 12: ...bels can be text shapes or other 2D objects N N OTE You can add labels to 3D models containing animation g To add a label 1 Select the 3D model 2 Right click the 3D model where you want to connect the...

Страница 13: ...tain internal details are called 3D scenes You can navigate 3D scenes using controls in SMART Notebook software N N OTE You can use the navigation controls to navigate any 3D model However not all 3D...

Страница 14: ...e Close button appear T TI P S o You can press the gray border of the map to drag it to another area of the page if it s covering materials you want to present You can also resize the map by pressing...

Страница 15: ...the scene H Move to the right in the scene I Move backward in the scene J Lower elevation Alternatively keyboard buttons can be used to navigate the 3D scene Keyboard button Use to W Change your orien...

Страница 16: ...el 4 Press Close when you re done Disguising 3D models before presenting them If you want to hide 3D models in your notebook file before presenting them you can use the Disguise feature to hide the 3D...

Страница 17: ...Select the magic hat 2 Press the magic hat s menu arrow and then select Disguise Change Color g To reveal a 3D model under a magic hat Press the hat icon in the lower left corner C H A P T E R 2 Inse...

Страница 18: ......

Страница 19: ...SketchUp sketching software to create 3D models You can save these 3D models in COLLADA dae format and then insert them in SMART Notebook software g To save a 3D model in dae format 1 Open the 3D mod...

Страница 20: ...the bottom section of the Gallery tab 3 Search or browse for a 3D model that you want to download Select the model 4 Press Download Model and then press the Download link beside Collada zip N N OTE S...

Страница 21: ...laying 8 restarting 8 B button navigation control 11 C COLLADA files 5 15 16 saving 15 D DAE files 5 15 16 disguises 12 F FBX files 5 G Gallery 6 Google 3D Warehouse 15 16 downloading 16 Google Sketch...

Страница 22: ...S scenes 9 SketchUp 15 W Warehouse 16 Windows operating systems 2 I N D E X 18...

Страница 23: ......

Страница 24: ...SMART Technologies smarttech com support smarttech com contactsupport...

Отзывы:

Похожие инструкции для Smart Notebook 3D Tools