background image

CHAPTER 2

CONNECTING THE INTERACTIVE WHITEBOARD TO A COMPUTER

9

smarttech.com/kb/170410

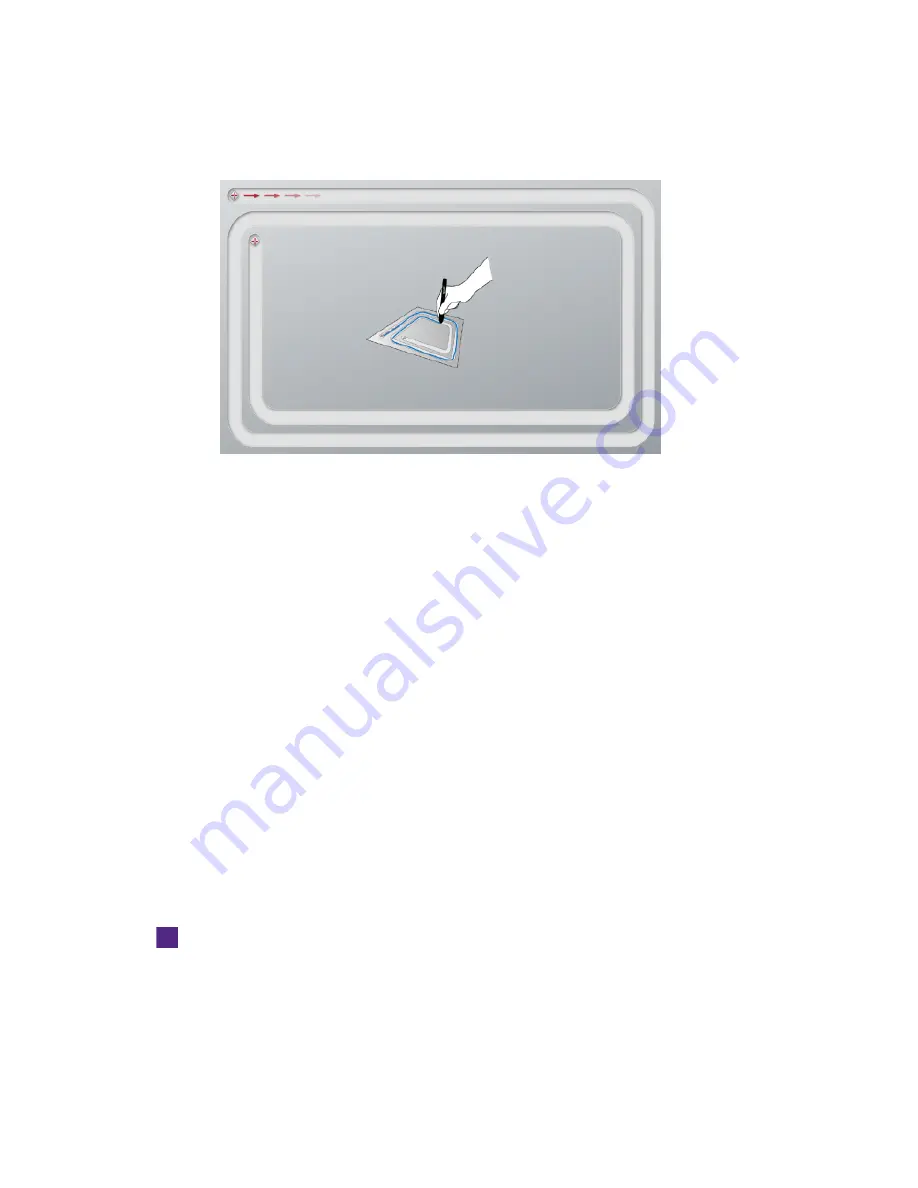
The calibration window opens.

2. With a pen tray pen, press the first target.

3. Keeping the pen on the interactive whiteboard surface, draw along the track until you reach

the second target. Keep the pen in the track, regardless of where the digital ink appears.

4. When you reach the second target, lift the pen from the surface.

5. If the calibration window remains open, the cameras require further calibration. Trace your pen

around the track a second or even a third time until the calibration window closes.

The

Orientation

screen appears.

Orienting the interactive whiteboard

After you install SMART Product Drivers on your computer and have completed the calibration

procedure, an orientation screen appears. Orienting the interactive whiteboard ensures the

greatest possible level of writing and touch accuracy. Orient the interactive whiteboard any time

the projector or interactive whiteboard has been moved since you last used it or whenever the

mouse pointer isn’t properly aligned with the pen or your finger when you touch the interactive

surface.

To orient your interactive whiteboard

1. On the interactive surface, click the

SMART Board

icon in the notification area (Windows) or

Dock (Mac), and then select

Orient

.

The

Orientation

screen opens.

Содержание M680

Страница 1: ...Help us make this document better smarttech com docfeedback 170410 SMART Board M600 series interactive whiteboard USER S GUIDE FOR MODELS M680 M685 M680E M685E M680V AND M685V ...

Страница 2: ...ired to correct the interference at his own expense Trademark notice SMART Board SMART Notebook DViT SMART Ink smarttech the SMART logo and all SMART taglines are trademarks or registered trademarks of SMART Technologies ULC in the U S and or other countries Microsoft and Windows are either registered trademarks or trademarks of Microsoft Corporation in the U S and or other countries Mac is a trad...

Страница 3: ...cautions in this user s guide and the included warnings document The included warnings document describes the safe and correct operation of the SMART Board interactive whiteboard and its accessories helping you to prevent injuries and equipment damage NOTE In this document the term interactive whiteboard refers to the interactive whiteboard and its accessories and options ...

Страница 4: ......

Страница 5: ...Calibrating the interactive whiteboard 8 Orienting the interactive whiteboard 9 Chapter 3 Using the interactive whiteboard 11 Using the Pen Tray 12 Using gestures dual touch and dual write 15 Updating the SMART software 19 Chapter 4 Maintenance and troubleshooting 21 Tips for trouble free performance 21 Cleaning the interactive whiteboard 22 General troubleshooting 23 Transporting the interactive ...

Страница 6: ......

Страница 7: ...hing that you can do at your computer open and close applications scroll through files teach collaborative lessons create or edit documents visit websites play video clips and more by touching the interactive surface with your finger or the included pen When you connect the interactive whiteboard to a computer and a projector the computer image displays on the interactive surface You can write ove...

Страница 8: ...urable pen ledge that holds the two included pens DViT technology Four digital cameras one in each of the interactive whiteboard s corners track the position of your finger or the pen as it moves across the interactive surface Multitouch gestures The interactive whiteboard supports multitouch gestures Windows and Mac only You can use two fingers to resize an object on a page to zoom in and out to ...

Страница 9: ...digital ink appears enabling you to write over the desktop or any open application Windows and Mac computers When you install SMART software you can access all the features of the interactive whiteboard SMART Notebook software includes SMART Ink and SMART Product Drivers SMART Ink works with SMART Product Drivers to enable you to write the your screen in digital ink using the interactive product s...

Страница 10: ...the SMART Board M600 series interactive whiteboard is within the limit defined by the USB standard for maximum length The interactive whiteboard includes a 16 5 m USB cable IMPORTANT The combined length of USB cables connected from the interactive whiteboard to your computer should not exceed 16 5 m However if the provided cable isn t long enough to reach from your computer to the interactive whit...

Страница 11: ...placement parts For a full list of items that you can order for your SMART Board M600 series interactive whiteboard go to smarttech com accessories Contact your authorized SMART reseller smarttech com wheretobuy to order accessories and standard replacement parts for the SMART Board M600 series interactive whiteboard ...

Страница 12: ......

Страница 13: ...hiteboard Matching the computer s resolution to the projector s resolution Ensure that the resolution settings for the projector and computer match If the computer s resolution doesn t match the projector s native resolution the image won t fill the interactive surface properly and can shimmer or appear distorted Set the projector to its optimal image resolution by following the instructions inclu...

Страница 14: ...ners of the interactive whiteboard track the position of the pens and your finger on the interactive surface and then send the information to the SMART software SMART software interprets this information as mouse clicks digital ink or ink removal in the appropriate location If you haven t used the interactive whiteboard before you must perform a calibration This process ensures that the cameras ac...

Страница 15: ... calibration window closes The Orientation screen appears Orienting the interactive whiteboard After you install SMART Product Drivers on your computer and have completed the calibration procedure an orientation screen appears Orienting the interactive whiteboard ensures the greatest possible level of writing and touch accuracy Orient the interactive whiteboard any time the projector or interactiv...

Страница 16: ...n from the pen tray 3 Beginning at the first target on the screen touch the center of the target firmly with the tip of the pen and hold the pen steady until the target turns green When you lift the pen the target moves to the next point 4 Repeat step 3 on all the targets 5 The Orientation screen closes ...

Страница 17: ...isplaying menu options right clicking 17 Enlarging an area or object 17 Reducing the scale of an object 17 Scrolling horizontally or vertically 17 Rotating an object 17 Best practices for gestures and tools 17 Updating the SMART software 19 When you touch the interactive whiteboard s surface the interactive whiteboard registers the horizontal and vertical or x and y coordinates on the interactive ...

Страница 18: ...TE SMART Board M680V and M685V interactive whiteboards feature a durable pen ledge that holds the two included pens rather than an interactive pen tray The pen tray on SMART Board M680E and M685E models includes an embedded Extended Control Panel which provides control of the basic operations of the interactive whiteboard Pen tray buttons In the center of the pen tray there are six buttons The mid...

Страница 19: ...y with the computer s USB HID driver but SMART Product Drivers isn t installed NOTE In HID mode interactive whiteboard tools such as the pens are unavailable but you can move the mouse pointer and perform mouse functions by touching the interactive surface The Right Click button on the pen tray might work depending on the version of operating system you re using Neither the Keyboard nor the Orient...

Страница 20: ...he Windows notification area or Mac Dock and then select SMART Settings SMART settings opens 2 Press SMART Hardware Settings and select your SMART Board interactive whiteboard 3 Select Pen and Button Settings from the drop down list and then select the button you want to customize 4 Follow the on screen instructions Using the Extended Control Panel M680E and M685E only The ECP gives you control of...

Страница 21: ... enable you to use pre determined commands on the interactive whiteboard without using the keyboard or mouse With a series of two finger touches on the interactive whiteboard screen you can navigate pages change the look of an object and more Dual touch enables two users to touch the interactive whiteboard and to simultaneously perform mouse functions They can also use their fingers to write on th...

Страница 22: ... the screen Keep your finger on the screen and slowly move the object or scroll bar When you reach the position you want release your finger Double clicking Quickly press and release the interactive surface twice in the same spot This performs a standard double click NOTE This gesture starts applications if your computer s operating system is set to start applications on a double click Displaying ...

Страница 23: ... away from each other Reducing the scale of an object Use one finger on each hand to press the screen at opposite ends of the area or object and then drag your fingers toward each other This gesture scales an object on a page or the entire page depending on the application Scrolling horizontally or vertically Use two fingers on the same hand to press the screen Keeping your fingers on the screen m...

Страница 24: ...HITEBOARD 18 smarttech com kb 170410 Hold your fingers perpendicular 90 to the interactive surface at the contact point 90 90 Keep your thumb and other fingers away from the interactive surface They can generate unintentional commands ...

Страница 25: ...meras view Updating the SMART software To update the computer s SMART software go to the SMART software download page or use SMART Product Update SPU To check for software updates 1 Click the SMART Board icon in the Windows notification area or the Mac Dock and then select Check for Updates and Activation The SMART Product Update dialog box appears listing the SMART software products installed on ...

Страница 26: ......

Страница 27: ...ake care to prevent any damage to it and its parts l Replace the pen when the nib wears out l Don t touch the interactive surface with sharp or pointed objects l Don t set up and use the interactive whiteboard in an area with excessive levels of dust humidity or smoke l Don t use low odor dry erase markers They can be very difficult to erase l Don t obstruct the cameras view of the interactive whi...

Страница 28: ... clean the interactive whiteboard disconnect its USB and power cables l To view dirt or streaks more easily turn the projector off or set it to standby lamp off mode l To clean dust dirt and finger grease wipe the interactive surface with a damp cloth or sponge Use mild soap if required l Don t spray cleaner directly onto the interactive surface Instead spray a light amount of cleaner on a cloth a...

Страница 29: ...jector consult the projector s documentation Resetting the interactive whiteboard You can reset the interactive whiteboard by disconnecting and then reconnecting the power cable This turns the power off and back on restarting all the interactive whiteboard s components Preventing USB cable issues To troubleshoot some common cable routing issues try disconnecting accessories such as USB hubs and US...

Страница 30: ...ch the interactive surface or any key on your keyboard to bring the computer out of standby mode The computer is off Turn on the computer or press the computer s reset button and then log on as usual The projected image is blurry too large or doesn t completely fill the interactive whiteboard s screen The projector s position zoom and focus settings aren t adjusted Adjust the projector s position ...

Страница 31: ...s and then scroll to and select SMART Technologies SMART System Menu For Mac computers select Finder Applications SMART Technologies SMART System Menu SMART Product Drivers isn t installed Install SMART Product Drivers on your computer For details about installing SMART Product Drivers see Installing SMART Product Drivers on page 8 The orientation procedure doesn t proceed to the second point The ...

Страница 32: ...perating system go to the Apps screen and then scroll to and select SMART Technologies SMART System Menu In the Windows 10 operating system select Start All apps and then scroll to and select SMART Technologies SMART System Menu For Mac computers select Finder Applications SMART Technologies Board Tools SMART Product Drivers isn t installed Install SMART Product Drivers on your computer For detail...

Страница 33: ...s SMART Settings SMART Settings opens 2 Select About Software and Product Support Tools Diagnostics The SMART Board Diagnostics window opens 3 Select Service Start 4 Close the SMART Board Diagnostics window and then close SMART Settings Troubleshooting using the status light If the interactive whiteboard has an active pen tray models SBM680 SBM680E SBM685 and SBM685E you can also use the Select bu...

Страница 34: ... isn t running Start the SMART Board service To determine whether the SMART Board service is running open SMART Settings and check the message that appears at the bottom SMART Product Drivers isn t installed Install SMART Product Drivers on the computer For details about installing SMART Product Drivers see Installing SMART Product Drivers on page 8 A solid white status light indicates that the in...

Страница 35: ...com wheretobuy first Your reseller can often resolve the issue without delay Before you contact SMART Support ensure the following l You know the serial number of the interactive whiteboard l The computer specifications and operating system meet the minimum requirements for SMART Product Drivers l The USB and power cables are connected properly to the computer and interactive whiteboard l Device d...

Страница 36: ...CHAPTER4 MAINTENANCE AND TROUBLESHOOTING 30 smarttech com kb 170410 ...

Страница 37: ...ications for your product located at smarttech com SupportSBM600 Waste Electrical and Electronic Equipment and Battery regulations WEEE and Battery Directives Electrical and electronic equipment and batteries contain substances that can be harmful to the environment and to human health The crossed out wheeled bin symbol indicates that products should be disposed of in the appropriate recycling str...

Страница 38: ......

Страница 39: ...o projector 7 refresh rate 7 system requirements 2 connection diagrams ECP 14 contacting SMART Support 29 D Digital Vision Touch DViT technology 2 dual touch dual write 2 dust 21 G gestures 15 best practices 17 multi finger 17 single finger 15 H humidity 21 I input selection 15 installation connecting to computer 7 SMART Product Drivers 8 M maintenance 21 multitouch gestures 2 15 O orientation 9 P...

Страница 40: ...number 29 SMART Board M600 interactive whiteboard features 2 how it works 3 resetting 23 SMART Ink 3 SMART Notebook software 1 SMART Product Drivers installing 8 orienting the interactive whiteboard 9 SMART software updating 19 SMART Support 29 T transporting 29 troubleshooting 23 U USB cable 4 USB drives 15 USB receptacles 15 V volume control 15 W WEEE and Battery Directives 31 ...

Страница 41: ......

Страница 42: ...SMART TECHNOLOGIES smarttech com support smarttech com contactsupport smarttech com kb 170410 ...

Отзывы: