background image

Chapter 1

Welcome

smarttech.com/kb/171554

10

Front control panel

The front control panel contains buttons for turning the display on and off, controlling the volume,

freezing and unfreezing the screen, and showing and hiding a screen shade.

For more information about the front control panel, see

Using the front control panel

on page


15.

Front connector panel

The front connector panel includes connectors for USB peripherals and a computer or other input

source.

For more information about the convenience panel, see

Connecting room computers and guest laptops

on page


31.

Ambient light sensor

The ambient light sensor is located in the bottom-right corner of the display’s frame.

The ambient light sensor detects the brightness of the room and adjusts the screen’s brightness

accordingly.

Power status light

The power status is located in the bottom-right corner of the display’s frame.

The power status light indicates the display’s status.

Power status light

Display status

Red

Standby mode

Green

Normal operating mode

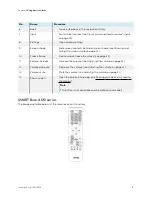
Remote control and IR sensor

You can use the remote control to turn the display on and off, adjust display settings, and so on.

The IR sensor for the remote control is located in the bottom-right corner of the display’s frame.

For more information about the remote control, see

Using the remote control

on page


16.

Содержание Board MX

Страница 1: ...W SBID MX065 V3 PW V3N PW SBID MX075 V3 PW V3N PW SBID MX086 V3 PW V3N PW SBID MX255 V2 C SBID MX265 V2 C SBID MX275 V2 C SBID MX286 V2 C SBID MX255 V2 CPW SBID MX265 V2 CPW SBID MX275 V2 CPW SBID MX2...

Страница 2: ...savings However changing some settings may increase energy consumption beyond the limits required for ENERGY STAR certification For example increased brightness and contrast will increase power consum...

Страница 3: ...or product damage which may not be covered by the warranty l Do not place heavy objects on the power cable Damage to the cable could cause shock fire or product damage which may not be covered by the...

Страница 4: ...g and erasing 21 Adjusting the volume 22 Freezing or hiding the screen 23 Chapter 3 Using the iQ apps 24 Using the Apps Library 24 Using the Files Library 25 Using SMART Whiteboard 25 Using Browser 25...

Страница 5: ...blem with the sound 43 Touch isn t working as expected 44 The pens and erasers aren t working as expected 45 iQ apps aren t working as expected 45 SMART software on connected computers isn t working a...

Страница 6: ...odel 11 Accessories 11 SMART OPS PC module 12 Stands 12 USB extenders 12 More information 13 This chapter introduces the SMART Board MX and MX Pro series interactive displays About this guide This gui...

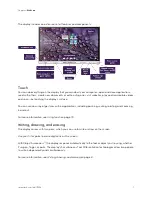
Страница 7: ...n applications including panning scaling rotating and zooming in and out For more information see Using touch on page 19 Writing drawing and erasing The display comes with two pens which you can use t...

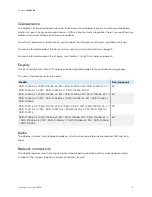
Страница 8: ...The size of the display varies by model Models Size diagonal SBID MX255 V3 SBID MX255 V3 PW SBID MX255 V3N SBID MX255 V2 C SBID MX255 V2 CPW SBID MX255 V2 SBID MX255 V2 PW 55 SBID MX265 V3 SBID MX265...

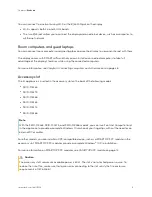
Страница 9: ...lot The iQ appliance is inserted in the accessory slot on the back of the following models l SBID MX365 l SBID MX375 l SBID MX386 l SBID MX265 l SBID MX275 l SBID MX286 Note With the SBID MX365 SBID M...

Страница 10: ...ge 31 Ambient light sensor The ambient light sensor is located in the bottom right corner of the display s frame The ambient light sensor detects the brightness of the room and adjusts the screen s br...

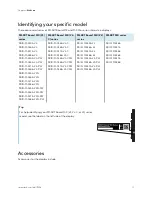
Страница 11: ...5 V3N SBID MX275 V3N SBID MX286 V3N SBID MX255 V3N PW SBID MX265 V3N PW SBID MX275 V3N PW SBID MX286 V3N PW SBID MX255 V2 C SBID MX265 V2 C SBID MX275 V2 C SBID MX286 V2 C SBID MX255 V2 CPW SBID MX265...

Страница 12: ...h as SMART Notebook SMART TeamWorks and SMART Meeting Pro software and access the internet directly through your display s network connection Upgrades and service for the OPS PC module are easy to per...

Страница 13: ...ch associated with the HDMI 3 input on the front of the display l For more information about extending USB connections see USB cable extenders More information In addition to this guide SMART provides...

Страница 14: ...he screen 23 Showing and hiding the screen shade 23 This chapter explains how to wake the display when it s asleep how to view connected computers input and how to interact with the display Waking up...

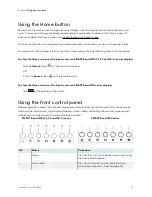
Страница 15: ...RT Board MX V3 V2 and V2 C series displays Tap the Home button on the front control panel OR Press the Home button on the remote control To show the Home screen or the Input screen on SMART Board MX s...

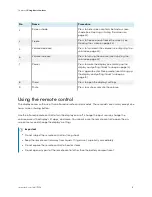
Страница 16: ...and putting it back to sleep on page 14 8 Menu Press to open the display s settings 9 Mute Press to mute or unmute the volume Using the remote control The display comes with one of two infrared remote...

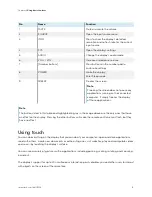
Страница 17: ...it back to sleep on page 14 Note Touch is not available right after waking up the display or turning it on Wait a few seconds and then the display will respond to touch l Press and hold for four secon...

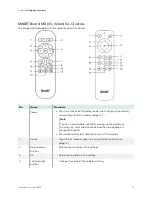
Страница 18: ...shade on page 23 10 Freeze frame Freeze and unfreeze the screen see page 23 11 Volume increase Increase the volume see Adjusting the volume on page 22 12 Volume decrease Decrease the volume see Adjus...

Страница 19: ...imply freezes the display of those applications Note The buttons listed in this table and highlighted in gray in the image above are the only ones that have an effect on the display Pressing the other...

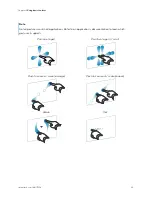
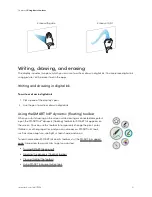
Страница 20: ...171554 20 Note Not all gestures work in all applications Refer to an application s documentation to learn which gestures it supports Pan one finger Pan two fingers scroll Pinch to zoom in scale enlar...

Страница 21: ...Ink dynamic floating toolbar When you start drawing on the screen while viewing a connected computer s input the SMART Ink dynamic floating toolbar for SMART Ink appears on the screen You can use this...

Страница 22: ...or palm over the digital ink you want to erase Adjusting the volume Use the buttons on the front control panel or the remote control to increase decrease or mute the display s volume Note See There s...

Страница 23: ...y freezes the display of those applications Tip You can write or draw over the screen while it is frozen see Writing drawing and erasing on page 21 If the iQ experience is enabled you can then save th...

Страница 24: ...een Share require a properly configured network connection If you re experiencing issues with these apps contact your IT administrator to make sure the network and display have been properly configure...

Страница 25: ...Whiteboard to open view and interact with SMART Notebook software files and whiteboards SMART Whiteboard makes it easy to present SMART Notebook files and play SMART lab activities on the display To l...

Страница 26: ...irror from devices and collaborate on content see Using SMART Mirror Using Input You can use the connectors the display to connect a room computer guest laptops and other input sources To learn how to...

Страница 27: ...rn more see About the iQ experience and navigating the Home screen Using kapp Whiteboard For SMART Board MX V2 C MX V2 C Pro MX V2 MX V2 Pro and MX series displays Use the kapp Whiteboard to write and...

Страница 28: ...hat cross the floor to the display are properly bundled and marked to avoid a trip hazard Installing and using SMART software The display comes with the following software which you can install on con...

Страница 29: ...iption Licensing details SMART Learning Suite A suite of desktop and online software that combines lesson delivery activities assessments and collaborative workspaces Includes SMART Notebook Plus soft...

Страница 30: ...computer input of the display to enable touch and digital inking features This supporting software is included with SMART s software products such as SMART Notebook SMART Meeting Pro and SMART TeamWo...

Страница 31: ...ttech com kb 171554 31 Connecting room computers and guest laptops You can connect room computers and guest laptops to the display and view and interact with their inputs l SMART Board MX V3 series Si...

Страница 32: ...Chapter 4 Connecting computers and other devices smarttech com kb 171554 32 l SMART Board MX V2 C series Side and bottom connector panels Front connector panel...

Страница 33: ...Chapter 4 Connecting computers and other devices smarttech com kb 171554 33 l SMART Board MX V2 series Side and bottom connector panels Front connector panel HDMI 3...

Страница 34: ...ttech com kb 171554 34 l SMART Board MX series Side and bottom connector panels HDMI 1 HDMI 2 VGA Front connector panel HDMI 3 Notes l Install SMART software on any computers you connect to the displa...

Страница 35: ...knowledge base article SMART Board interactive displays and USB tier structure use This article also describes the number and position of internal hubs in SMART Board MX V2 and V2 C displays Viewing...

Страница 36: ...ption Setting a connected computer s resolution and refresh rate The following table presents the recommend resolutions and refresh rates for the display s USB C HDMI 1 HDMI 2 and HDMI 3 input sources...

Страница 37: ...ected computers operating system documentation for instructions Connecting USB drives peripherals and other devices You can use USB drives peripherals and other devices with a computer connected to th...

Страница 38: ...herals and other devices The display includes the following USB Type A receptacles You can connect USB drives peripherals such as keyboards and other devices to these connectors and use the devices wi...

Страница 39: ...acle3 USB 2 0 Type A receptacle4 iQ SuperSpeed Hi Speed HDMI 1 SuperSpeed Hi Speed HDMI 2 SuperSpeed Hi Speed HDMI 3 SuperSpeed Hi Speed VGA SuperSpeed Hi Speed Accessory slot SuperSpeed Hi Speed OPS...

Страница 40: ...solutions to the symptoms don t work refer to the SMART knowledge base for additional troubleshooting information community smarttech com s topic 0TO0P000000Xt5yWAC mx series The display isn t turning...

Страница 41: ...or the remote control and then select OPS to switch to the iQ experience and open the Home screen l Make sure the SMART Board MX V3 V2 or V2 C series display is not in Standby mode by pressing the Pow...

Страница 42: ...via USB Type C Look for the Display Port logo beside the USB Type C receptacle on the computer If it s not there the computer may not support Display Port Alternate Mode video via USB Type C l Make s...

Страница 43: ...are securely fastened Notes o The display s stereo 3 5 mm in connector works with the VGA input only o Connecting an audio cable to the display s stereo 3 5 mm out connector disables the internal spe...

Страница 44: ...explanation mark over the display s icon l On Mac computers open System Information and make sure there are no error messages in the display s row l For Mac computers with macOS Mojave see How to reso...

Страница 45: ...riting is intermittent OR Ink disappears as you write l Make sure you are using a SMART Board MX or MX Pro series interactive display pen l Restart the display l Confirm with the installers that the c...

Страница 46: ...MART Ink SMART Product Drivers isn t working as expected See Troubleshooting SMART Product Drivers The SMART OPS PC module isn t working as expected Symptom Troubleshooting steps The SMART OPS PC modu...

Страница 47: ...SMART website For SMART Board MX series displays the serial number is on labels located on the bottom frame and the back of the display Note To find the serial number for the iQ appliance and Intel C...

Страница 48: ...to channels 1 through 13 Caution i the device for operation in the band 5150 5250 MHz is only for indoor use to reduce the potential for harmful interference to co channel mobile satellite systems ii...

Страница 49: ...eur afin de r duire les risques de brouillage pr judiciable aux syst mes de satellites mobiles utilisant les m mes canaux ii le gain maximal d antenne permis pour les dispositifs utilisant les bandes...

Страница 50: ...AM50 are in compliance with Directive 2014 53 EU Warning Operation of this equipment in a residential environment this equipment may could cause radio interference The full text of the EU declaration...

Страница 51: ...smarttech com kb 171554 SMART Technologies smarttech com support smarttech com contactsupport...

Отзывы: