background image

Appendix A

Specification 

Drawings

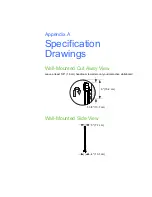
Wall-Mounted Cut Away View

Leave at least 5/8" (1.6 cm) headroom to wall-mount your interactive whiteboard.

Wall-Mounted Side View

5 3/8" (13.7 cm)

6" (15.2 cm)

3" (7.7 cm)

4" (10.1 cm)

Содержание SMART Board V280

Страница 1: ...PLEASE THINK BEFORE YOU PRINT SMART Board V280 Interactive Whiteboard Installation and User s Guide...

Страница 2: ...ia Visio and OneNote are either registered trademarks or trademarks of Microsoft Corporation in the U S and or other countries Kensington is a trademark of the Kensington Computer Products Group KTG A...

Страница 3: ...ty warnings precautions and other important information published by your projector s manufacturer Do not stare or allow children to stare directly into your projector s beam of light Do not touch or...

Страница 4: ...perate in the temperature range of 41 F to 95 F 5 C to 35 C with up to 80 humidity non condensing The shipping and storage temperature range is from 40 F to 120 F 40 C to 50 C Do not lean your interac...

Страница 5: ...able for any damage caused or loss suffered as a result of insufficient processing power Your SMART Board V280 interactive whiteboard is not a dry erase product Do not use dry erase or permanent marke...

Страница 6: ...1 Before your clean your interactive whiteboard shut down or disconnect the connected computer If your SMART Board interactive whiteboard requires replacement parts make sure that the service technic...

Страница 7: ...dard Replaceable Parts 7 Other Accessories 7 Installing and Securing Your SMART Board V280 Interactive Whiteboard 9 Environmental Requirements 10 Installing Your SMART Board V280 Interactive Whiteboar...

Страница 8: ...Whiteboard 45 General Troubleshooting 47 Transporting Your Interactive Whiteboard 60 Contacting SMART Technical Support 61 Specification Drawings 63 Wall Mounted Cut Away View 63 Wall Mounted Side Vie...

Страница 9: ...vii CONTENTS Customer Support 77 Online Information and Support 77 Training 77 Technical Support 77 Shipping and Repair Status 77 General Inquiries 78 Warranty 78 Registration 78 Index 79...

Страница 10: ...viii CONTENTS...

Страница 11: ...ore about your SMART Board V280 interactive whiteboard and its parts and accessories Introduction 2 Features 2 How Does Your SMART Board Interactive Whiteboard Work 3 Minimum Computer Requirements 4 C...

Страница 12: ...gh speed USB 2 0 cable There s no power switch on your interactive whiteboard It s always running when your computer is turned on Features Your SMART Board V280 interactive whiteboard is durable and r...

Страница 13: ...and its input devices i e mouse and keyboard enabling you to control any application by touching the screen with your pen When you install SMART Notebook software on your computer a Floating Tools to...

Страница 14: ...arttech com support when you use your SMART Board V280 interactive whiteboard with a standard projector If you add accessories to your computer including but not limited to an AirLiner wireless slate...

Страница 15: ...INTERACTIVE WHITEBOARD three L shaped tabs a 32 81 3 cm wall mounting bracket eight self tapping wall anchors eight long self tapping screws three small thread forming screws a 16 5 m high speed USB...

Страница 16: ...T BOARD V280 INTERACTIVE WHITEBOARD two AAA alkaline batteries two software CDs four replacement pen nibs four replacement pen tips a limited warranty document a product registration card textless ins...

Страница 17: ...n Nibs and Tips Your interactive whiteboard comes with four replacement pen nibs and tips NOTE You can also replace the detachable valance and the USB hub Additionally you can replace your interactive...

Страница 18: ...8 INTRODUCING YOUR SMART BOARD V280 INTERACTIVE WHITEBOARD...

Страница 19: ...equirements 10 Installing Your SMART Board V280 Interactive Whiteboard 11 Before Installing Your Interactive Whiteboard 11 Recommended Heights for Wall Mounting 11 Tools Required 12 Wall Mounting Your...

Страница 20: ...efer to page 45 for detailed instructions on periodically cleaning your interactive whiteboard Electrostatic discharge ESD Designed to withstand electrostatic shock EN61000 4 2 severity level 4 for di...

Страница 21: ...eneral height of your user community when you choose a height for your wall mounted interactive whiteboard If your interactive whiteboard is too low it might force some people to bend over uncomfortab...

Страница 22: ...all installations WARNING Failure to follow these instructions might result in personal injury and product damage CAUTIONS Do not lean your interactive whiteboard against a wall Your interactive white...

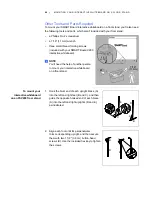
Страница 23: ...urely connected and that the cable clip is fastened as illustrated below 3 Using a pencil a carpenter s level and a measuring tape or ruler draw a horizontal line on the wall centered on the mid point...

Страница 24: ...this is the case you don t need to use an anchor in this location The stud will provide adequate support for the screw that secures the bracket to the wall NOTES For a concrete wall drill holes at th...

Страница 25: ...f the projected image according to your projector manufacturer s instructions 3 Slide your interactive whiteboard sideways on its bracket to align it with the projected image 4 Repeat steps 2 and 3 un...

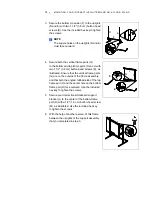
Страница 26: ...mark the location of the three holes on the wall 4 Slide your interactive whiteboard 2 5 cm sideways to the left along the wall mounting bracket 5 Using the screwdriver secure an included self tapping...

Страница 27: ...tally knocked off the wall make sure that you secure your interactive whiteboard to the wall with the included wall anchors and screws NOTE If you want to lock your interactive whiteboard with a secur...

Страница 28: ...with your finger to check that the pen is working properly The LED light beside each battery compartment illuminates green Place the pens on the pen tray NOTES A green LED light indicates that the pen...

Страница 29: ...a broken Kensington lock hole which would readily identify it as a stolen item In each of the three brackets under your interactive whiteboard s pen tray you ll find a lock slot that accommodates a se...

Страница 30: ...20 INSTALLING AND SECURING YOUR SMART BOARD V280 INTERACTIVE WHITEBOARD...

Страница 31: ...oard V280 interactive whiteboard to a computer Overview 22 Connecting the USB Cable 22 Configuring Your Computer Settings 24 Recommended Settings 24 Matching Your Computer s Resolution to Your Project...

Страница 32: ...0950 and bear the CE mark and CSA and or UL Mark s for CAS UL 60950 Use only the included high speed USB 2 0 cable to connect your SMART Board V280 interactive whiteboard to your computer IMPORTANT La...

Страница 33: ...might not provide sufficient power to run your interactive whiteboard reliably Connect your laptop computer to an AC power receptacle to run your interactive whiteboard 3 Press the power button on you...

Страница 34: ...features and power management properties in the Power Schemes tab For more information on changing these power management settings see the instructions included with your operating system Matching You...

Страница 35: ...your computer after you install SMART product drivers you might see an error message stating that SMART Board Service encountered a problem For more details see http www2 smarttech com kbdoc 133790 Re...

Страница 36: ...creen When you orient your interactive whiteboard ensure that it is away from ambient lighting caused by sunlight or incandescent pot lights Fluorescent lighting has no effect on your interactive whit...

Страница 37: ...etes appears The Orientation screen closes The orientation procedure can be six or fifteen touches depending on the precision setting you specify in your SMART Hardware Settings in the SMART Notebook...

Страница 38: ...ed image To open an application on your interactive whiteboard press the tip of the pen twice consecutively on the application s icon When you double press the pen to open an application it is the sam...

Страница 39: ...de 33 Writing 33 Erasing 34 Using the On Screen Keyboard to Add Text 34 Customizing the Floating Tools Toolbar 35 Capturing Your Notes and Creating Presentations with SMART Notebook 36 Capturing Your...

Страница 40: ...n restart it If you don t know how to remove software ask your system administrator Don t remove the Gallery if you want to keep your existing Gallery content To fully install SMART Notebook you must...

Страница 41: ...duct key that you received from SMART 4 When the installation is complete press Exit NOTE If you didn t type the product key during the installation complete the following steps to activate SMART Note...

Страница 42: ...SMART Notebook on your interactive whiteboard To open the default Floating Tools Toolbar press the SMART Board icon in the Windows notification area and then press Show Floating Tools NOTES You can m...

Страница 43: ...right hand corner This border indicates that the Ink Layer is in place and that you can now write on your desktop in the same way that you would write on a transparent sheet NOTE If the Ink Layer doe...

Страница 44: ...ting Tools toolbar and then press your preferred size Using the On Screen Keyboard to Add Text To open an on screen keyboard press the SMART Keyboard button With this keyboard you can add text to an a...

Страница 45: ...e toolbar Add or remove as many buttons as you like to fully customize Floating Tools with the buttons you need To recreate one of the default tool sets press Restore Defaults Some of the additional b...

Страница 46: ...Digital Ink Layer preferences by right clicking the Ink Layer and selecting Ink Layer Setting To display several options for capturing your notes and drawings to a SMART Notebook page press the Screen...

Страница 47: ...e Sorter View a thumbnail image of each page in your SMART Notebook file Gallery Add custom pages clip art animations and video from the Gallery collections to your file Attachments Add hyperlinks or...

Страница 48: ...utton and then select a pen style To convert a handwritten word to text press the Left Click Select button select your word and then choose its correct spelling from the word object s drop down menu i...

Страница 49: ...e your notes to a SMART Notebook file Use this application to play video files stored on your computer or to view content from a camera VCR CD or DVD SMART Video Player is compatible with most video a...

Страница 50: ...ware application similar options to the Ink Layer menu appear in the application s own toolbar or as a floating toolbar Microsoft Office Microsoft Word Excel and PowerPoint software Graphic Applicatio...

Страница 51: ...and more Access the Help Center from the SMART Board icon in the Windows notification area For more resources visit http www2 smarttech com st en US Country and then select your country In the Suppor...

Страница 52: ...42 GETTING STARTED WITH SMART NOTEBOOK SOFTWARE...

Страница 53: ...rouble Free Performance 44 Safety Tips for Teachers 44 Preventing Damage to Your SMART Board V280 Interactive Whiteboard s Writing Surface 45 Cleaning Your Interactive Whiteboard 45 General Troublesho...

Страница 54: ...last approximately 25 weeks Use needle nose pliers to pull the tip and nib out of the pen and then insert new ones You received four replacement pen tips and nibs with your interactive whiteboard Safe...

Страница 55: ...rea with excessive levels of dust humidity or smoke Cleaning Your Interactive Whiteboard IMPORTANT Before you clean your interactive whiteboard shut down or disconnect the connected computer To view d...

Страница 56: ...residue might remain it isn t usually visible when the projector is on Remove persistent stains by gently rubbing a paste of baking soda and water on the screen surface The digital cameras located in...

Страница 57: ...d see The orientation procedure stops at the first point and won t proceed to the next point on page 52 To adjust the projected image 1 If the left and right edges of the projected image aren t parall...

Страница 58: ...escribes the symptoms causes and solutions for problems that you might experience with your SMART Board V280 interactive whiteboard Try the troubleshooting tips in the following table to quickly resol...

Страница 59: ...andby mode Your computer is off Turn on your computer or press your computer s reset button and then log on as usual The projected image is blurry too large or doesn t completely fill your interactive...

Страница 60: ...ht vary depending on your version of Windows operating system and your system preferences To check if your computer is high speed USB 2 0 compliant 1 Select Start Control Panel The Control Panel windo...

Страница 61: ...Disconnect the additional USB devices to ensure that your interactive whiteboard connects to an enhanced host controller IMPORTANT Your SMART Board V280 interactive whiteboard does not support webcam...

Страница 62: ...ve your projector away from your interactive whiteboard or adjust the projector s zoom feature so that the projected image fills the entire writing surface and then repeat the orientation procedure OR...

Страница 63: ...ls about installing SMART product drivers see page 25 Your interactive whiteboard s screen surface is curved obstructing the line of sight from your interactive whiteboard s digital cameras to the tip...

Страница 64: ...in the slow version but not in the quick version the frame rate is set too low To increase your interactive whiteboard s frame rate 1 In the Windows notification area select the SMART Board icon and t...

Страница 65: ...Zone To decrease the size of the Double click zone 1 In the Windows notification area select the SMART Board icon and then select Control Panel The SMART Notebook control panel opens 2 Select SMART Ha...

Страница 66: ...puters the front USB ports aren t high speed USB 2 0 compliant Try a different USB port SMART Board Service isn t running Start SMART Board service To start SMART Board service 1 In the Windows notifi...

Страница 67: ...e USB cable To check the SMART Board service log 1 In the Windows notification area select the SMART Board icon and then select Control Panel The SMART Notebook control panel opens 2 Select About Soft...

Страница 68: ...Control Panel The SMART Notebook control panel opens 2 Select About Software and Product Support Tools Diagnostics The SMART Board Diagnostics window opens 3 Select Default or Restore Camera Defaults...

Страница 69: ...ns 2 Select About Software and Product Support Tools Diagnostics The SMART Board Diagnostics window opens 3 Select the Service menu and then select Stop 4 Close the SMART Board Diagnostics window and...

Страница 70: ...b with your finger or against your interactive whiteboard The screen also doesn t respond when you touch it with a pen and you re unable to write in digital ink The pen s battery is weak or dead Repla...

Страница 71: ...echnical Support make note of your SMART Board V280 interactive whiteboard s serial number and then note it in the inside cover of this manual if you printed it To determine your interactive whiteboar...

Страница 72: ...62 MAINTENANCE AND TROUBLESHOOTING...

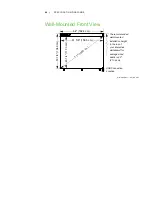
Страница 73: ...pendix A Specification Drawings Wall Mounted Cut Away View Leave at least 5 8 1 6 cm headroom to wall mount your interactive whiteboard Wall Mounted Side View 5 3 8 13 7 cm 6 15 2 cm 3 7 7 cm 4 10 1 c...

Страница 74: ...ll dimensions 1 8 3 2 mm The recommended wall mounted installation height to the top of your interactive whiteboard for average sized adults is 84 213 4 cm USB Connection Location 64 162 4 cm 61 5 8 1...

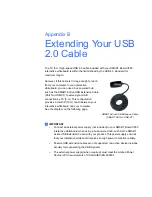
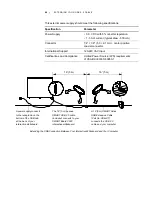
Страница 75: ...ach between your interactive whiteboard and your computer See the diagram on the following page IMPORTANT Connect an external power supply not included to your SMART Board V280 interactive whiteboard...

Страница 76: ...5 5 2 1 mm center positive coaxial connector International Support 120 240 VAC Input Certifications and Compliance Limited Power Source LPS requirements of CSA UL IEC EN 60950 1 A power supply connect...

Страница 77: ...porting its weight at the bottom corners while balancing the top with your other hands Do not leave cables on the floor where they can be a tripping hazard If you must run a cable over the floor lay i...

Страница 78: ...ent Multi lingual product warnings document Textless installation instructions not shown You also received a hardware kit containing the following smaller parts Sixteen 1 1 2 3 8 cm button head screws...

Страница 79: ...d NOTE You ll need the help of another person to mount your interactive whiteboard on a floor stand To mount your interactive whiteboard on an FSV280 floor stand 1 Hook the blunt end of each upright b...

Страница 80: ...rated Ensure that the vertical frame parts G are on the outside of the frame assembly and that both the angled tabbed side of the top frame part J and the center hole on the bottom frame part H face o...

Страница 81: ...to the third hole from the bottom on the upright support assembly the distance to the top of your interactive whiteboard will be 75 190 5 cm which will enable you to move your floor stand mounted inte...

Страница 82: ...he back of your interactive whiteboard Secure it with two 1 2 1 3 cm button head screws M Use the included hex key to tighten the screws 10 Secure each of the three interactive whiteboard support brac...

Страница 83: ...tronic equipment including SMART Technologies products we strongly encourage you to properly recycle the electronic product when it has reached end of its life If you require further information pleas...

Страница 84: ...in heavy metals in product packaging The packaging used by SMART Technologies to ship products complies with applicable packaging laws Covered Electronics Devices Many U S states classify monitors as...

Страница 85: ...Resource Board Airborne Toxic Control Measure California has enacted a law to restrict the emissions of Formaldehyde from Composite Wood Products The SMART Technologies products that contain Composit...

Страница 86: ...76 HARDWARE ENVIRONMENTAL COMPLIANCE...

Страница 87: ...contacting SMART Technical Support Your local reseller can resolve most issues without delay NOTE To locate your local reseller visit www2 smarttech com st en US Where to Buy All SMART products includ...

Страница 88: ...ranty that shipped with the SMART product at the time of purchase Registration To help us serve you register online at www smarttech com registration Address SMART Technologies 3636 Research Road NW C...

Страница 89: ...eboard 21 matching resolution to projector 24 47 recommended settings 24 refresh rate 24 47 system requirements 4 concrete installation 12 14 16 74 contact information 78 contacting SMART online resou...

Страница 90: ...Notebook software O online resources 41 online support 77 orientation 26 precision 27 P packaging 74 parts accessories 7 pens 7 install battery 18 LED indicator 18 nibs and tips 7 44 working with 28 p...

Страница 91: ...ital ink 34 Floating Tools 32 full screen 38 getting started 29 importing graphics text files 37 Ink Aware applications 40 installing 25 online resources 41 other tools 39 presentations 36 side tabs 3...

Страница 92: ......

Страница 93: ......

Страница 94: ...Toll Free 1 866 518 6791 U S Canada or 1 403 228 5940 www smarttech com...

Отзывы: