background image

99-00864-20 D0

Troubleshooting the Document Camera

27

Troubleshooting the Document Camera

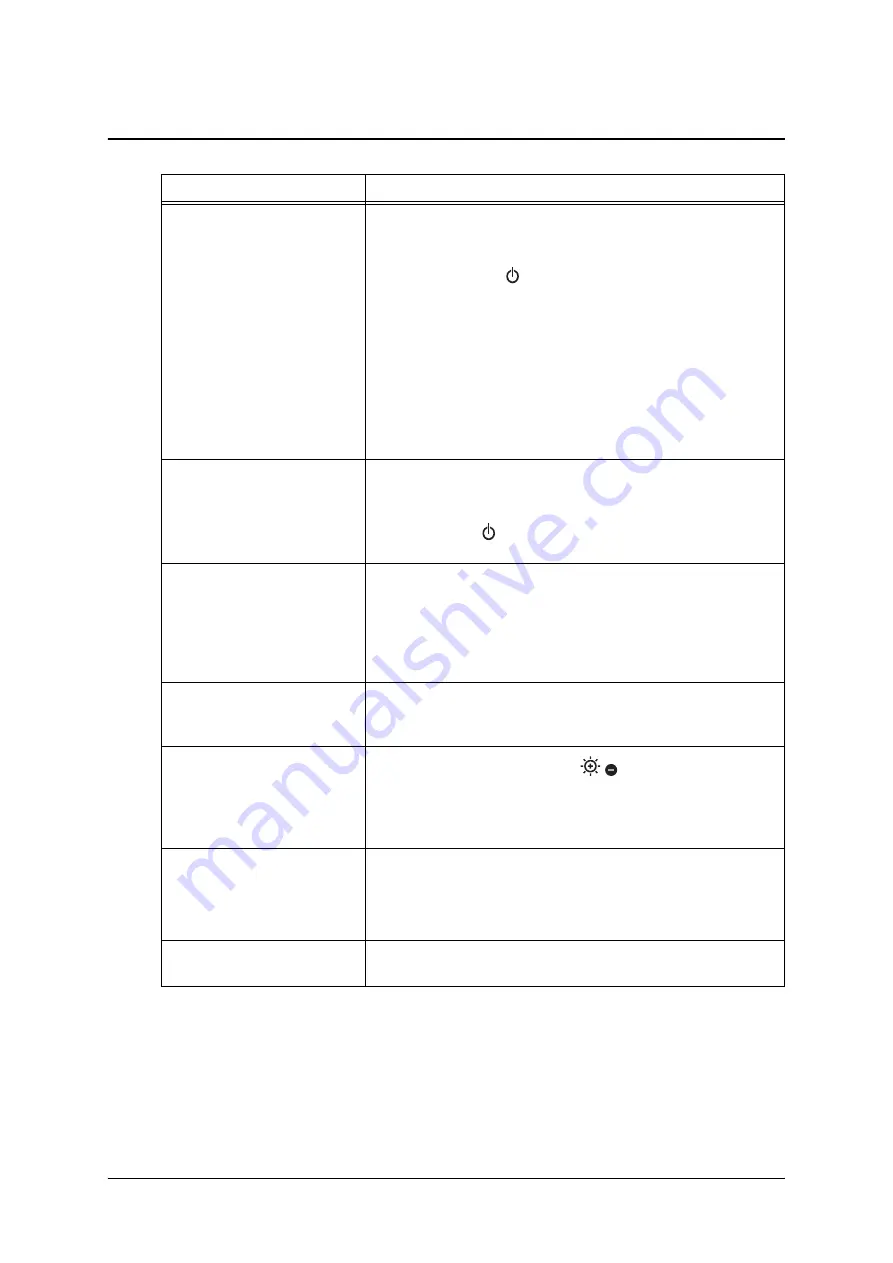
Issue

Solution

No image displays or 
appears.

• Turn off the document camera (see page 11). Securely 

connect all cables and connect the camera’s AC adapter to 
a power outlet. Wait for several seconds, and then press 

the 

Power

 button 

 on the document camera control panel 

to turn it on.

• Adjust the zoom dial. The camera may be magnified and is 

displaying a blank section of the document.

• Ensure that the 

Output

 DIP switches on the rear panel are 

set to the proper image output (

RGB

 or 

Video

 on the left, 

and 

NTSC

 or 

PAL

 on the right).

• If you’re using the included USB connector, set the left 

Output

 DIP switch to 

RGB

.

No image displays after you 
restart your computer.

• If the document camera is connected to a USB hub and you 

restart your computer, turn off the power on the document 
camera, wait for several seconds, and then press the 

Power

 button 

 on the document camera control panel to 

turn it on again. 

The image is out of focus.

• Press the 

AF

 button to sharpen the image.

• Use the manual focus option in SMART Notebook (see 

page 13).

• Move the document or object further away from the 

camera lens.

The image is scrambled or 
black and white.

• Ensure the right DIP switch is set to 

NTSC

 if you’re using an 

NTSC display, or that it’s set to 

PAL

 if you’re using a 

PAL display.

The image is too dark.

• Press the brightness buttons 

   on the document 

camera control panel to adjust the brightness.

• If the document or object isn’t well lit, turn on the 

illumination lamp.

The image is broken apart by 
lines.

• Adjust the distance between the camera lens and the 

document or object.

• Adjust your projector’s settings so that the lines disappear. 

Refer to your projector’s documentation for more info.

The image doesn’t move.

• Select 

Menu > Pause > Off

 to turn off the camera’s pause 

feature in the on-screen display menu.

Содержание SMART 280

Страница 1: ...Installation and User s Guide SMART Document Camera 280 ...

Страница 2: ...om the television or radio If necessary consult SMART Technologies ULC or an experienced radio television technician for help Changes or modifications to this product not authorized by SMART Technologies ULC could void the FCC Certification and negate your authority to operate the product Trademark Notice The SMART logo and smarttech are trademarks or registered trademarks of SMART Technologies UL...

Страница 3: ...sk of electric shock This marking is located on the bottom of the product WARNING Do not overload wall outlets extension cords or integral convenience receptacles as this can result in a fire or electric shock WARNING Do not use this product near water Never spill liquid of any kind on the product WARNING Do not place this product on an unstable surface If the product falls this could result in se...

Страница 4: ...rm safety checks and determine that the product is in proper operating condition WARNING The exclamation point within an equilateral triangle is intended to alert the user to the presence of important operating and maintenance servicing instructions in the literature accompanying the product WARNING If you connect a nonshielded equipment interface cable to this equipment you void the FCC Certifica...

Страница 5: ...hunderstorm as there is a risk of electrical shock Turn off and disconnect this product if you won t use it for an extended period CAUTION Disconnect this product from the power outlet and refer servicing to qualified service personnel under the following conditions If the power supply cord or plug is damaged If liquid is spilled or an object falls on the product If the product is exposed to rain ...

Страница 6: ...s when you carry it CAUTION Do not hold the magnetic strip close to a cathode ray tube Braun tube a speaker a CD player a DVD a cellular phone or any other item whose normal operation may be interrupted or fail due to the strip s magnetic field CAUTION Save the data from an SD memory card to another hardware device such as a computer before you insert the memory card into the document camera If th...

Страница 7: ...inted Materials 14 Displaying Printed Materials Using the Stage 15 Displaying a Three Dimensional Object 16 Displaying a Wall Surface or Distant Object 17 Displaying a Microscope Slide 18 Displaying Image Data from an SD Memory Card 19 Transferring Image Data from the SD Memory Card to a Computer 22 Changing the Image Selection 24 Using Image Mate Software 24 Changing the Focus Brightness and Grap...

Страница 8: ...vi 99 00864 20 D0 ...

Страница 9: ...cted computer or an SD memory card You can focus the camera image automatically and magnify it up to a 5 2 zoom ratio You can magnify a digital image up to a 8 0 zoom ratio You can control the document camera from SMART Notebook software or the camera s control panel You can customize the camera s behavior in Camera mode using the on screen display menu Number Name Number Name 1 Camera head 7 Stag...

Страница 10: ... with a bright LED lamp that may diminish in brightness over time Zoom Dial The zoom dial enables you to change the magnification of a camera image You can also enlarge or reduce the size of a digital image if you re using the document camera to display images from an SD memory card The zoom ratio is 5 2 for optical images and 8 for digital images CAUTION Do not stare directly into the lamp or shi...

Страница 11: ... 20 D0 Introduction 3 AF Button The AF button enables you to automatically focus the camera image You can also manually focus the image using the options in SMART Notebook For more information see page 13 Push ...

Страница 12: ...isplay and control the on screen display menu save images to an SD memory card switch output modes and control the brightness of the image Number Button Name 1 Power 2 Image Save and Up Arrow 3 Left Arrow 4 Menu 5 Right Arrow 6 SD Mode and Down Arrow 7 PC 8 Camera 9 Increase Brightness 10 Reduce Brightness 1 4 5 8 10 9 7 2 6 3 ...

Страница 13: ...l enables you to insert an SD memory card and display image data from the memory card or save camera images to the memory card Stage Magnetic Strip and Anti Glare Sheet The stage helps you to present printed materials You can attach your printed material to the stage using the magnetic sheet If glare makes the images difficult to see you can cover the affected area with the supplied anti glare she...

Страница 14: ...6 Introduction 99 00864 20 D0 ...

Страница 15: ...ad until it s in the position shown in the figure below To set up the document camera CAUTION Do not hold the document camera by the camera column or the camera head when you carry it Hold the document camera with both hands when you carry it Take care to prevent damage to the camera head CAUTION Never rotate the camera column in the opposite direction Do not hold the camera head when you rotate t...

Страница 16: ... Connect the included USB cable to the USB receptacle on the rear panel of the document camera 7 Connect the other end of the USB cable to your computer 8 Connect the AC adapter to the DC IN 12V receptacle on the rear panel of the document camera 9 Connect the other end of the AC adapter to a power outlet 1 Set the left Output DIP switch on the rear panel of the document camera to Video 2 Set the ...

Страница 17: ...k Software NOTE The document camera works with the latest version of SMART Notebook For more information on upgrading SMART software see http www2 smarttech com st en US Support Downloads default htm Insert the SMART Notebook CD into your computer s CD drive to launch the software installation screen and then follow the on screen instructions Using the On Screen Display Menu You can use the on scr...

Страница 18: ...urning On the Document Camera 99 00864 20 D0 5 Press the left arrow button to return to the previous menu 6 Press the Menu button to confirm your selection 7 Press the Menu button again to close the on screen display menu ...

Страница 19: ...trol panel to display the camera image 3 Press the Power button on the document camera control panel for three seconds to turn off the document camera 1 Disconnect the cables from the rear panel 2 Rotate the camera head as shown in the figure below CAUTION Do not disconnect cables from the rear panel when the document camera is turned on To turn off the document camera CAUTION Do not turn off the ...

Страница 20: ...CAUTION Never rotate the camera column in the opposite direction Do not hold the camera head when you rotate the camera column Instead hold the camera column as you rotate it CAUTION Do not hold the document camera by the camera column or the camera head when you carry it Hold the document camera with both hands when you carry it Take care to prevent damage to the camera head CAUTION Do not use vo...

Страница 21: ... SMART Document Camera window To change the image magnification press the plus or minus buttons to the right of the magnification icon To adjust the image focus automatically press the AF Auto Focus button OR To adjust the image focus manually press the plus or minus buttons to the right of the focus icon NOTE The image focus controls are very sensitive and you may have to press the buttons repeat...

Страница 22: ...ns to the right of the magnification icon until the document image is at the desired magnification 4 Press the AF button on the document camera to focus the image OR In SMART Notebook press the AF button in the SMART Document Camera window to focus the image You can also fine tune the focus with the plus or minus buttons to the right of the focus icon 5 Press the brightness buttons on the document...

Страница 23: ...5 Rotate the zoom dial on the camera until the document image is at the desired magnification OR In SMART Notebook press the plus or minus buttons to the right of the magnification icon until the document image is at the desired magnification 6 Press the AF button on the document camera to focus the image OR In SMART Notebook press the AF button in the SMART Document Camera window to focus the ima...

Страница 24: ... until the object image is at the desired magnification OR In SMART Notebook press the plus or minus buttons to the right of the magnification icon until the object image is at the desired magnification 4 Press the AF button on the document camera to focus the image OR In SMART Notebook press the AF button in the SMART Document Camera window to focus the image You can also fine tune the focus with...

Страница 25: ...surface or object the camera is unable to focus 2 Rotate the camera head to face forward or backward 3 If you rotate the camera head so that the camera faces forward change the Image Rotation setting to On in the on screen display menu For more information on changing settings in the on screen display menu see page 9 To display a wall surface or distant view WARNING If you use the document camera ...

Страница 26: ...n screen display menu see page 9 NOTE The document camera automatically changes the Mode setting to Graphics 6 Adjust the focus of the microscope 7 Press the brightness buttons on the document camera control panel to adjust image brightness NOTE After you finish using the document camera with the microscope change the Microscope setting in the on screen display menu to Off For more information on ...

Страница 27: ...e vulnerable to static electricity and exposure to static electricity can cause the memory card to malfunction or corrupt its contents Do not insert an SDHC memory card These memory cards are not compatible with the document camera SMART Technologies assumes no liability for any damage caused by the loss of data in the memory card or any passive damage TIP For best results use a Panasonic 256MB or...

Страница 28: ...e SD memory card that you saved with the document camera If you try displaying image data with a format that isn t compatible with the document camera the connected projector or television display shows a black or gray image If you try displaying image data from an SD memory card without first inserting the memory card the connected projector or display shows a black image and the message NO CARD ...

Страница 29: ...then press the Menu button to delete the image or images OR Select No and then press the Menu button to cancel 1 If the projector or television display shows the on screen display menu press the Menu button on the document camera control panel to close the menu 2 Press the SD Mode button on the document camera control panel to switch to SD mode The projector or television display shows an image fr...

Страница 30: ...d projector or display 2 Push the SD memory card to remove it from the slot Transferring Image Data from the SD Memory Card to a Computer If you connect a computer to the document camera using a USB cable you can transfer image data from an SD memory card not provided to a computer NOTE You can transfer image data to your computer only if the computer is running the Microsoft Windows 2000 SP4 or l...

Страница 31: ...lock or format data on the SD memory card using the computer You re unable to save delete lock unlock or format data using the on screen display menu when the document camera s USB Mode setting is Mass Storage You re unable to record image data with the correct date and time 8 After you finish transferring image data to the computer reset the document camera s standard configuration as follows a P...

Страница 32: ...use Image Mate software to view and present document and object images with the document camera and your computer 1 Visit the document camera page of the SMART support website www2 smarttech com st en US Support DocumentCamera 280 2 Click Image Mate Software and then follow the on screen instructions to complete the download and installation 1 Set up the document camera and connect it to your comp...

Страница 33: ...anel The on screen display menu appears For more information on changing settings in the on screen display menu see page 9 2 Select Focus 3 Select the up and down arrow buttons on the document camera control panel to adjust the focus 4 After you finish adjusting the focus press the Menu button on the document camera control panel to close the on screen display menu Adjusting the Brightness By defa...

Страница 34: ...etting to Set the document camera automatically changes the Mode setting in the on screen display menu to Graphics If you connect the document camera to a DLP projector change the Mode setting in the on screen display menu to Graphics If you want to sharpen the image of black characters against a white background change the Mode setting to Text 3 in the document camera on screen display menu OR If...

Страница 35: ...f the power on the document camera wait for several seconds and then press the Power button on the document camera control panel to turn it on again The image is out of focus Press the AF button to sharpen the image Use the manual focus option in SMART Notebook see page 13 Move the document or object further away from the camera lens The image is scrambled or black and white Ensure the right DIP s...

Страница 36: ...28 Troubleshooting the Document Camera 99 00864 20 D0 ...

Страница 37: ...oduct that has a WEEE symbol or accompanying WEEE guidelines If you need more information on the collection reuse and recycling of electrical and electronic equipment please contact your local WEEE recycling agency Alternatively contact your local reseller or SMART Technologies for information on the environmental performance of our products Restriction of Certain Hazardous Substances RoHS Directi...

Страница 38: ...e issue without delay All SMART products include online telephone fax and e mail support Online www smarttech com contactsupport Telephone 1 403 228 5940 or Toll Free 1 866 518 6791 U S Canada Monday to Friday 5 a m 6 p m Mountain Time Fax 1 403 806 1256 E mail support smarttech com General Inquiries Address SMART Technologies 1207 11 Ave SW Suite 300 Calgary AB T3C 0M5 CANADA Switchboard 1 403 24...

Страница 39: ......

Страница 40: ...www smarttech com support www smarttech com contactsupport Support 1 403 228 5940 Toll Free 1 866 518 6791 U S Canada 99 00864 20 REV D0 ...

Отзывы: