


6. MAINTENANCE AND STORAGE
7. To remove the deposits and/or other residues from
suitable brush.
the blade, use a
8. Clean the outside of the charging station from any
residues.
accumulated
9. Keep all nuts, bolts and screws tight to be sure the
safe working condition.
appliance is in
10. Replace worn or damaged parts for safety.
11. Ensure that only replacement cutting means of the
used.
right type are
12. Ensure that batteries are charged by using the correct
recommended by the manufacturer.
charger
13.Incorrect use may result in electric shock,
of corrosive liquid from the
overheating or leakage
14. In the event leakage of electrolyte flush with
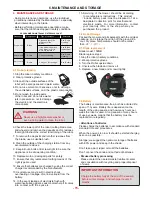
5.Do not wash the inside parts
of the robot and do not use water
jets in pressure so not to damage
6.Check the lower part of the robot (cutting blade area
and remove the deposits and/or residues
and wheels)
correct functioning of the robot.
that might obstruct the
WARNING
Never use a high-pressure washer or
even running water to clean the robot.
6
.
MAINTENANCE AND STORAGE
- During maintenance operations, use the individual
by the Manufacturer , especially
protections indicated
- Before performing maintenance operations, make
has stopped in safety conditions.
sure that the robot
PROGRAMMED MAINTENANCE INTERVALS CHART
See “Robot
cleaning”
See “Blade
replacement”
Robot
Carry out cleaning
See “Robot
cleaning”
6.1 Robot cleaning
1.Stop the robot in safety conditions.
2. Wear protective gloves.
Frequency
Component
Type of operation
Reference
Every week
Every month
Blade
Clean and check the
efficiency of the
blade
If the blade is bent due
to an impact or if it is
worn-out, replace it.
3.Clean all the outside surfaces of the
warm water
.
robot with a sponge soaked in
4.Do not use solvents or benzene so not to
damage
surfaces
and
the
plastic components.
the varnished
Every months
3
Robot
Carry
out
for
rechage
See “Battery”
when intervening on the blade.
the electric and the electronic
components.
battery.
agent, seek medical help if it comes
water/neutralising
etc
.
into
contact
with
the
eyes
15. Servicing
of
the mower
should
be
according
manufacturers
instructions
.
This
product
to
must
be
disposed
of
at
a
(
include
battery
pack
)
and
designated
collection
pint
for
electrical
city
office
or
the
shop
where
you
your
local
electronic
waste
.
For
more
information
,
contact
purchased
the
product
.
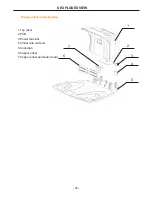
6.2 Robot Storage
Packed the mower and all spareparts with the original
package, and storage the carton off the ground in a
6.3 Blade replacement
Blade model: 158NB
Blade replace steps:
1.Stop the robot in safety conditions.
2. Wear protective gloves.
3. Turn the Robot upside down.
4. Unscrew the blade and remove it.
5. Replace a new blade and screw it tightly.
6.4 Battery
The battery is maintenance-free, but has a limited life
span of 1-3years. Battery life is dependent on the
length of the using season and how many hours per
of use per week, means that the battery must be
cool, dry place. Temperature should not be colder
than
-4
F
°(-20℃)
week the robot is used. A long season or many hours
replaced more regularly.
- Attentions of batteries
Please charge the batteries in accordance with standard
procedures.
standard time and
When the power is too low. It should be started charging
possible.
as soon as
Storage, we suggest the optimum storage of batteries
power and keep in the shade.
with 80%
- Disused battery processing
Please contact the nearest waste treatment center
recycling and proper disposal
and consultation with
IMPORTANT INFORMATION
Charge the battery fully at the end of the season
before winter storage. And recharge it every 3
of views.
months.
- 15 -
Don’t take a part, repair or modif the batteries.
Don’t connect the anode and cathode of batteries.
Содержание TC-158N
Страница 22: ...USER MANUAL Robot lawn mower ...


