STP60-JP-10-IA-en-11 | Version 1.1
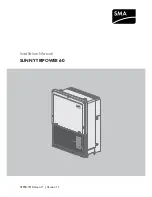
Installation Manual
SUNNY TRIPOWER 60
Страница 1: ...STP60 JP 10 IA en 11 Version 1 1 Installation Manual SUNNY TRIPOWER 60...
Страница 2: ...luation or other proper use is allowed and does not require prior approval SMA Warranty You can download the current warranty conditions from the Internet at www SMA Solar com Trademarks All trademark...
Страница 3: ...ing the Inverter 14 2 4 Disassembling the Inverter 15 2 5 Access to the Installation Area 15 2 6 AC Grid Connection 15 2 7 Cable Entry 17 2 8 Ethernet Connections 17 2 9 PV Connection 18 2 9 1 Externa...
Страница 4: ...tenance 29 5 Technical Data 30 5 1 Specifications 30 5 2 Compliance 32 5 3 Installation Conditions 33 5 4 Torque Specifications 34 5 5 Specifications for Grid Protection 34 5 6 Technical Data of the C...
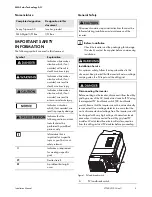
Страница 5: ...ng a specific goal Desired result A problem that might occur This manual contains important instructions that must be followed during installation and maintenance of the inverter Before Installation C...
Страница 6: ...rk on electric equipment Familiar with local requirements rules and regulations for the installation The inverter does not provide overcurrent protection This must be provided by the installer See Tab...
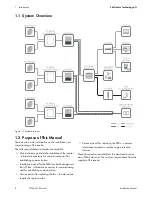
Страница 7: ...upload to cloud services and power plant control Local commissioning and service tool LCS Tool The LCS Tool is required for commissioning and servicing the inverter via the SMA Inverter Manager The L...
Страница 8: ...inverter information necessary for commissioning and for establishing communication Installation manual for the SMA Inverter Manager and the I O Box information necessary for commissioning and for es...
Страница 9: ...and is measured in Watts W PCB Printed circuit board PCC Point of Common Coupling point of interconnection The point on the public electricity network to which other customers are or could be connecte...
Страница 10: ...pecific characteristics 1 5 Installation Sequence 1 Pay special attention to the important safety information at the beginning of this manual 2 Mount the inverter according to Section 2 1 page 12 Sect...
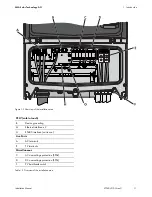
Страница 11: ...f the installation area Table 1 2 Overview of the installation area PELV safe to touch B Device grounding G Ethernet interface x 2 H RS485 interface not in use Live Parts A AC terminals E PV terminals...
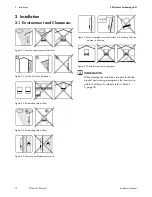
Страница 12: ...Figure 2 3 Ensure adequate air flow Figure 2 4 Ensure adequate air flow Figure 2 5 Mount on non flammable surface Figure 2 6 Mount upright on vertical surface A backward tilt of ten degrees is allowe...
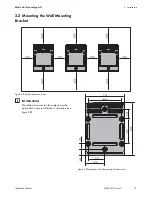
Страница 13: ...P 10 IA en 11 13 2 2 Mounting the Wall Mounting Bracket Figure 2 8 Safety clearances in mm Figure 2 9 Dimensions of wall mounting bracket in mm INFORMATION The safety clearances to other objects must...
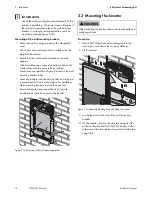
Страница 14: ...safe installation and service access to the inverter Figure 2 10 Mounting of the wall mounting bracket 2 3 Mounting the Inverter Procedure 1 Attach M12 lifting bolts and matching nuts to the inverter...
Страница 15: ...Connection Before working on the inverter disconnect it from the utility grid by means of the AC breaker and switch off PV using the integrated PV load break switch DC load break switch Ensure that t...
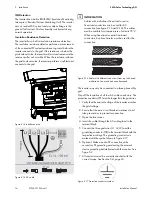
Страница 16: ...onnected to a three phase utility grid Strip off the insulation of all four AC cable conductors The protective conductor PE must be longer than the grid wires 1 Verify that the nominal voltage of the...
Страница 17: ...art of the cable inside the inverter enclosure In this way the RJ45 Ethernet connectors mounted on the printed circuit boards are protected against excessive stress which could lead to damages or prob...
Страница 18: ...Observe correct fuse rating Consult the module manufacturer s manuals for information on correct string fuse rating INFORMATION Use a suitable voltage detector that can measure up to 1000 V DC Verify...
Страница 19: ...s Observe the right torques see section Section 5 4 page 34 Figure 2 24 Connection of the DC terminal blocks lug combiner 3 Assemble the PV cables of the PV array junction box before connecting them t...
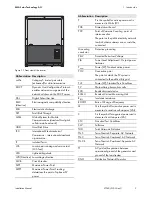
Страница 20: ...LCS tool can be used for configuring one or more inverters 3 1 1 Operating modes The inverter has five operation modes indicated by LEDs Table 3 1 Operating modes Off grid LEDs off 0 51 When no power...
Страница 21: ...g mode or during operation it switches over to the Fail safe operating mode and is disconnected from the utility grid The inverter remains in the Fail safe operating mode until the PV power has been a...
Страница 22: ...gital I O Box LCS Tool After installation check all cables and close the inverter Turn on AC power 3 2 2 Switching on the PV Load Break Switch Figure 3 2 PV load break switch Switch on the PV load bre...
Страница 23: ...ile or via the LCS tool For further information on the configuration of the system fallback between the SMA Inverter Manager and a superior control unit e g SCADA system or Power Plant Controller see...
Страница 24: ...act Service for further assistance see Section 6 Contact page 37 PV If the prescribed action has not identified the malfunction contact the PV module supplier for further assistance ID Status message...
Страница 25: ...lt ride through The inverter has detected that the grid voltage was below or above a certain level If this event is reported several times each day perform onsite grid analysis 48 51 Grid frequency to...
Страница 26: ...al The event could indicate that the PE connection is missing x x 258 PV voltage too high waiting The DC voltage is too high Make sure that PV system and layout correspond to recommendations in the ma...
Страница 27: ...ommunication disturbance with the SMA Inverter Manager ID Status message Description Measure DNO SMA Service Line PV ID Status message Description Measure DNO SMA Service Line PV 201 208 The internal...
Страница 28: ...s call Service x 279 Temperature sensor error If the event persists call Service x 280 Self test 24 hour timeout Self test must run at least once per 24 hours None 281 Too many RCMU events during the...
Страница 29: ...e PV system If polarity is correct call Service x 264 266 Measurement circuit test failed Restart the inverter If the event persists call Service x 272 PV overvoltage protection device error Inverter...
Страница 30: ...er consumption for communication 3 W Nominal grid frequency range 50 Hz 60 Hz 10 DC Maximum PV array power 90000 Wp Input voltage range at 420 Vac at 440 Vac 593 V to 1000 V 622 V to 1000 V Nominal vo...
Страница 31: ...level 58 dB A typical Parameter STP 60 JP 10 Parameter STP 60 JP 10 Protection class according to IEC 62109 1 I Electrical Electrical safety IEC 62109 1 IEC 62109 2 Class I grounded Communication par...
Страница 32: ...ficiency Standard JIS C 8961 EC low voltage directive 2014 35 EU EC directive for electromagnetic compatibility EMV 2014 30 EU Safety IEC 62109 1 IEC 62109 2 Functional Safety IEC 62109 2 EMC interfer...
Страница 33: ...lity coastal heavy industrial and agricultural zones Must be measured and classified in accordance with ISA S71 04 1985 G3 at 75 RH Vibration 1 G Enclosure protection class IP65 UL 50E enclosure type...
Страница 34: ...y to the right of it TX 30 3 9 Nm D PV terminals TX 30 14 Nm E DC collective terminals Lug combiner TX 30 4 Nm F M25 cable gland Wrench 33 mm 10 Nm G Swivel nut for M25 cable gland Wrench 33 mm 1 8 Nm...
Страница 35: ...cable Shielded Twisted Pair CAT 5e or SFTP CAT 5e 1 Cable characteristic impedance 100 to 120 RJ45 connector 2 pcs RJ45 for Ethernet Wire size 0 14 to 0 25 mm depending on the design of the RJ45 plug...
Страница 36: ...3 There are two LEDs per interface Table 5 13 LED status Pin assignment Ethernet Color standard Cat 5 T 568A Cat 5 T 568B 1 RX Green white Orange white 2 RX Green Orange 3 TX Orange white Green white...
Страница 37: ...t the SMA Service Line We require the following information in order to provide you with the necessary assistance Inverter device type Inverter serial number Inverter firmware version Special country...
Страница 38: ...www SMA Solar com SMA Solar Technology...