


{ Design. Uniqueness. Innovation }
INNOVATION
DIRECT
SERIES
9
10
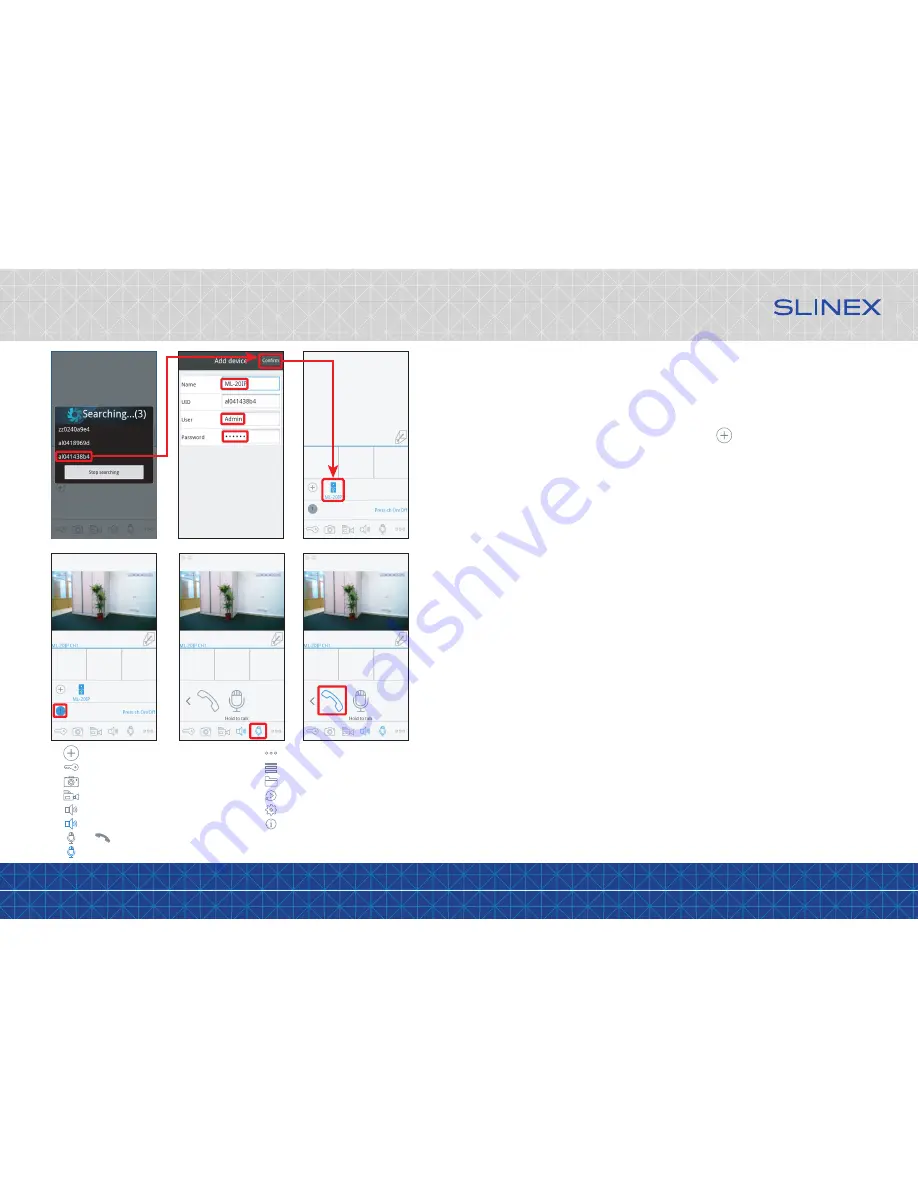
5.2 Wireless Wi-Fi network connection steps
Wireless Wi-Fi network connection should be made according to Diagram 3.
Wireless network setup includes next steps:
1) Enter «GooglePlay» (for Android) or «AppStore» (for iOS) and search for «Slinex» application, then install
this applicationи on your mobile device.
2) Run «Slinex» application on your mobile device and push icon to add a new device.
3) Push «Click here for NEW wireless device» button.
4) Enter into «Access point» mode: push and hold call button until you will hear «beep» sound from the door
station then release call button and repeat previous operations two more times. After third «beep» door
station will be restarted and then you will hear constant «beeps» sound. It means the door station entered
«Access point» mode. Press «NEXT» button on the mobile device screen to go to the next step.
5) Wait for a minute while the door station connects your mobile device. On the Android devices the
connection will be established automatically. On the iOS device user should connect to the door station
manually. Press «Wi-Fi settings» on the iOS device to view networks list. Find the network name with UID
number of the door station and connect it. Then press «NEXT» button.
6) The list of the available wireless networks will be displayed in the next window. Choose the network
which is the outdoor station will be connected and enter the password if it is needed. After that, the door
station will be restarted and after a minute it will be connected to the chosen network.
7) Press «NEXT» button, to add the door station to the device list. Fill in the device information:
Name: enter device name in the list
UID: unique identification number of the device (don’t change this number)
User:
Admin
(by default)
Password:
888888
(by default)
then push «Confirm» button.
8) Device will be added to the bar in the middle part of the screen. You can also push alarm notification on
or off by the blue switch in the devices list («Switch ON/OFF notification»).
9) On the mobile device go to the «Wi-Fi settings» menu and connect the device to the same network as
door station was connected in Step 5 if it wasn’t reconnected automatically.
10) If you want to view the image from the door station press its icon on the bar and then press first channel
icon to start monitoring mode. Press first channel icon again to stop monitoring mode.
Note:
If the door station has been entered into «Access point» mode and wasn’t connected to any wireless
network during 10 minutes then after that time it will be returned to the working mode.
− additional settings
− devices list
− local snapshots and video
− remote snapshots and video
− settings
− help
− add new device
− door unlock
− snapshot
− start/stop video recording
− turn on the sound from the door station
− press again to turn off the sound
+ - start conversation
− press again to stop conversation


