background image

1

3

2

INFLATE RIGHT™ TECHNOLOGY INSTRUCTIONS

1. Hold the + or – button for approximately 2 seconds until the display flashes. Set the 

required pressure using the + or – buttons, then wait 3 seconds.  The display will 

show the pressure value to which the tire will be inflated. (Continuously pressing 

the “+” or “-“ button will enter into “Fast setting mode”, increasing or decreasing 

the rate of target pressure at an increased speed.)

2.  Use the toggle switch to power for the inflator to start. 

3.  When the pressure gauge reaches the pre-set value, the inflator will automatically 

stop inflation. Once desired tire pressure is reached, disconnect the air hose and 

unplug the power cord (if applicable). 

WALL MOUNTING / STORAGE INSTRUCTIONS

Your inflator has built-in features for conveniently wall mounting the unit for storage. Use 

the included hardware to wall-mount the unit. Take extra care to ensure there is no wiring, 

plumbing, or other objects located within the wall behind your chosen mounting location. 

Manufacturer is not responsible for any damage or losses incurred from complications in 
wall-mounting.

For Drywall mounting:

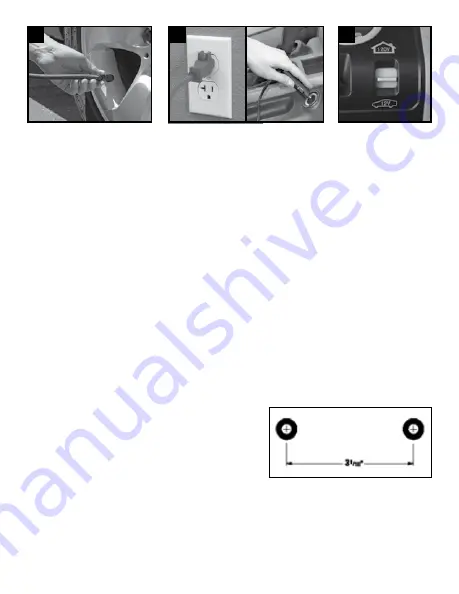
1.  Use  the  template  below  to  mark  mounting 

locations on wall 3 1/16" apart.

2.  Using 1/4" drill bit, drill holes at the marked 

locations. 

3.  Using a hammer, tap in the wall anchors until 

flush with the wall

4.  Using a screwdriver or screw gun, install the 

screws into the wall anchors, leaving approximately 3/8" protruding from the wall.

5.  Hang  the  inflator  on  the  screws  using  the  recesses  located  on  the  back  of  the 

inflator.


* Wall mount is for storage only. Remove inflator from wall mount and place on a hard 

clean surface before operating

*NOTE:

  Correct  tire  pressure  can  be  found  in  vehicle  owner's  manual  or  on  driver's 

side door jamb.

Содержание 40052

Страница 1: ... 99 PSI range ON OFF SWITCH Toggles between Home 120V OFF Auto 12V EASY GRAB HANDLE POWER SOURCE Plugs into a Home 120V wall outlet Plugs into an Auto 12V power outlet MOUNTING BRACKETS Mounting screws and anchors included Air Accessories INFLATOR Dual power motor air cooled INFLATE RIGHT TECHNOLOGY Inflator automatically shuts off when the set pressure level is achieved Perfect pressure with ever...

Страница 2: ...ug power cord and remove air hose connector CAUTION HOT DO NOT HOLD IN HAND WHILE OPERATING PLACE INFLATOR ON A HARD CLEAN SURFACE 1 DO NOT run vehicle while inflator is operating You may need to be in accessory or on position Please make sure emergency brake is set and car is in park 2 Always ensure air hose chuck touches the core of the valve stem for proper inflation 3 DO NOT use inflator conti...

Страница 3: ...l mounting the unit for storage Use the included hardware to wall mount the unit Take extra care to ensure there is no wiring plumbing or other objects located within the wall behind your chosen mounting location Manufacturer is not responsible for any damage or losses incurred from complications in wall mounting For Drywall mounting 1 Use the template below to mark mounting locations on wall 3 1 ...

Страница 4: ...check hose for breaks and leaks at fittings Inflator runs slowly 1 Overheated from excessive use Shut if off and allow to cool for 25 minutes 2 Voltage too low Check condition of vehicle battery NOTE If tire is totally deflated it is possible that the tire could separate from the rim allowing air to leak out when trying to inflate In the event this occurs you will have to jack up the tire prior to...

Страница 5: ... doble poder enfriado por aire frío ATENCIÓN LEA TODAS LAS INSTRUCCIONES CON ATENCIÓN SI NO SIGUE LAS INSTRUCCIONES DE ADVERTENCIA PUEDE CAUSAR INCENDIO LESIONES A PERSONAS O DAÑOS MATERIALES MEDIDOR DIGITAL Carcasa resistente a golpes Alcance de 0 99PSI TECNOLOGÍA INFLATE RIGHT IEl compresor se apaga automáticamente cuando se ha alcanzado el nivel de presión configurado Garantiza una presión perf...

Страница 6: ...N LA MANO AL OPERAR COLOQUE EL COMPRESOR SOBRE UNA SUPERFICIE FIRME Y LIMPIA 1 NO conduzca el vehículo mientras esté funcionando el compresor Es posible que deba estar en la posición de accesorios o encendido Asegúrese de colocar el freno de emergencia y que el vehículo esté en park estacionamiento 2 Asegúrese siempre de que el conector de la válvula esté bien sellado y presione contra el vástago ...

Страница 7: ...u compresor está fabricado convenientemente para poder fijarlo a la pared para almacenaje Utiliza la estructura del montaje Tenga cuidado extra y asegúrese de no perforar algún otro objeto localizado en la pared de su elección para la instalación del equipo El fabricante no sera responsable de ningún daño o pérdida generada al intentar montar el equipo en la pared Para Montaje en pared 1 Utilice l...

Страница 8: ...ago de la válvula 2 Inspeccione la llanta para comprobar que no tenga escapes y que la manguera no tenga roturas ni escapes en las juntas El compresor funciona muy despacio 1 Se ha sobrecalentado debido al uso excesivo Apáguelo y permita que se enfríe durante 25 minutos 2 El voltaje está demasiado bajo Inspeccione la condición de la batería del vehículo PRECAUCIÓN Si la llanta está desinflada por ...

Отзывы: