background image

1.  How to enter and exit factory mode

      Press Source button, and then press digital button “3”, “1”, “9”, “5” in turns to enter the factory menu. Press 

©

and

ª

 button to choose the item 

ˈ

press OK button to enter the submenu and press 

¨

 button to adjust the value. 

In the factory mode, press “menu” key can exit the factory mode.   

Software information: 

Enter factory mode, you can get the software information from the bottom of menu. 

Panel information: 

Enter factory mode, enter “PANEL CONTROL” item, you can get the panel information from the bottom of 

menu. 

Aging mode 

Enter factory mode, select “SYSTEM SETTING” item, press OK button enter, select “AGING MODE” item, 

press

¨

 button open aging mode. 

Note: You can press the shortcut key in the factory remote control to open or close the aging mode. 

4.  How to adjust ADC 

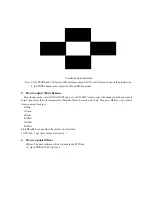
Before adjusting, enter the channel you want to adjust and input adjust signal (YPBPR channel: 576P and 720P, 

100% color bar;  VGA channel: 1366*768, tessellated white and black). Select “AUTO ADC”, press

¨

button to 

auto adjusts the ADC value.   

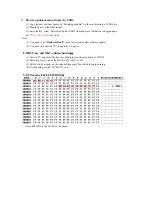
100% color bar 

Содержание 8M51B

Страница 1: ...te Date Date SERVICE MANUAL 8M51B 2012 5 23 SKYWORTH SIZE A5 Design and specifications are subject to change without prior notice Only Referrence 1 2 3 4 5 6 7 8 9 FREEZE PO W ER M ENU M UTE P P S M O...

Страница 2: ...Content 2 11 17 18 19 20 21 28 29 45 46 49 50 57...

Страница 3: ...LED 8M51B...

Страница 4: ...TOSHIBA CODE Component NTSC M PAL M PAL N VHF LOW 2 B VHF HIGH C W 11 VHF W 12 69 55 25MHz 127 25MHz 133 25MHz 311 25MHz 367MHz 801 25MHz...

Страница 5: ...65 120 140 For 32 LED For 42 LED For 47 LED...

Страница 6: ...8 8 6...

Страница 7: ...40 40 3 2 1 4 2 50 0 5 80 40 3 12000 26inches is 8 ohm 3 3 3 3 DC Voltage PANEL 12 12...

Страница 8: ...40 YES 8 6 46 46 NO NO Standard Spanish Standard 20...

Страница 9: ...4 2 4 0 40 70 0 40 70 0 40 40 85 Y0 50 30000...

Страница 10: ...29 Ultra high speed 32 bi RISC CPU IF Demo Build in MPEG1 2 4 H 264 Decoder Analog Demo Serial TS C it A di p LED PANEL JPEG MP3 Decoder Composite Audio L R Audio L R AMP5707 8W 8W I 2 S HDMI data USB...

Страница 11: ...stable Output Thermal Shutdown Ou t INPUT OUTPUT U50 1 1V 3A LOW DROPOUT LINEARAR REGULATOR AOZ1051PI SO 8 500kHz Oscillator AGND PGND VIN EN FB SS COMP LX OTP Internal 5V ILimit PWM Control Logic 5V...

Страница 12: ...U3 2 5V 1A AS1117L ADJ A1 SOT 223 U19 1 2V 1A AP1122EG 13 SOT223 3L GND Fixed Output ADJ Adjustable Output Thermal Shutdown Out INPUT OUTPUT 3 Thermal Shutdown 1 2 Vout GND 1 2V CURRENT LIMIT Vin...

Страница 13: ..._LINK G PIO _PM 3 DD CA _D A U AR T0_TX GN D GN D GN D GN D GN D GN D N SO G IN2 GIN 2P GIN 2M VSYN C0 H SYN C0 SAR2 DD CA _CK U AR T0_RX GN D GN D GN D GN D GN D GN D P RIN2P RIN2M CVBS5 SAR0 SAR1 VS...

Страница 14: ...D GN D GN D B_D D R3_ A 3 B_D D R3_ BA 0 B_D D R3_ D Q U 5 B_D D R3_ D Q MU GND M GN D G N D GN D AVD D _DD R1 GN D G N D GN D GN D B_D D R3_ A 7 B_D D R3_ A 5 B_D D R3_ D Q L 2 B_D D R3_ D Q L 0 GND...

Страница 15: ...dri vi ng strength ExternalSPI Fl ash Chi p Sel ect F2 G PIO _PM 5 0 I O w 5V tol erant G eneralPurpose Input O utput 4m A dri vi ng strength E2 K4 M 6 L4 L6 K7 PW M 4 O utput Pul se W i dth M odul at...

Страница 16: ...D RAM M em ory Posit i ve D i fferenti alCl ock B14 A_M CLKZ O utput D RAM M em ory N egati ve D i ff erenti alCl ock B13 A_DD R3_D Q MU O utput D ata M ask for Low Byte acti ve hi gh B23 A_DD R3_D Q...

Страница 17: ...obe K24 B_D D R3_D Q SBU I O D ata Str obe Inverse H 25 B_D D R3_D Q SBL I O D ata Str obe Inverse J24 B_D D R3_D QU 7 0 I O D RAM M em ory D ata Bus L25 G25 M 24 H 24 L24 F25 K25 G 24 B_D D R3_D QL...

Страница 18: ...lPurpose Input O utput 4m A dri vi ng strength U ni versalAsynchronous Recei ver 2 AF21 G PIO 43 U ART2_TX I O w 5V tol erant G eneralPurpose Input O utput 4m A dri vi ng strength U ni versalAsynchron...

Страница 19: ...H DC P Seri alBus D ata D D C Da ta ofD VI H D M I PortD AC4 D D CDD _CK Input w 5V tol erant H DC P Seri alBus Cl ock D D C Cl ock ofD VI H D M I PortD AB4 H O TPLU G A I O w 5V tol erant H ot pl ug...

Страница 20: ...3 3V Pow er M O D 3 3V Pow er T6 AVDD _PG A25 2 5V Pow er D em od PG A Pow er T7 AVDD _11 1 1V Pow er Anal og 1 1V Pow er W 20 AVDD _DD R0 1 5V Pow er D D R3 Pow er K16 K19 L17 AVDD _DD R1 1 5V Pow e...

Страница 21: ...ial Audio Port 7 BQ L R V O L U M E DRC Protection Logic Click and Pop Control 7 BQ SDA SCL 4 Order th Noise Shaper and PWM S R C mDAP Sample Rate Autodetect and PLL Serial Control Microcontroller Bas...

Страница 22: ...U4 1 5V 5A AS1084R TR LF ADJUSTABLE TO 252 U52 U59 5V 2A MP1494DJ LF Z TSOT 23 8 U18 3 3V 5A AS1084R 3 3 TR LF TO 252...

Страница 23: ......

Страница 24: ...U16 64M X 16 BIT G DIE DDR3 1333 SDRAM FBGA 96...

Страница 25: ...U17 128M X 16 BIT G DIE DDR3 1333 SDRAM FBGA 96...

Страница 26: ...U8 16MB SPI FLASH SOP 8 U21 2G BIT CMOS NAND EEPROM TSOPI48...

Страница 27: ......

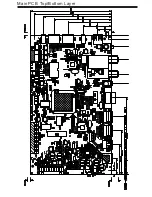
Страница 28: ...Main PCB Top Bottom Layer...

Страница 29: ...Main PCB Top Bottom Layer...

Страница 30: ...8M51B Service Adjustment V0 1...

Страница 31: ...l information Enter factory mode enter PANEL CONTROL item you can get the panel information from the bottom of menu Aging mode Enter factory mode select SYSTEM SETTING item press OK button enter selec...

Страница 32: ...T and go to the MODE item to select the channel which you want to adjust then select the color temperature Medium Warm Favorite and Cool Then press Key to go to these items you want to adjust R Gain G...

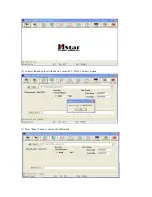
Страница 33: ...2 Connect the debug tool to the device turn on TV Press Connect button 3 Press Read button to choose the MBoot file...

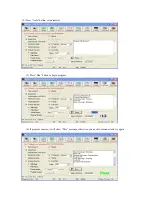
Страница 34: ...4 Press Auto button set parameter 5 Press Run button to begin program 6 If program success it will show Pass message otherwise you need to reconnect and try again...

Страница 35: ...te 1 You need to do Restore Default in the factory mode after software update 2 You need to restart the TV set again by AC power 8 HDCP key and MAC address burning 1 Turn on TV and insert the bus wire...

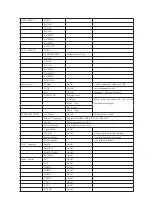
Страница 36: ...U p o r C n w o D SYSTEM SETTING Fac Hotkey On Off Factory hot key enable H C N E R F E S E U G U T R O P H S I N A P S h s i l g n E e g a u g n a L t l u a f e D e l i h C u r e P a n i t n e g r A...

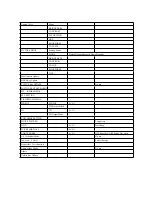
Страница 37: ...ey UPDATE No use SOFTWARE UPDATE USB SW INFORMATION SSC SETTING VIF INITIALIZATION PIP POP PIP POP 2Q 2II PIP Border Width 3D 3D 2Q 2II 3D Output Mode CUSTOMER SETTING WHITE PATTERN Test pattern WDT 2...

Страница 38: ...nnections Note The graphics are for representation only Front view 1 Power indicator Remote sensor 2 Speakers 3 Standby Button 4 Source Button 5 Menu Button 6 Volume Down Up Button 7 Channel Down Up B...

Страница 39: ...N IN USB1 5V 500mA HDMI1 HDMI2 HDMI IN PC RGB AUDIO IN RF IN CABLE AIR PC RGB IN 1 2 3 4 5 6 10 S PDIF VIDEO RIGHT LEFT AV IN Y P r P b YPbPr IN USB2 5V 500mA HDMI3 HDMI4 HDMI IN 2 9 3 8 7 LAN 1 USB1...

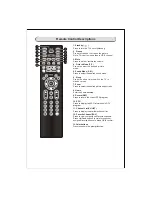
Страница 40: ...6 Sleep Press to set the time to switch the TV to standby mode 2 1 3 4 5 6 7 8 9 10 11 12 13 5 Sound Mode S M Press to select the desired sound mode 7 Zoom Press to select the desired picture aspect r...

Страница 41: ...st Forward Press to fast forward Previous Press to play the previous file Next Press to play the next file Stop Press to stop the playing 15 16 17 19 18 20 Subtitle Press to open or close the video su...

Страница 42: ...27 24 28 Program Select 0 9 Press to select the TV channel directly 25 Channel Press to select channel Up Down CH Next Previous 24 Volume Up Down VOL Press to adjust the volume 26 Menu Press to enter...

Страница 43: ...Show the information about the TV set SOURCE Open the source list select and switch the TV source DLNA Begin the Digital Living Network Alliance application Note 1 VIDEO Enter the USB state play the...

Страница 44: ...press OK to enter connection page If the base station need password select Password item press OK to input the password Press blue color key to connect the base station Notes Please use the Wi Fi don...

Страница 45: ...other TV INDEX display the list of recorded programs OK to play the initial segment and end segment when the replay you can jump directly to the end of the segment play green show or hide the camera p...

Страница 46: ...al Warm Favorite and Cool Picture Size Contain Auto 4 3 16 9 ZOOM1 ZOOM2 Panoramic and Just Scan Some option is no visible at some source Noise Reduction Contain Off Low Middle and High four modes No...

Страница 47: ...Audio Delay Adjust the speaker delay time to synchronize with video Only Useful at DTV source Auto Sync Off Clock Power Off Time Power On Time Sleep Timer Auto Sleep Time 00 00 Auto Sync Can set TV t...

Страница 48: ...ing the information of current DTV channel Function Audio Language English Subtitle PVR File System Closed Caption HDMI CEC DTVi setup Restore Factory Default FUNCTION Audio Language Set the primary o...

Страница 49: ...gram Parental Guidance Lock LOCK Lock system Switch the lock system between On and Off Set Password Reset the password Block Program Set the blocked programmers you desired Parental Guidance Set the p...

Страница 50: ...in it may be damaged 6 Please use only a USB storage device which is formatted in FAT16 FAT32 NTFS file system provided with the Windows operating system In case of a storage device formatted as a di...

Страница 51: ...vel 4 0 MPEG4 Simple Profile and Advanced Simple Profile Level 5 mkv MKV H 264 MPEG1 2 4 1080P 30P 20Mbit sec H 264 Main Profile and High Profile Level 4 0 MPEG4 Simple Profile and Advanced Simple Pro...

Страница 52: ...Repeat Play Mode A B Repeat Current Information Zoom In Pause Move zoom picture Zoom Out Press HOME enters the home page Select VIDEO item press OK key to open the desired content Press OK key to sel...

Страница 53: ...he desired content Press OK key to select the music file Press key to play or pause Press EXIT to exit playing or go back the previous menu MUSIC 1 1 Return Stop Skip Previous Skip Next Fast Reverse F...

Страница 54: ...aying or go back the previous menu PHOTO 1 1 Return Photo Control Bar Current Information Zoom In Pause Zoom Out Stop Skip Previous Skip Next Rotate CW Rotate CCW Play List Press to display Photo Cont...

Страница 55: ...t Press OK key to select the text file Press EXIT to exit reading or go back the previous menu Press Go to next page or pre page Text Control Bar Note It supports txt files English character Please en...

Страница 56: ...set by the PC Suggest to change to the best resolution or other standard resolutions of Windows system Set refresh rate to be 60Hz SNOWY DOTS AND INTERFERENCE If the antenna is located in the fringe a...

Страница 57: ...ange the power supply board Done Done Upgrade the software Check the 5V 12V 24V on power supply board Change the power supply board Check the ON OFF voltage on CN7 should be greater than 2 7V Check Q3...

Страница 58: ...mute Done Check the voltage of Mute pin beside the amplifier IC It should not be 0V Check the mute circuit if it is OK Done Fix the mute circuit Upgrade the software Change the main IC U9 Done Change...

Страница 59: ...s exactly connected Well connect the cable Check the current input source if it is TV Done Change the main IC U9 Adjust AGC follow the working guide Change the mainboard Done Done Done Check the DC po...

Страница 60: ...ine is 24V Done Y Y Y N N N Check the ON OFF voltage on CN7 should be greater than 2 7V Check Q39 U9 PinAB24 if it works well Change the panel Done Upgrade the software Change the Q39 or U9 Change the...

Страница 61: ...49 100 10K R49 100 10K R16 220ohm NC R16 220ohm NC CA8 100uF 16V CA8 100uF 16V H3 NC H3 NC 1 TP7 TP7 C27 0 1uF C27 0 1uF Q53 NC M2345 Q53 NC M2345 1 3 2 C24 10uF 16V C24 10uF 16V R1 22K R1 22K C14 0 1...

Страница 62: ...V6P BLUE 1 C11 TCON21 D4 TCON20 E4 TCON19 D9 TCON18 F10 TCON17 F4 TCON16 E8 TCON15 G6 TCON14 D6 TCON13 F6 TCON12 G10 TCON11 D7 TCON10 G7 TCON9 F5 TCON8 F9 TCON7 D8 TCON6 E9 TCON5 E11 TCON4 D10 GPIO_PM...

Страница 63: ...2 A TMA 0 14 2 A TMDQL 0 7 2 Title Size Document Number Rev Date Sheet of DDR V00 20 MSD6329SV C 3 10 Tuesday April 17 2012 Title Size Document Number Rev Date Sheet of DDR V00 20 MSD6329SV C 3 10 Tu...

Страница 64: ...382 10R D44 NC D44 NC 1 2 R401 0 NC R401 0 NC R390 10R R390 10R R439 0 NC R439 0 NC D31 NC BAT54C D31 NC BAT54C D65 NC D65 NC 1 2 D35 NC D35 NC 1 2 R419 10K R419 10K R430 10R R430 10R CN15 HDMI 180D C...

Страница 65: ...34 33R R279 49 9R 1 R279 49 9R 1 R599 NC 0R R599 NC 0R R214 49 9R 1 R214 49 9R 1 C422 10n C422 10n U22 LAN1102 SO 16 U22 LAN1102 SO 16 TX 16 TX 14 CMT 15 TD 1 TD 3 CT1 2 NC 4 NC 5 NC 13 NC 12 RD 6 CT2...

Страница 66: ...V00 20 MSD6329SV A 6 10 Monday January 09 2012 USB ESD 2pF USB INTERFACE USB POWER USB ESD 2pF D36 ESD0402 D36 ESD0402 1 2 CN51 USB_4P CN51 USB_4P 1 VCC 1 2 D 2 3 D 3 4 GND 4 SHIELD 5 SHIELD 6 CA20 10...

Страница 67: ...0 20 MSD6329SV A 7 10 Tuesday April 17 2012 NAND FLASH R724 22R R724 22R R730 22R R730 22R R728 22R R728 22R C281 33p C281 33p R727 22R R727 22R R723 22R R723 22R R722 22R R722 22R R721 22R R721 22R R...

Страница 68: ...0D CN8 PHONEJACK STEREO 90D 4 3 2 1 R209 68 R209 68 C42 NC 10pF C42 NC 10pF CN34 PHONEJACK STEREO 90D CN34 PHONEJACK STEREO 90D 4 3 2 1 C182 2 2u C182 2 2u C66 47n NC C66 47n NC CN40 RCA1_180D CN40 RC...

Страница 69: ...R43 100R R43 100R TL18 FB120R TL18 FB120R C1459 100uF 16V C1459 100uF 16V C1227 2 2u C1227 2 2u TC15 100nF TC15 100nF 7 5 3 1 8 6 4 2 RP41 22RX4 7 5 3 1 8 6 4 2 RP41 22RX4 TR16 NC 100 TR16 NC 100 TR14...

Страница 70: ...47UF R118 470 R118 470 R133 100 R133 100 R198 100K R198 100K R138 0 R138 0 L608 22uH_5A L608 22uH_5A R116 100 R116 100 TP8 TP8 ZD193 NC 9V1 ZD193 NC 9V1 C90 0 1UF C90 0 1UF C36 10uF 50V C36 10uF 50V...

Страница 71: ...D9 LL4148 D10 LL4148 D14 LL4148 R53 1K ZD3 6 2V ZD4 13V ZD5 27V R54 27K R60 470 3W 1 2 3 Q14 60N04 C28 1000U 25V R63 2K R64 20K Q17 2N4403 C34 2 2UF D5 LL4148 R61 12K R62 100K D16 IN5408 D17 IN5408 D...

Отзывы: