


48
All Rights Reserved.
Sky
Vue
®
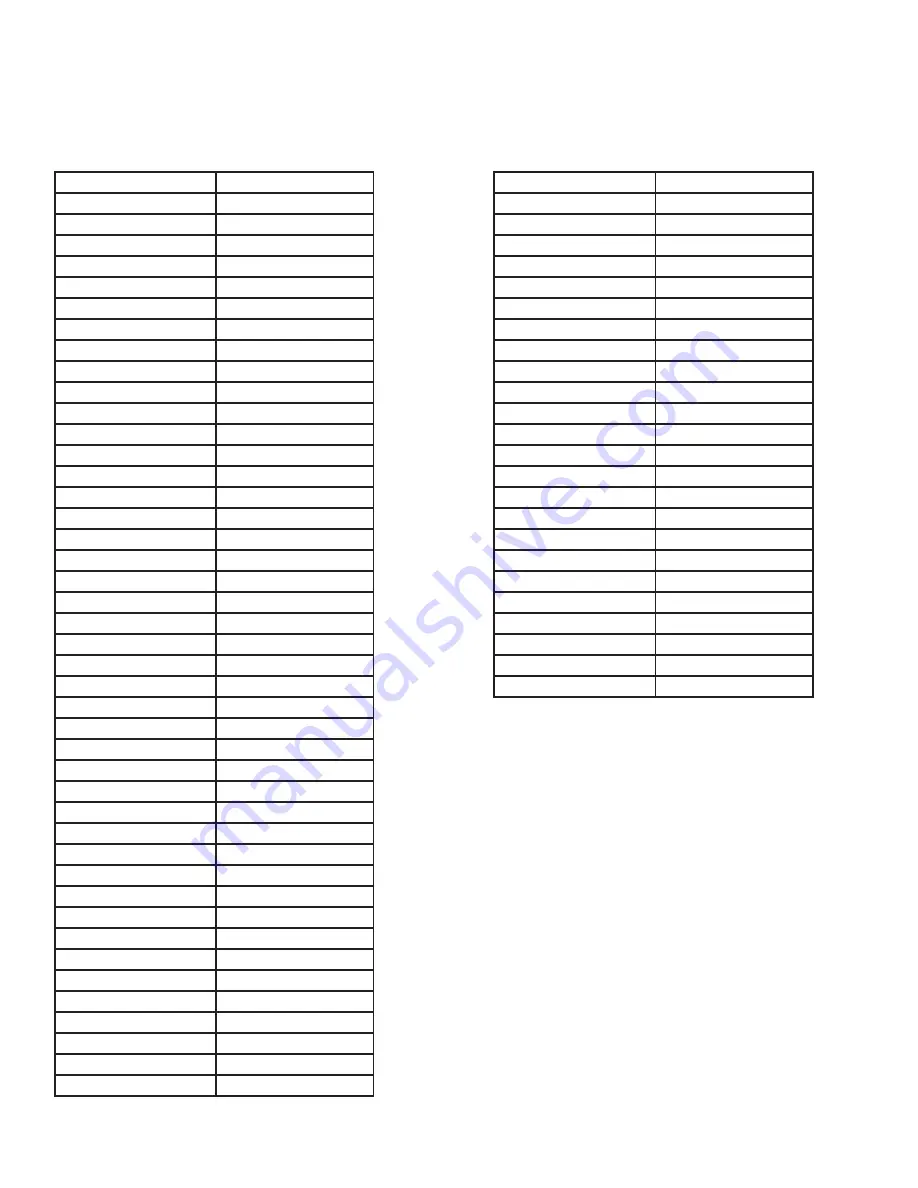
RS232 Control Codes
Mute:
A0 F0 55 FF 14 EB
Menu:
A0 F0 55 FF 4E B1
Right:
A0 F0 55 FF 05 FA
OK:
A0 F0 55 FF 02 FD
Down:
A0 F0 55 FF 0D F2
Up:
A0 F0 55 FF 17 E8
Left:
A0 F0 55 FF 0C F3
Source / TV Input
A0 F0 55 FF 01 FE
(1):
A0 F0 55 FF 32 BD
(2):
A0 F0 55 FF 43 BC
(3):
A0 F0 55 FF 0F F0
(4):
A0 F0 55 FF 1E E1
(5):
A0 F0 55 FF 1D E2
(6):
A0 F0 55 FF 1C E3
(7):
A0 F0 55 FF 18 E7
(8):
A0 F0 55 FF 45 BA
(9):
A0 F0 55 FF 4C B3
(0)
A0 F0 55 FF 56 A9
Dash (-) or List ./DRF
A0 F0 55 FF 09 F6
Information
A0 F0 55 FF 50 AF
Favorite
A0 F0 55 FF 10 EF
Flashback
A0 F0 55 FF 09 F6
Back
A0 F0 55 FF 09 F6
DVR List
A0 F0 55 FF 57 A8
Play/Pause
A0 F0 55 FF 16 E9
Fast Reverse
A0 F0 55 FF 47 B8
Fast Forward
A0 F0 55 FF 13 EC
Stop
A0 F0 55 FF 12 ED
Record
A0 F0 55 FF 48 B7
USB
A0 F0 55 FF 4D B2
Exit:
A0 F0 55 FF 1B e4
Power On:
A0 F0 55 FF AE 51
Power Off:
A0 F0 55 FFAF 50
Power On/Off:
A0 F0 55 FF 0B F4
:
A0 F0 55 FF 0A F5
Volume -:
A0 F0 55 FF 40 BF
C:
A0 F0 55 FF 55 AA
Channel -:
A0 F0 55 FF 5A A5
Page Up
A0 F0 55 FF 06 F9
Page Down
A0 F0 55 FF 58 A7
Go To Next
A0 F0 55 FF 13 EC
Go to Prev
A0 F0 55 FF 47 B8
Guide
A0 F0 55 FF 15 EA
Sleep:
A0 F0 55 FF 53 AC
AV Input
A0 F0 55 FF ED 12
HDMI1:
A0 F0 55 FF EC 13
HDMI2
A0 F0 55 FF E1 1E
HDMI3
A0 F0 55 FF E3 1C
VGA:
A0 F0 55 FF EA 15
TV:
A0 F0 55 FF E8 17
Component:
A0 F0 55 FF E7 18
Usb:
A0 F0 55 FF 57 A8
AV Mode
A0 F0 55 FF 4B B4
Zoom:
A0 F0 55 FF 51 AE
Surround:
A0 F0 55 FF C7 38
Sound Mode
A0 F0 55 FF 5B A4
Captions
A0 F0 55 FF 59 A6
VOL 25
A0 F0 55 FF 21 dE
VOL 50
A0 F0 55 FF 22 dD
VOL 75
A0 F0 55 FF 23 dC
VOL 100
A0 F0 55 FF 24 dB
Brightness_25
A0 F0 55 FF 26 d9
Brightness_50
A0 F0 55 FF 27 d8
Brightness_75
A0 F0 55 FF 28 d7
Brightness_100
A0 F0 55 FF 29 d6
Red
A0 F0 55 FF 46 B9
Green
A0 F0 55 FF 4A B5
Yellow
A0 F0 55 FF 52 A1
Blue
A0 F0 55 FF 5E A1
Baud Rate: 38400/ Bits: 8/ Parity: None/Stop Bit: 1
Command Code Sequence: A0 F0 55 FF <IR Code> <Check Sum>
The time of the command sequence must be < 500 ms. The interval time of two continuous command sequences must be > 500 ms.


