


GB 12
8. Reception
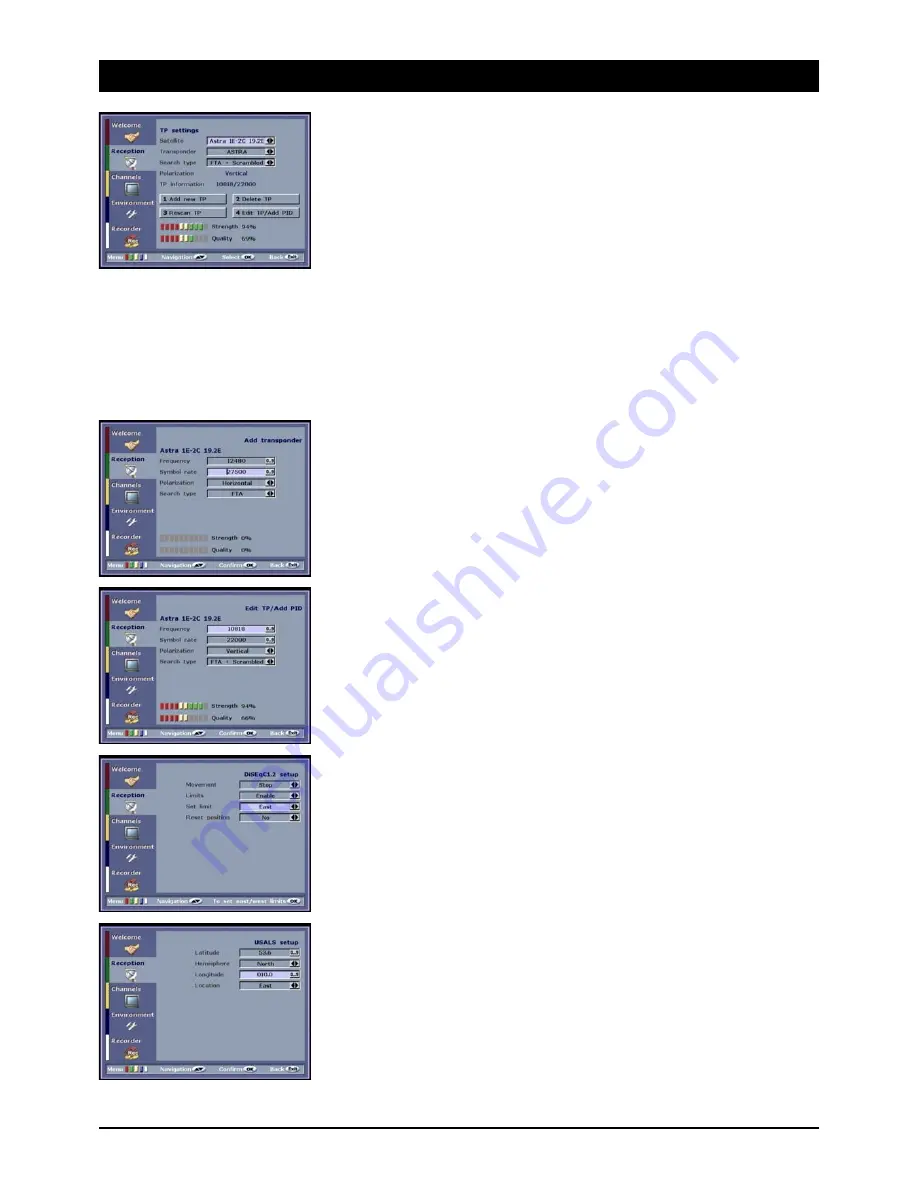
Transponder setup
Each satellite has a number of transponders. Each transponder has at least one channel, usually
there are 4 - 10 TV channels and radio stations. In the course of time transponders are continuously
being switched off or changed and new transponders added.
• Satellite: Select the satellite whose transponder list you wish to process.
• Transponder: The transponder name of the operator is displayed (e.g. “BetaDigital”).
• Search type: There are three different search options. “FTA” searches for all FTA channels.
“FTA + coded” searches for all channels - even coded PAY-TV channels. Coded channels can
only be viewed with a special decoder. All the channels are easily found via the “Network search”.
ASTRA and HOTBIRD transmit an overview which lists all the channels and transponders. The
receiver can read this overview. Note: Not all satellite operators provide this service!
The information about the current transponder (polarisation, frequency and symbol rate) contains
options which can be called via the buttons [ 1 ], [ 2 ], [ 3 ] and [ 4 ]:
1 New TP: For adding a new transponder (see below)
2 Delete TP: For deleting a transponder
3 Search for TP: Starts the search run on the current transponder in order, e.g., to re-read the data
or to find the new channel
4 Change TP: For changing the transponder settings (see below)
Add transponder
In almost all cases the frequency of the transponder has to be entered as five digits. Please refer to
teletext and specialist or TV magazines for the frequencies - round up/down decimal places. The
symbol rate of a transponder is usually 27500 or 22000. Set the reception level (polarisation) to
“horizontal” or “vertical” (H or V). Under search type set whether the search should only include FTA
or also coded channels. Typical transponder details are, e.g.:
Example TV:
12,449.75 V (= 12450 vertical),
SR 27500 (=27500),
FEC 3/4 (the FEC “error correction” is determined automatically).
Change transponder
If the transponder settings have been changed by the channel, you can correct the transponder
parameters in this menu. You can monitor the effects via the signal indicators.
DiSEqC 1.2
If you own a motorised DiSEqC 1.2 rotating system, you can carry out the necessary presettings in
this menu. Please observe the assembly instructions to ensure correct installation of your DiSEqC
rotors! In order to use the DiSEqC 1.2 function, you have to select the option DiSEqC 1.2 in the LNB
setup menu (under DiSEqC).
Movement: You can rotate the system towards the east or west via the Left/Right control buttons.
Limits: You can limit the easterly and westerly swivel range to ensure that the antenna cannot rotate
unhindered to the outer most end stop. This prevents possible damage by obstacles which are
located in the swivel range (wall, branches). Select the “Off” setting if there are no obstacles in the
swivel range.
Setting limits: Select east and then go to the selection “Movement” in order to rotate the antenna
to the maximum easterly stop. Confirm the position via the OK button and repeat the procedure for
the westerly limit.
Reset position: The DiSEqC 1.2 antenna rotor moves to the 0 position.
USALS
If you own a USALS, all the satellite positions can be calculated automatically. The receiver requires
the exact location of the antenna as the basis for the calculation. Enter the following data for
Hamburg (53.57° North, 10.03° East):
Latitude: 53.6
Hemisphere: Northern
Longitude: 010.0
Location: East
After saving the data, the receiver can calculate all the distances between the satellites and move to
the exact positions. To achieve this, the USALS antenna has to be aligned 100%! If it is not possible
to receive all the available satellites, please refer to the installation instructions of your rotating
system!