SKYLUX Cintralux Alu EP 10/10 Скачать руководство пользователя страница 9

01/09/2020

9/18

E_MH_Mounting_instructions_Skylux_Cintralux_Alu_EP10-10

Assembly sequence for fixed parts

1.  Installation of the end profile and lateral profile
2.   Installation of the lower arches and inner sheets
3.   Installation of the intermediate arch profiles and the spacer profiles
4.   Installation of the outer sheets
5.   Installation of the upper arch profiles
6.   Tighten the bolts
7.  Installation of the outer end sheets
8.   Finish with aluminium draft strips
9.   Check the arch tensions
10.  Finish the seams of the lateral profiles
11.   Continue finishing the opening parts, if any

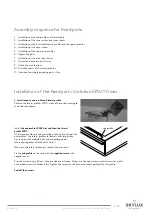
Installation of the fixed parts Cintralux EP10/10 mm

1.  Installation of end profile and lateral profile
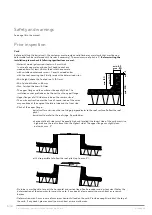
Position the lateral profiles LP210- around the curb according to

the enclosed scheme.

Install 

the end profile LP528 first and then the lateral

profile LP210-.

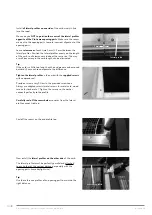
(The lateral profiles are to be installed on the ends on top of the

end profiles - the lateral profiles for barrel vaults larger than

4 m long exist of multiple parts and are packaged per 

reference, together with the draft strips.)

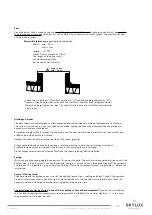
Make sure the lateral profile just reaches the end sheet.

Fix the 

end profile on the curb with the supplied screws with

neoprene seal. 

Provide a screw every 50 cm, in the provided screw zone. Always use the right screws (metal screws for metal 

curb, wood screws for timber, etc.). Tighten the screws so the washer connects perfectly to the profile. 

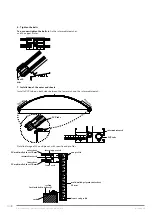
Seal off the corners.

end profile

Содержание Cintralux Alu EP 10/10

Страница 1: ...BARREL VAULTS Cintralux Alu EP 10 10 Mounting instructions EN Art N 43984...

Страница 2: ...le safety nets below the danger zones Before making the roof opening for the skylight barrel vault make sure there are safety nets conform to the current legislation The nets must be attached firmly a...

Страница 3: ...our body as possible Parts of more than 25 kg must be lifted with at least 2 persons Personal protective equipment Work clothes safety shoes and helmet are mandatory for everyone Lifeline and harness...

Страница 4: ...FIXED PARTS p 9 INSTALLATION OF THE END PROFILE AND LATERAL PROFILE p 9 INSTALLATION OF THE LOWER ARCH PROFILES AND THE INNER SHEETS p 11 INSTALLATION OF THE INTERMEDIATE ARCHES p 12 INSTALLATION OF T...

Страница 5: ...lateral arch upper arch with bottom flange LP502 upper arch LP528 lower end profile LP505 aluminium draft strip LP210 lateral profile LP623 upper end profile LT545 corner profile PVC tube 16 x 500 mm...

Страница 6: ...the upper flange Upper flanges of all 4 sides must be on the same surface The curb construction must be free all round none of the curbs may continue at the angle of the lateral side and the front si...

Страница 7: ...size pre curved pre drilled and provided with screw thread Respect the exposed UV protected top side of the sheets glazing Always apply the bolts by hand before using a screwing machine to have two fu...

Страница 8: ...e Cintramax opening parts Tip only in combination with opening parts make sure the position of the power supply electric or pneumatic corresponds to the position of the opening part Outline drawing of...

Страница 9: ...x EP10 10 mm 1 Installation of end profile and lateral profile Position the lateral profiles LP210 around the curb according to the enclosed scheme Install the end profile LP528 first and then the lat...

Страница 10: ...g then the end pieces can be moved outwards 2 cm each to compensate the difference Tighten the lateral profile on the curb with the supplied screws with neoprene seal Provide a screw every 50 cm in th...

Страница 11: ...pneumatic corresponds to the position of the opening part Installation of the lower arches The light lower arches are placed on the uppermost edge The heavy lower arches are placed on the lowest edge...

Страница 12: ...bolts in the pre drilled holes in the lateral profile in the intermediate arch Do not tighten the bolts yet 4 Installation of the outer sheets The outer wall outer sheet is installed and slid into th...

Страница 13: ...e of the upper arch profile fit into the notch of the intermediate arch profile Fix the upper arch profiles by hand with the stainless steel bolts M6 or M8 Do not tighten yet and make sure you do not...

Страница 14: ...ube on both sides between the lower arch and the intermediate arch Detailed image of the end pieces with specific end profiles M8x60 bolts end profile lateral upper arch outer sheet PC multi walled sh...

Страница 15: ...e must face outwards Mark until the ends of the lowest end profile for the correct sheet length Take out the sheet from the lowest end profile again Saw off the sheet 3 mm BELOW the marked line in arc...

Страница 16: ...lts Finish the 4 corners by installing the corner profile on the lowest and uppermost end profile on the ends of the barrel vault 8 Finish with aluminum strips Clamp the sheets into the lateral profil...

Страница 17: ...tral soap All attachments must be inspected and loose or damaged parts of the Cintramax must immediately be fixed or replaced by original parts as described in the ETA Cintralux Clean the condensation...

Страница 18: ...ve film Remove the protective film just before installation to avoid scratches Point load avoid point load on multi layered sheets as this can cause permanent imprints Never lean or walk on the multi...

Отзывы: