background image

4

PART I : SETTING UP THE VIRTUOSO GTi MOUNT

1.1  Installing the Telescope

1. 

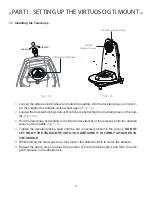
Loosen the altitude clutch wheel and rotate the saddle until the dovetail groove is horizon-

tal, then tighten the altitude clutch wheel again 

(Fig 1.1a)

.

2. 

Loosen the dovetail locking knob until nothing is obstructing the dovetail groove in the sad-
dle 

(Fig 1.1b)

.

3. 

Hold the telescope horizontally and slide the dovetail bar of the telescope into the dovetail 

groove of the saddle 

(Fig 1.1b)

4. 

Tighten the dovetail locking knob until the bar is securely locked in the groove. 

DO NOT 

LET GO OF THE TELESCOPE UNTIL YOU ARE SURE IT IS FIRMLY ATTACHED TO 
THE SADDLE

5.

  While holding the telescope tube, fully loosen the altitude clutch to check the balance.

6.

  Repeat the above steps to adjust the position of the dovetail bar back and forth to reach 

good balance in the altitude axis.

Saddle

Dovetail Groove

Tighten

Loosen

2

Fig. 1.1a

Fig. 1.1b

Altitude Clutch Wheel

Dovetail Locking Knob

Tighten

Loosen

1

Содержание VIRTUOSO GTi

Страница 1: ...INSTRUCTION MANUAL VIRTUOSO GTi Copyright Sky Watcher 202102V1...

Страница 2: ...bles 6 2 5 Power Supply Requirements 6 Parts Diagram PART IV Assembling Your Telescope 4 2 Eyepiece Assembly 13 PART V Operating Your Telescope 5 2 Focusing the Telescope 15 5 1 Using the Red Dot Find...

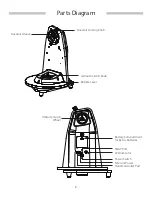
Страница 3: ...gram Dovetail Groove Altitude Clutch Wheel Bubble Level Battery Compartment for 8x AA Batteries LED Indicator Hand Controller Port External Power Power Switch SNAP Port Azimuth Clutch Knob Dovetail Lo...

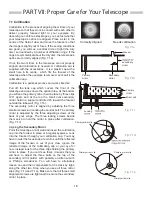
Страница 4: ...dovetail bar of the telescope into the dovetail groove of the saddle Fig 1 1b 4 Tighten the dovetail locking knob until the bar is securely locked in the groove DO NOT LET GO OF THE TELESCOPE UNTIL YO...

Страница 5: ...onnecting the SynScan hand controller SNAP This is a stereo jack outlet to connect with a camera s shutter control port The SynScan hand control can control the camera to take pictures automatically v...

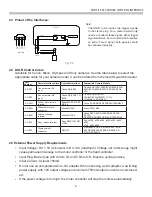
Страница 6: ...ony cameras See the table below to select the appropriate cable for your camera model it can be ordered from the local Skywatcher dealer Part Number Camera Interface Style Controller Interface Compati...

Страница 7: ...rder to control the telescope and mount for astronomical observation Please refer to the SynScan hand control manual for operation instructions Users can download the free SynScan App from the App Sto...

Страница 8: ...ture can be disabled with the SynScan hand controller or the SynScan App If an user does not need to rotate the mount manually after alignment it is recommended to dis able this feature to obtain the...

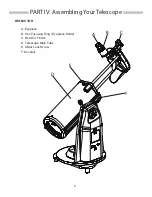
Страница 9: ...9 A Eyepiece B Hex Focusing Ring Eyepiece Holder C Red Dot Finder D Telescope Main Tube E Slider Lock Screw F Dovetail PART IV Assembling Your Telescope REFLECTOR A B C D E F...

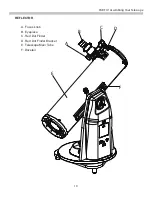
Страница 10: ...10 A Focus knob B Eyepiece C Red Dot Finder D Red Dot Finder Bracket E Telescope Main Tube F Dovetail PART IV Assembling Your Telescope REFLECTOR A B C D E F...

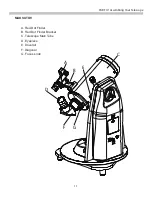
Страница 11: ...11 A Red Dot Finder B Red Dot Finder Bracket C Telescope Main Tube D Eyepiece E Dovetail F Diagonal G Focus knob PART IV Assembling Your Telescope MAKSUTOV A B C D E G F...

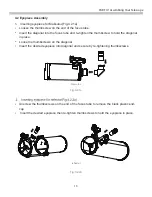
Страница 12: ...ctions carefully before beginning Your telescope should be assembled during daylight hours Choose a large open area to work to allow room for all parts to be unpacked reflector Fig 4 1 1a 1 PART IV As...

Страница 13: ...and re tighten the thumbscrew to hold the diagonal in place Loose the thumbscrews on the diagonal Insert the desired eyepiece into diagonal and secure by re tightening thumbscrews reflector Maksutov F...

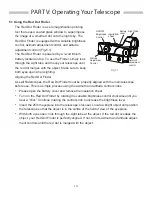
Страница 14: ...sight tube and move your telescope until the red dot merges with the object Make sure to keep both eyes open when sighting Turn on the Red Dot Finder by rotating the variable brightness control clock...

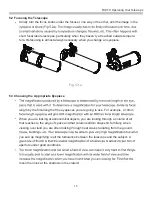
Страница 15: ...osing the Appropriate Eyepiece length by the focal length of the eyepieces you are going to use For example a 10mm When you are looking at astronomical objects you are looking through a column of air...

Страница 16: ...tmosphere complete with turbulence dust particles and increased light pollution 6 2 Selecting an Observing Site Travel to the best site that is reasonably accessible It should be away from city lights...

Страница 17: ...telescope automatically with the VIRTUOSO GTi mount connected to your smart device equipped with WiFi smartphone tablet laptop 6 9 Wireless Terrestrial Photography Control The VIRTUOSO GTi mount can...

Страница 18: ...which covers the front of the telescope and look down the optical tube At the bottom you will see the primary mirror held in place by three clips 120 apart and at the top the small oval secondary mir...

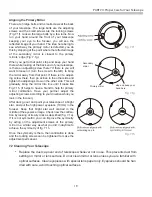
Страница 19: ...the primary mirrors edge Fig 7 1g When you get to that point stop and keep your hand there while looking at the back end of your telescope is there an adjusting screw there If there is you will want...

Страница 20: ...VIRTUOSO GTi Mount...

Отзывы: