6
OPERATING YOUR TELESCOPE
U
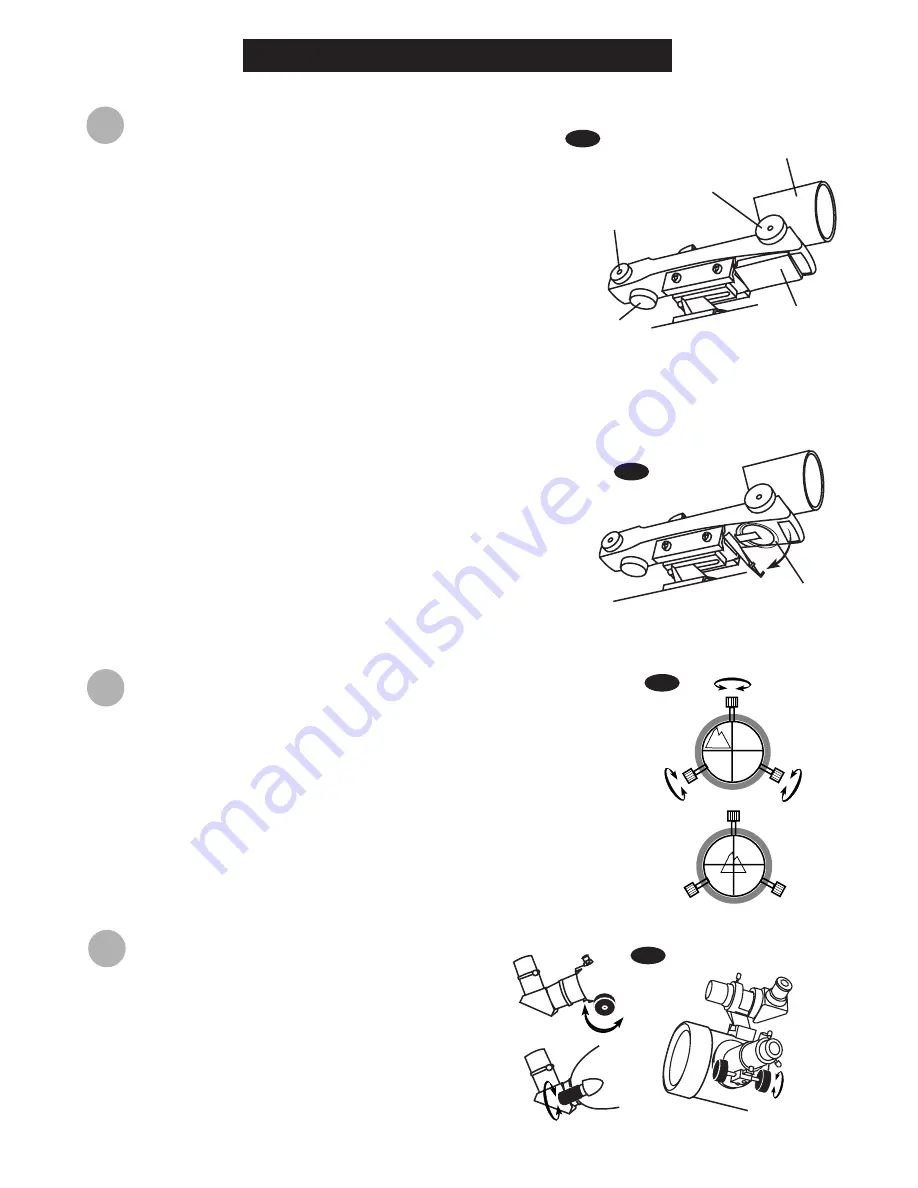
sing the Red Dot Finder
(for SK 80/350 EQ/TA, SK 80/400 EQ/TA, and SK MAK90EQ/TA)
The Red Dot Finder is a zero magnification pointing tool that
uses a coated glass window to superimpose the image of a
small red dot onto the night sky. The Red Dot Finder is
equipped with a variable brightness control, azimuth
adjustment control, and altitude adjustment control (Fig.a). The
Red Dot Finder is powered by a 3-volt lithium battery located
underneath at the front. To use the Finder, simply look through
the sight tube and move your telescope until the red dot
merges with the object. Make sure to keep both eyes open
when sighting.
U
sing the finderscope
(for SK 76/300 EQ/TA only)
These fixed magnification scopes mounted on the optical tube are very useful
accessories. When they are correctly aligned with the telescope, objects can
be quickly located and brought to the centre of the field. Alignment is best
done outdoors in day light when it's easier to locate objects.
Fig.c
Aligning the Red Dot Finder
Like all finderscopes, the Red Dot Finder must be properly aligned with the main telescope before use.
This is a simple process using the azimuth and altitude control knobs.
Open the battery cover by pulling it down and remove the plastic
shipping cover over the battery (Fig.b).
Turn on the Red Dot Finder by rotating the variable brightness control
clockwise until you hear a "click". Continue rotating the control knob
to increase the brightness level.
Insert a low power eyepiece into the telescope's focuser. Locate a
bright object and position the telescope so that the object is in the
centre of the field of view.
With both eyes open, look through the sight tube at the object. If the
red dot overlaps the object, your Red Dot Finder is perfectly aligned.
If not, turn its azimuth and altitude adjustment controls until the red
dot is merged with the object.
1.
2.
3.
4.
Choose a distant object that is at least 500 yards away and point the main
telescope at the object. Adjust the telescope so that the object is in the
centre of the view in your eyepiece.
Check the finderscope to see if the object centred in the main telescope
view is centred on the crosshairs.
Use the three alignment screws to centre the finderscope crosshairs on
the object (Fig.c).
1.
2.
3.
F
ocusing
(for all models)
Slowly turn the focuser knobs (Fig.d), one way or the other,
until the image in the eyepiece is sharp. The image usually
has to be finely refocused over time, due to small
variations caused by temperature changes, flexures, etc.
This often happens with short focal ratio telescopes,
particularly when they haven't yet reached outside
temperature. Refocusing is almost always necessary when
you change an eyepiece or add or remove a Barlow lens.
Fig.d
Fig.a
Fig.b
Shipping
cover
Azimuth
adjustment
control
ON/OFF
Brightness
Control
Altitude
Adjustment
Control
Battery cover
Sight Tube


