background image

40 

Offline/Overlay map 

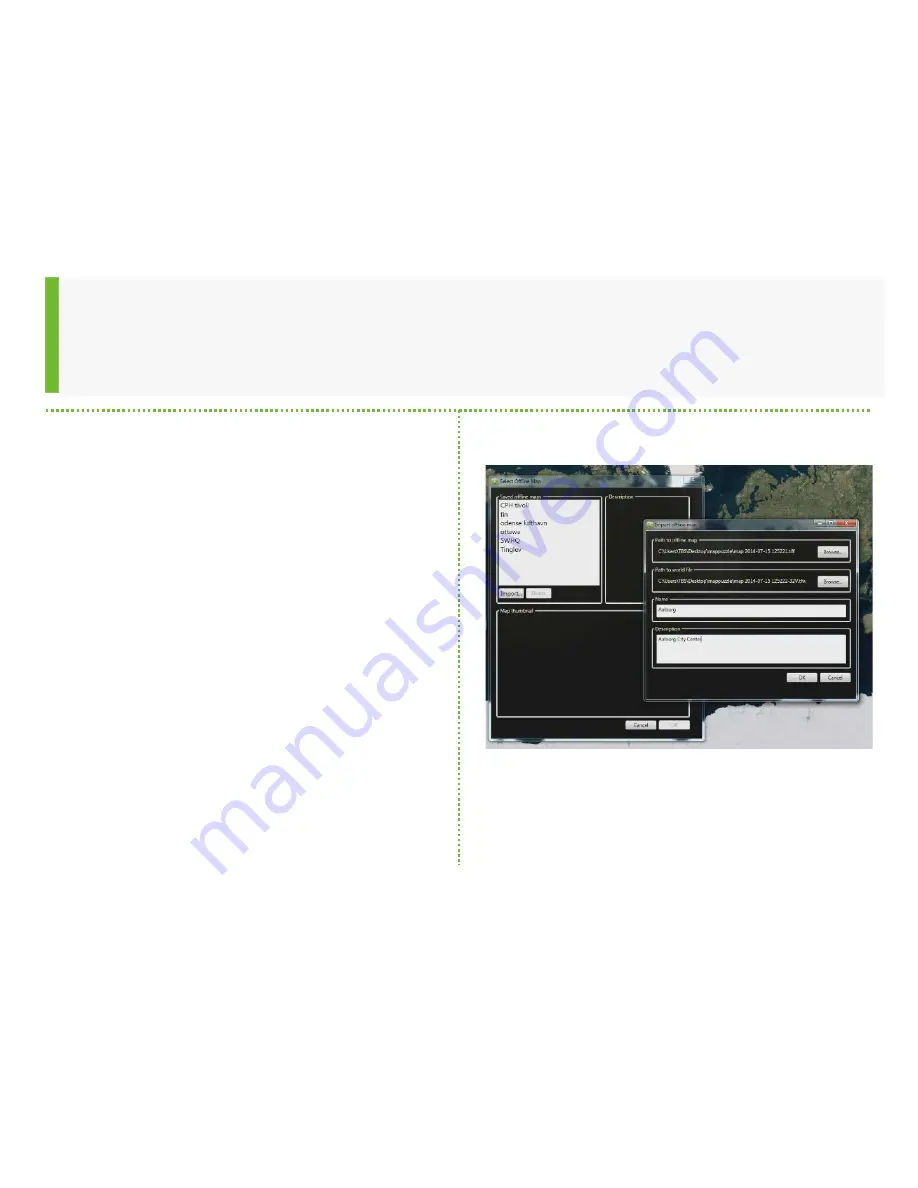
If no maps shows in the list the user will need 

to import a map .  
 

Click the import button, this will take you to the 

import map option here the user can select the 

Browse Button to go to your local drive and 

select the map material the user would like to 

use, as well a the needed worldfile if the map if 

not a GEO-TIFF file from the start 
 

When the user have selected a map, make sure 

a name is typed in for this map in the name 

field as well as a description of the map in the 

description field. 
 

When the user selects ok the map will be saved 

in the Navigator and the name, description and 

a small photo will be attached to that map for 

future use. 

Содержание Huginn X1

Страница 1: ...Sky Watch Huginn X1 User Manual Version 2 3 17 07 2014...

Страница 2: ...2 THE HUGINN X1 KIT...

Страница 3: ...3 Key Components Charger Ground Station 4x Batteries 4x Extra Rotors Installation Manual Maintenance tool Cables High Gain Antenna One handed Controller Huginn X1...

Страница 4: ...4 Huginn X1 Details H Rotor B Data Antenna E Camera Payload D Landing Gear C Body Flight Computer A ON Button F Rotor Blade Holders G Arm I Motor Controller...

Страница 5: ...5 Huginn X1 Details A Cooling D Battery Compartment E Video Transmitter B Sonar C Video Antenna F Camera connector...

Страница 6: ...6 Ground Station Details E Data Antenna F Video Antennas G Battery Compartment A One handed Controller B External Power Source C Mini USB Connector D Video Out...

Страница 7: ...7 Handheld Controller Details A Joystick B Land Take Off button C Change button to vertical and pan control...

Страница 8: ...8 Battery Details B Marker C Unlock Button A Lock...

Страница 9: ...9 CONNECTING THE SYSTEM...

Страница 10: ...er 3 The Computer will make a sound when the drivers have been installed if sound is not muted 4 The ground station has a flash drive build into it that can be used to store software maps flight logs...

Страница 11: ...troller to the Ground Station A The One Handed Controller is calibrated when the Ground Station is turned on The One Handed Controller can be connected at any given time during the flight The plug can...

Страница 12: ...when takeoff is completed If the LED blinks while the Huginn X1 is on the ground check warnings in the Navigator In Air Full light low Battery One flashes Loss of Connection During Landing Blinks star...

Страница 13: ...e Huginn X1 is connected Turns GREEN when the PC is connected to the Ground Station Turns RED when the battery on the Ground Station is low and starts to BLINK RED when the Battery on the GS is critic...

Страница 14: ...14 GETTING READY...

Страница 15: ...ing the Huginn X1 1 Take the Huginn X1 out of the box 2 Foldout the front arms 3 Foldout the rear arms 4 Fold up the data communication antenna 5 Place the drone on the ground and push the ON button 1...

Страница 16: ...arging the Battery 1 Turn the Battery so that the Unlock Button is UP 2 When the Battery is installed the Charger will give out three beeps 3 To see the status push the Button on the side once Mode Bu...

Страница 17: ...the Battery into the Battery compartment 2 When the Battery Clicks check if both white markers are visible The battery level can be checked by looking at the navigator when the Huginn X1 have been tu...

Страница 18: ...8 Connect External Monitor Connect the video cable to the Ground Station D Connect the other end of the video cable to the monitor projector TV Head up display etc If needed find the right AV channel...

Страница 19: ...changing the arm Is there any dust in the engines if yes clean with pressurized air Is the Battery installed and are the two white marks visible if no try a different battery Check if the Rotor blade...

Страница 20: ...or to go through a flight recorded by the Black Box to see how and where the drone was flying in a 3d model in Google Maps 2 Step 1 start the Black Box Viewer by selecting the icon on your desktop 3 S...

Страница 21: ...21 SKY WATCH HUGINN UPDATER...

Страница 22: ...1 Go to Sky Watch dk 2 Select login and use your X1 serial number and provided password to login If you do no not have a password please contact Sky Watch support info sky watch dk and have your X1 s...

Страница 23: ...logged in please download the latest version of the Huginn Updater 2 Select the file and follow the installation guide 3 Please make sure to watch any new videos concerning new software releases and...

Страница 24: ...24 Huginn Updater 1 Once installed Click the Updater icon now located on your Desktop 2 Type in the Username and Password you also use as login on the website Press OK...

Страница 25: ...e releases have been made they can be found in the Updater 2 To update Huinn X1 Ground station please connect it the computer Remember to only update one unit at a time 3 To update Navigator click Upd...

Страница 26: ...nn X1 if a new software is available before changing the com settings Remember to only update one unit at a time 2 Click the settings icon in the highlighted Huginn image 3 Communication channel must...

Страница 27: ...station if a new software is available before changing the com settings Remember to only update one unit at a time 2 Click the settings icon in the highlighted Ground Station image 3 Communication cha...

Страница 28: ...oad select how many Black Box files you wish to save to you local drive 4 1 Black Box file equals one flight A flight is recognized by the X1 from when the rotors start spinning until the drone is shu...

Страница 29: ...29 INSTALLING SKY WATCH NAVIGATOR...

Страница 30: ...gator Before starting installation of the Navigator please power on and connect the Ground station to the computer 1 Open Sky Watch Huginn Updater and login with username and password 2 Click install...

Страница 31: ...31 Installing Sky Watch Navigator 1 Click I Agree 2 If installation location changes is needed it can be done here if not then just click Next 3 Click Next to start installation 1 2 3...

Страница 32: ...Installing Sky Watch Navigator 1 Wait for installer to proceed Hauppauge and GeoServer installer windows will show 2 Hauppauge Follow installer instructions until it is done 3 GeoServer Click Next 1 2...

Страница 33: ...33 Installing Sky Watch Navigator 1 Click I Agree 2 If installation location changes is needed it can be done here if not then just click Next 3 Click Next 1 2 3...

Страница 34: ...34 Installing Sky Watch Navigator 1 If Java is installed just click Next if not then please install java http www java com 2 Click Next 3 Click Next 1 2 3...

Страница 35: ...35 Installing Sky Watch Navigator 1 Click Next 2 Click Next 3 Wait for GeoServer Installer to finish 1 2 3...

Страница 36: ...36 Installing Sky Watch Navigator 1 Click Finish 2 Click Close The Sky Watch Huginn Navigator have now been installed 1 2...

Страница 37: ...37 SKY WATCH NAVIGATOR...

Страница 38: ...38 Navigator Orientation Autonomous control Waypoint Advanced Waypoint Drag and Drop Camera Controls For use of online maps please remember to connect to the Internet...

Страница 39: ...offline overlay map The offline overlay map option can also be used while using online maps can will just act as a overlay to the online map To select a offline overlay map click the icon at the top...

Страница 40: ...ct the map material the user would like to use as well a the needed worldfile if the map if not a GEO TIFF file from the start When the user have selected a map make sure a name is typed in for this m...

Страница 41: ...d overall system status Elapsed time since take off Length of Route Distance to Home next target Connection Status Battery Level in Voltage Battery Level Indicator Green Yellow Red None Ground Station...

Страница 42: ...Start pause waypoint route Stop waypoint route Loop WP route Add WP Delete route Delete WP temp WP POI Delete last WP Save WP route Open WP route Enter waypoint edit mode Come home button Land take of...

Страница 43: ...43 Takeoff altitude Takeoff altitude can be changed for nomal takeoff and delayed takeoff default altitude is 6 meters...

Страница 44: ...to fly outside that zone If the waypoint route goes outside the fly only zone or if the huginn x1 should go out of the fly only zone a audio warning will sound The fly only zone can be edited in the d...

Страница 45: ...eight up by 10 or 1 Adjust height Down by 10 or 1 Climb Descent Before or after reaching the Waypoint Click a Waypoint to open Advanced Waypoints Click for Next Waypoint Click for Previous Waypoint Fl...

Страница 46: ...46 Save Waypoint Routes Enter a Route Name Enter a Route Description Press Save You can also export Route...

Страница 47: ...47 Load Waypoint Routes Thumbnail of the Route Only avalible if connected to the internet Select the Route the user would like to load...

Страница 48: ...mputers might experience lag when recording locally This will enable de interlacing of live video Warning slow or old Computers might experience lag when recording locally Measurement units Coordinate...

Страница 49: ...9 Camera Controls Zoom Out digital zoom Zoom In digital zoom Take snap shot from Navigator or Store on SD Card if HD cam is selected Record Video from Navigator or Store on SD Card Switch Video and Ma...

Страница 50: ...Camera Controls Press on screen to center Camera on that position Right click on screen to open full screen Video If using tablet with touch interface press and hold on screen to open full screen vid...

Страница 51: ...51 Full screen video Move Camera to top Auto Center Camera Move Camera to bottom...

Страница 52: ...52 Thermal Camera AUTO Calibrate inflight calibration Change between EO IR...

Страница 53: ...Pop up or by the X1 on the GUI turning yellow If it is the warning button on the GIU turning yellow do as following 1 Click on the yellow warning 2 Click on the Pop up which appear in the button of yo...

Страница 54: ...54 HAND LAUNCH HUGINN X1...

Страница 55: ...ay from ground control station 2 Place the Huginn X1 on the ground 3 Turn on the Huginn X1 4 Wait for rear red LED to turn off 5 Rest the Huginn X1 on your palm above your head in full reach Safety no...

Страница 56: ...n and selects take off 3 When the operator feels that the Huginn X1 is trying to break free the Huginn X1 has enough lift to take off the operator slowly pulls his her hand down and clear of the Hugin...

Страница 57: ...tion 2 Place the Huginn X1 on the ground 3 Turn on the Huginn X1 4 Wait for rear red LED to turn off 5 Press take off and select 15 sec delayed take off 6 Rest the Huginn X1 on your palm above your he...

Страница 58: ...or feels that the Huginn X1 is trying to break free the Huginn X1 has enough lift to take off the operator slowly pulls his her hand down and clear of the Huginn X1 moves back and away so as the Hugin...

Страница 59: ...59 MANUAL FLIGHT...

Страница 60: ...ush the top Button on the Controller C to initiate the takeoff or land procedure During Take off and land you are able to navigate the drone using the Joystick If C is released the drone will cancel t...

Страница 61: ...avigate the drone by moving the joystick in the direction the user would like to fly Forward is ALWAYS the direction of the camera As soon as the user releases the joystick the the Huginn X1 in a GPS...

Страница 62: ...Flight Up Down By pushing the lower button Z and pushing the Joystick upwards or downwards you can control height The drone will automatically stop when lowered to an altitude of approx 80 cm above t...

Страница 63: ...ystick to either side you can control the orientation of the drone It is recommended that you ALWAYS turn your body to the direction of the Huginn X1 Forward is ALWAYS the direction of the camera Only...

Страница 64: ...64 SAFETY...

Страница 65: ...65 Safety Instructions 20 to 40 Degree Core Temperature...

Страница 66: ...66 Failsafes Critical Battery Auto Land Loss of Signal Come Home Crash Detect System Shutdown...

Страница 67: ...67 SERVICE MAINTENANCE PAYLOAD CHANGE...

Страница 68: ...Allen Key Remove the Rotor blade holder by turning it counter clockwise Remove the Rotor blade holder by pulling it straight up Remove the ring if it is damaged Clockwise Pusher Clockwise Pusher Coun...

Страница 69: ...69 Changing an Arm Tools 1 5mm Allen Key Plier or Hand 1 2 Remove the Screw Pull the arm gently out turning the arm clockwise while taking out the arm make it easier to disconnect the arm...

Страница 70: ...1 Replace the Rotors if marks or cracks are present Clean the Battery Compartment for dust with a piece of cloth or pressurized air Clean the Sonar gently with a piece of cloth Replace the the landing...

Страница 71: ...71 Changing the Payload Payload Connector Press Buttons to release Do not remove camera while X1 is turned on Doing so may result in product damage...

Страница 72: ...72 Changing the SD Card SD Card Lit SD Card Push to access the card...

Отзывы: