background image

1

Warnings and Cautions

WARNING: 

This high-capacity flow-thru humidifier must be installed by 

a qualified heating and air conditioning contractor. 

Failure to comply could 

result in serious injury from electrical shock, or damage to the humidifier or heating 

appliance. Failure to comply could also void all warranties. 

!

ADDITIONAL WARNINGS: 

1.  To avoid serious injury or electrocution, 

disconnect electrical power to the 

furnace before starting installation. 

2. 

Use care when cutting plenum 

openings and handling ductwork.


Sharp edges may cause serious injury. 

3. 

Do not cut or drill any air conditioning 

or electrical accessories 

during 

humidifier installation. Electrocution is 

possible if you come in contact with a 

live electrical wire; blindness can occur if 

refrigerant contacts your eyes. 

CAUTIONS: 

1.  Do not install the unit where freezing 

temperatures could occur, or where 

temperatures could exceed 180°F 

(82.22°C). 

2.  Do not install the unit on a furnace jacket. 

3.  Do not install the unit on a plenum face 

where the blanked-off ends of the cooling 

coil restrict air movement through the 

humidifier. 

4.  Do not set the humidity level higher than 

recom mended. Condensation damage 

may result. 

5.  Do not set humidity up to recommended 

levels if there is condensation on the 

inside windows of any living space. 

Condensation damage may result. 

6.  Do not install the unit on any plenum 

where static pressure exceeds 0.4 in. 

(1.02 cm) W.C. 

7.  Do not install the unit where water 

pressure exceeds 125 psi (861.85 kPa). 

Leakage may result. Follow relevant 

codes regarding pressure reduction. 

8.  Be sure that the installation, wiring and 

plumbing on the humidifier comply with 

local codes, ordinances and regulations.

Humidifier Placement 

Mount the Model 

2002 Fan-Powered 

Flow-Thru Humidifier 

on the WARM AIR 

PLENUM ONLY. 

Position the humi-

difier as shown in 

relation to the AC 

cooling coils. 

Installation Instructions 



Содержание 2002

Страница 1: ...ntretien d un humidificateur Instructions pour l installation des modèles 2002 Humidificateurs à circula tion directe actionnés par des ventilateurs motorisés de grande capacité Page 12 Part No 000 0756 335 Skuttle Mfg Co 10 18 KD Contratista Lea estas intrucciones antes de instalar o dar mantenimiento al humidificador Instrucciones para la Instalación de los Modelos 2002 Humidificadores de Desvío...

Страница 2: ...Humidifier Placement 1 Step by Step Installation Instructions 2 Wiring Diagrams 4 Español 6 Français 12 Contractor Assistance Phone 888 SKUTTLE 758 8853 Email techservice skuttle com Web www goskuttle com Technical assistance is available in English only ...
Страница 3: ...ratures could occur or where temperatures could exceed 180 F 82 22 C 2 Do not install the unit on a furnace jacket 3 Do not install the unit on a plenum face where the blanked off ends of the cooling coil restrict air movement through the humidifier 4 Do not set the humidity level higher than recom mended Condensation damage may result 5 Do not set humidity up to recommended levels if there is con...

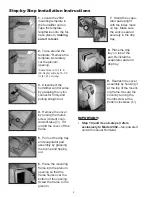
Страница 4: ...d upright with the index mark on top Make sure the wick is seated securely in the drip tray 8 Place the drip tray on top of the pad Reinstall the evaporator pad and drip tray 9 Reattach the cover assembly by hooking it at the top of the mount ing frame Secure the cover by turning the thumb screw at the bottom clockwise 1 Locate the 2002 mounting template in the humidifier carton Tape the template ...

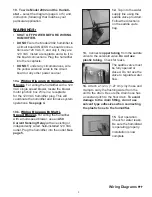
Страница 5: ...lled 120 VAC outlet Plug the humidifier into the outlet See page 5 12 Tap into the water supply line using the saddle valve provided Follow the directions on the saddle vavle bag WARNINGS SHUT OFF POWER BEFORE WIRING HUMIDIFIER DO NOT wire the Model 2002 humidifier to a circuit board UNLESS the board connec tions are 120 VAC If and only if they are 120 VAC install a receptacle and wire it to the b...

Страница 6: ...tlet Connected to the Single Speed Blower Motor 120 Volt AC Power Cord Plug into the Installed Outlet Connected to the Single Speed 120 Volt Blower Motor 120 Volt AC Blower Motor Single Speed Only Common Hot DO NOT CONNECT YELLOW HUMIDISTAT WIRES TO THE FURNACE CONTROL BOARD DO NOT CONNECT ELECTRICAL POWER TO THE YELLOW HUMIDISTAT WIRES Ground ...

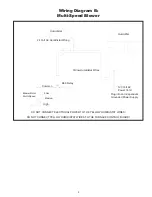
Страница 7: ...y Common Low Medium High 120 Volt AC Power Cord Plug into an Independent Grounded Power Supply DO NOT CONNECT YELLOW HUMIDISTAT WIRES TO THE FURNACE CONTROL BOARD Blower Motor Multi Speed DO NOT CONNECT ELECTRICAL POWER TO THE YELLOW HUMIDISTAT WIRES Wiring Diagram B Multi Speed Blower ...

Страница 8: ...o al cortar las aberturas para los plenum y al manipular los conductos Los bordes afilados pueden causar lesiones graves 3 Ni corte ni taladre ningún componente eléctrico o del aire acondicionado durante la instalación del humidificador Es posible la electrocución si se tiene contacto con un cable eléctrico cargado se puede quedar ciego si el refrigerante tiene contacto con los ojos PRECAUCIONES 1...

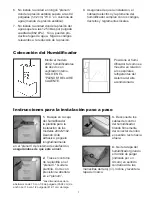
Страница 9: ...no de la plantilla en el plenum Quite la plantilla Corte con precisión la abertura en el plenum Las dimensiones de la abertura son de 13 con 1 8 de pulgada 33 34 cm de ancho por 16 con 1 2 pulgada 41 91 cm de largo 1 Busque en la caja del humidificador la plantilla para la instalación de los modelos 2002 2102 Usando cinta adhesiva péguelo longitudinalmente en el plenum del sistema de calefacción a...

Страница 10: ... en la parte inferior girándolo en sentido de las manecillas del reloj IMPORTANTE Paso 10 y sus subpasos se refiere exclusivamente al modelo 2002 ventilador de poder con humidistato manual AVISOS DESCONECTE LA CORRIENTE ELÉCTRICA ANTES DE PROCEDER CON EL CABLEADO NO CONECTE el humidificador modelo 2002 a un tablero de circuitos A MENOS QUE las conexiones del tablero sean de 120 VCA Si y sólo si so...

Страница 11: ...de tipo sillín incluida Siga las instrucciones impresas en la bolsa de la válvula tipo sillín 13 Conecte la tubería de cobre desde la válvula tipo sillín hasta la válvula del solenoide No use tuberías de plástico Revise para ver si hay fugas de agua La válvula tipo sillín debe estar comple tamente abierta o completamente cerrada No use esta válvula para regular el flujo del agua 14 Conecte una tub...

Страница 12: ...ente instalada al motor del ventilador de una sola velocidad de 120 VCA NO CONECTE NINGÚN TIPO DE CORRIENTE ELÉCTRICA A LOS CABLES AMARILLOS DEL HUMIDISTATO NO CONECTE LOS CABLES AMARILLOS DEL HUMIDISTATO AL TABLERO DE CONTROL DEL APARATO DE CALEFACCIÓN Toma a tierra Motor del ventilador de 120 VCA de una sola velocidad Salida de abastecimiento de 120 VCA puesta a tierra y conectada al motor del v...

Страница 13: ...ble de 120 VCA para el ventilador NO CONECTE NINGÚN TIPO DE CORRIENTE ELÉCTRICA A LOS CABLES AMARILLOS DEL HUMIDISTATO NO CONECTE LOS CABLES AMARILLOS DEL HUMIDISTATO AL TABLERO DE CONTROL DEL APARATO DE CALEFACCIÓN Humidistato Cableado para el humidistato de 24 VCA Cables amarillos del humidistato Diagrama B para el cableado Ventilador de múltiples velocidades ...

Страница 14: ...er les acces soires électriques ou de climatisation pendant l installation de l humidificateur Vous pourriez toucher un câble électrique sous tension et vous électrocuter ou recevoir du fluide frigorigène dans les yeux et risquer la cécité MISE EN GARDE 1 Ne pas installer l unité dans un emplace ment où la température pourrait descendre en dessous du point de congélation 32 F 0 C ou monter au dess...

Страница 15: ... de la fournaise à l aide d un ruban collant en vous assurant qu il est au niveau 3 Débrancher les câbles de contrôle de l humidificateur en attrapant fermement les capuchons de connexion en nylon puis en tirant dessus 4 Retirer le couvercle de l humidificateur du cadre de montage en faisant tourner la vis à serrage à main encerclé dans le sens contraire des aiguilles d une montre Faire basculer l...

Страница 16: ...es 10 10a et 10b s appliquent exclusivement au modèle 2002 ventilateur avec hygrostat manuel ATTENTION FERMER L ALIMENTATION ÉLECTRIQUE AVANT DE CÂBLER L HUMIDIFICATEUR NE PAS brancher l humidificateur modèle 2002 à une carte de circuit À MOINS que les branchements de la carte soient de 120 VCA Si et seulement s il y a 120 VCA installer une prise de courant et passer un câble jusqu au circuit Bran...

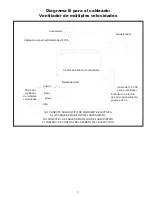
Страница 17: ...tuyau en plastique à l humidificateur 15 Faire un test Vérifier les fuites S assurer du bon fonctionnement de l hygrostat L installation est terminée 10b Diagramme du câblage B Ventilateur à plusieurs vitesses Pour le câblage d un ventilateur à plusieurs vitesses utiliser un relais détecteur pour le courant électrique A50 ayant déjà une prise de courant indépendante et sur place de 120 VCA Branche...

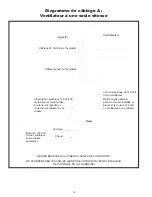
Страница 18: ...entation électrique 120 Volt CA Masse Moteur à 120 Volt CA du ventilateur à une vitesse seulement Commun Chaud Humidificateur Cordon électrique de 120 Volt CA du ventilateur Mettre la prise dans la prise de courant installée et brancher le moteur 120 Volt du ventilateur à une vitesse NE RIEN BRANCHER AUX CÂBLES JAUNES DE L HYGROSTAT NE PAS BRANCHER LES CÂBLES JAUNES DE L HYGROSTAT DANS LE TABLEAU ...

Страница 19: ...âbles jaunes de l hygrostat Commun Bas Moyen Haut NE RIEN BRANCHER AUX CÂBLES JAUNES DE L HYGROSTAT NE PAS BRANCHER LES CÂBLES JAUNES DE L HYGROSTAT DANS LE TABLEAU DE CONTRÔLE DE LA FOURNAISE Relais A50 Cordon électrique de 120 Volt CA du ventilateur Ventilateur à plusieurs vitesses Brancher dans une prise indépendante ...

Страница 20: ...cha de manufactura Véase la etiqueta en la unidad Date de fabrication voir l étiquette sur l unité Installation Date Fecha de instalación Date d installation 101 Margaret Street Marietta OH 45750 800 848 9786 740 373 9169 techservice skuttle com www goskuttle com ...

Отзывы: