Skriware Skriware 1 Скачать руководство пользователя страница 11

11

6. 3D printing

If it has been a while since the last time you used your Skriware 3D Printer or you have moved it around, you 
may want to level the 

printing platform

 (follow the instructions in the section 10. Levelling The Printing Platform 

on page 17) and wipe the 

magnetic bed

 with a rubbing alcohol and a clean cloth.

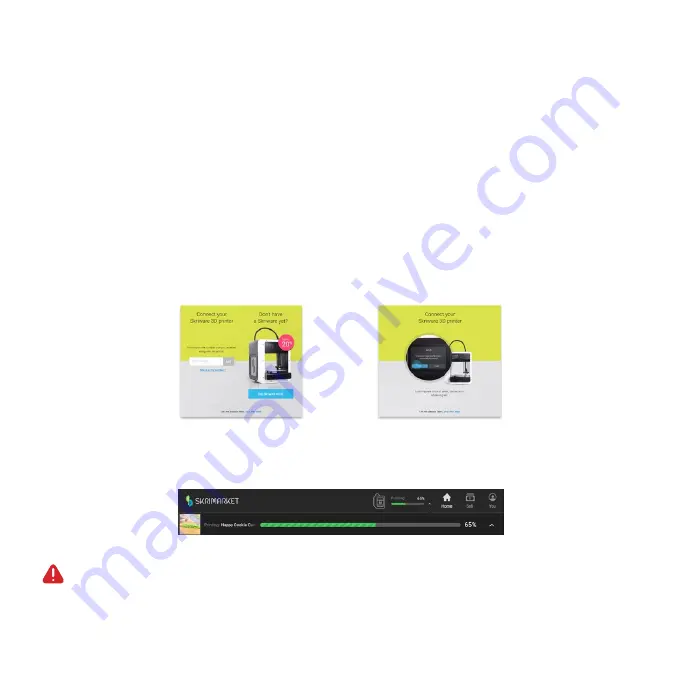
PRINTING FROM THE SKRIMARKET

For hassle-free 3D printing experience you will need a 

Skrimarket

 account and a Skriware 3D Printer paired with 

it. To do it go to 

www.skrimarket.com

 and create a new account. Follow the instructions online to register via 

e-mail or Facebook. After you log in click a printer icon on the top of the page and input a serial code that you will 

find in 

SETTINGS -> ABOUT

 on your Skriware 3D Printer. Confirm the pairing on the display. 

You can now browse the 

Skrimarket

 and print any model available simply by pressing Print on the model’s page. 

You will see a progress of your print next to the printer icon on 

Skrimarket

 and a pop-up prompt after it has 

finished.

After a finished print you will need to remove the printed model from the magnetic bed and confirm 

it with OK prompt on your Skriware 3D Printer’s display before printing another model.

If you are planning to print remotely remember to place the 

magnetic bed

 evenly on the 

printing platform


and to check if there is enough filament left for your chosen model!

Содержание Skriware 1

Страница 1: ...User Manual...

Страница 2: ...ls 3 Overview 4 First Set Up 5 Main Menu 6 3D Printing 7 Changing A Filament 8 Settings 9 Setting Up A Network Connection 10 Levelling The Printing Platform 11 Maintenance 12 Specifications 13 Trouble...

Страница 3: ...opefully using it will be as fulfilling for you as building it was for us To make it possible we packed your Skriware 3D Printer full of advanced features and functions We also strived to make it as u...

Страница 4: ...ne that may pull in a piece of clothing or clip a body part Risk of electrocution Skriware 3D Printer requires electric power to operate Always connect the power cable to a grounded power socket Never...

Страница 5: ...210 C 410 F At this moment ABS filaments are not supported due to the non heated magnetic bed of the Skriware 3D Printer so your results with this kind of material may vary Although Skriware 3D Printe...

Страница 6: ...2 3 1 Display 2 Side panel 3 Printing platform 4 USB port 5 Power button 6 Extruder s gantry system 7 Hotend 8 Magnetic bed 1 Ethernet port 2 Printer s power socket 3 Power cable 4 Filament spool 5 Sp...

Страница 7: ...not pull the black cord with the yellow warning sticker it is not a handle and place it on the designated working surface Make sure it is stable and level Remove the foams securing the extruder s gant...

Страница 8: ...d list and input your Wi Fi password Skriware 3D Printer will confirm the successful connection via blue Wi Fi or ethernet icon in the the top right corner of the display Pair with Skrimarket To pair...

Страница 9: ...are located under the printing platform They may seem difficult to turn at first Run a test Your Skriware 3D Printer comes preloaded with a filament of your choice Run a test print to ensure everythin...

Страница 10: ...CANCEL be careful Make sure the HOT sign disappears before doing anything in the extruder s vicinity FULL UP Docks the printing platform in the front of the Skriware 3D Printer and extruder s gantry s...

Страница 11: ...acebook After you log in click a printer icon on the top of the page and input a serial code that you will find in SETTINGS ABOUT on your Skriware 3D Printer Confirm the pairing on the display You can...

Страница 12: ...ing the model You will see current temperature time elapsed and the progress bar with a percentage reading press each for an alternative information You can CANCEL the print anytime or PAUSE it If you...

Страница 13: ...Do not touch the extruder and its vicinities while HOT warning is displayed The filament will now unload It should take about a minute When it has finished open the side panel and pull out the remain...

Страница 14: ...10 cm 4 in until you feel it won t go in anymore Press CONTINUE Keep pushing the filament lightly until you feel it being pulled into the filament loading tube Do not push filament forcefully Once you...

Страница 15: ...t more about us and how to contact us UPDATE Your satisfaction is paramount to us so we will be adding new features and squashing bugs via updates Your Skriware 3D Printer checks for them every time i...

Страница 16: ...the back of your Skriware 3D Printer To connect wirelessly press SETTINGS in the main menu then NETWORK and CONNECT TO WI FI after that Your Skriware 3D Printer will scan for available networks Choose...

Страница 17: ...ials are located under the printing platform They may seem difficult to turn at first In the main menu go to SETTINGS then press LEVEL Read the prompt and click CONTINUE All three dials need to be adj...

Страница 18: ...mm h 5 9 in w x 5 9 in d x 5 1 in h Wifi Ethernet USB port and Skrimarket 1 75 mm 0 007 in PLA 330 mm w x 345 mm d x 425 mm h 13 0 in w x 14 8 in d x 16 7 in h 235 C 455 F 10 30 C 50 86 F Automaticall...

Страница 19: ...evices can connect to it Skriware 3D Printer does not support 5GHz networks Make sure the power cable is connected the power switch is in 1 position and press the power button Clean the magnetic bed w...

Страница 20: ...d to technical or any matter do not hesitate You can reach us by mail on info skriware com or message us on Facebook facebook com skriware For all the technical issues write to support skriware com En...

Отзывы: