7
• For an optimal use of the tool a steady pressure on the
screw is required, especially while removing
• When screwdriving in hard wood one should pre-drill a
hole
MAINTENANCE / SERVICE
• This tool is not intended for professional use
• Always keep tool clean (especially ventilation slots
1
)
! remove battery from tool before cleaning
• Be aware that damage due to overload or improper
handling of the tool will be excluded from the warranty
ENVIRONMENT
• Do not dispose of electric tools, batteries,
accessories and packaging together with household
waste material. The electric tools, accessories and
packaging should be sorted for environmental-friendly
recycling
! prior to disposal protect battery terminals with
heavy tape to prevent short-circuit
-
the battery temperature is not within the allowable
operating temperature range of -20 to +50°C --> 2
levels of the battery level indicator start flashing when
pressing button
8
c; wait until battery has returned
within the allowable operating temperature range
-
the battery is nearly empty (to protect against
deep discharge) --> a low battery level or flashing low
battery level
8
b is shown by the battery level indicator
when pressing button G; charge battery
! do not continue to press the on/off switch after the
tool is switched off automatically; battery may be
damaged
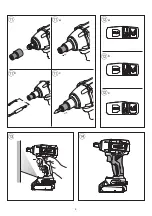
• Changing direction of rotation
9
-
when not properly set in left/right position, switch
cannot be activated
! change direction of rotation only when tool is at a
complete standstill
• Changing sockets
q
-
for removing a socket, simply pull it off square drive
-
for mounting simply push a socket onto square drive
until it locks into place
! only use sockets with a 1/2” square drive
! do not use damaged sockets
• Changing bits with hex adapter
w
-
mount hex adapter onto square drive
-
pull the locking sleeve forward, insert the bit to the stop
into the bit holder and release the locking sleeve to lock
the bit.
-
to remove a bit, pull the locking sleeve forward
! only use bits with ball catch, other bits can be
used with a universal bit holder with ball catch
q
b
! do not use bits with a damaged shank
• Mode selection
e
-
press the mode selector to select the desired mode:
Low speed mode (L)
e
a
-
tightening when fine adjustment is needed
-
for smaller screws and bolts
High speed mode (H)
e
b
-
tightening with high force and speed
-
for large screws and bolts
Reverse control mode
e
c
-
for loosening bolts and nuts
-
stops when the bolt is loosened
! reverse control mode is only available with reverse
rotation; in forward rotation it is used for high
speed
! modes can only be changed after slightly pressing
the on/off switch (green LED(s) are activated) and
when the tool is at a complete standstill
• Holding and guiding the tool
t
! while working, always hold the tool at the grey-
coloured grip area(s)
-
keep ventilation slots
1
uncovered
-
do not apply too much pressure on the tool; let the tool
do the work for you
APPLICATION ADVICE
• Use the appropriate bits
• When turning in a screw at/near the cross cut end or an
edge of wood, pre-drill a hole in order to avoid cracking
of the wood


