44
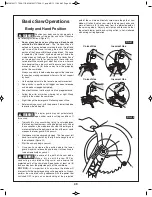
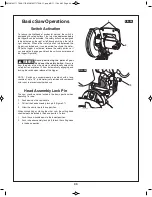
Switch Activation
To reduce the likelihood of accidental start-up, the switch is
equipped with safety buttons
1
that must be depressed before
the trigger
2
can be activated. The safety buttons are designed
to be activated by the right or left thumb pushing in the left to
right direction. When either safety button is depressed, the
trigger is unlocked and it can be pulled to activate the motor.
Once the trigger is activated, release the safety button so it
can automatically engage and lock the switch upon release of
the trigger (Figure 26).
Avoid positioning the palm of your
hand over the safety button.
Pressure
from the palm of your hand may unintentionally unlock the
safety button or prevent it from automatically engaging and
locking the switch upon release of the trigger.
NOTE: Switch can accommodate a padlock with a long
shackle of up to 1/4” in diameter (not provided with compound
miter saw) to prevent unauthorized use.
Head Assembly Lock Pin
The saw should never be locked in the down position when
operating. To raise:
1.
Push down on the saw handle.
2.
Pull out the head assembly lock pin
3
(Figure 27).
3.
Allow the saw to rise to the up position.
When transporting or storing the miter saw, the cutting head
should always be locked in the down position. To lock:
1.
Push the saw handle down to the lowest position.
2.
Push in head assembly lock pin
3
to lock the cutting head
in the down position.
Basic Saw Operations
15
45
33.9
30
2
1
1
15
0
45
33.9
30
3
FIG. 26
FIG. 26
WARNING
!
SM 2610017175 08-11:SM 2610017175 08-11.qxp 8/2/11 11:24 AM Page 44

