background image

11

SIR-PAN1 Operation and Installation Guide

11

SIR-PAN1 Installation Guide

You must activate the SIR-PAN1 before
you can start to receive the SIRIUS
Satellite Radio broadcast.

1. Make sure that the SIR-PAN1 is

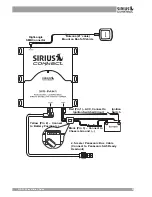
properly connected and that the
antenna is oriented to receive the
SIRIUS satellite signal.

2. Turn on the Panasonic headunit.
3. Press and release the

 SOURCE

button on the headunit to select
SIRIUS as the source. (Each press
of the SOURCE button will change
to a different audio source.)

4. The display will read “UPDATING”

until the SIR-PAN1 channel update
is completed. This is where the
latest channel line up is updated on
the SIRIUS tuner.

     NOTE: Don’t push any buttons

or perform any operations until
updating has been completed.
Once updated and the SIRIUS
channels are received, the display
will change to “Call 1-888-539-SIRIUS
to Subscribe” and will place you in
SIRIUS Satellite Radio’s Preview
Channel (Channel 184). You Should
be able to hear the SIRIUS Preview
channel’s Audio.

5. Use the     /     buttons to select to

Channel “000” on the display to
bring up the SIRIUS ID (SID).

6. The unit will display “CH000”,

followed  by “ESN
XXXXXXXXXXXX”.  The SID will
be displayed in each of the Artist,
Song Title, and Composer Fields of
the Display – Example “ESN
123456789123.” Write down the 12
digit SID in the location provided on

the next page for future reference.
(See the Panasonic Owners
Manual for more information.)

7. Contact SIRIUS on the Internet:

https://activate.siriusradio.com
Follow the prompts to activate your
subscription.
You can also call SIRIUS toll-free at
1-888-539-SIRIUS (1-888-539-
7474).

8. You will not be able to tune to any

other channels until you activate
your SIRIUS subscription. After
your SIR-PAN1 is activated, you
will be able to change channels and
hear the audio playing.

Note: The SID can also be found on
the sticker that is on the bottom of the
SIR-PAN1 and on the packaging that
the unit was packed in.

Basic Operation

The SIR-PAN1 SIRIUS Satellite Radio
Tuner is compatible with 2006 models
of Panasonic headunits that are
designated as “SAT RADIO READY”.
The following models are compatible:

Activating Your SIRIUS Subscription

CQ-C3303U
CQ-C3333U
CQ-C3403U
CQ-C3433U
CQ-C5303U
CQ-C5403U

CQ-C7103U
CQ-C7203U
CQ-C7303U
CQ-C7403U
CQ-C7413U
CQ-C8303U

CQ-C8403U
CQ-C8413U
CQ-C8803U
CQ-VD6503U
CQ-VD7003U

Consult the Panasonic or SIRIUS
Customer Support Departments for more
information about compatibility.

Please consult your Panasonic owner’s
manual for proper operation instructions
for using satellite radio products.

Содержание SiriusConnect SIR-PAN1

Страница 1: ...Installation Guide SIR PAN1 PANASONIC COMPATIBLE SIRIUS SATELLITE RADIO TUNER...

Страница 2: ...ess concern for buildings trees or other objects that might block conventional satellite signals Once you experience more than 125 channels of digital entertainment you ll never want to leave your car...

Страница 3: ...g Locations 7 Wiring and Cable Connections 8 System Connection Examples 10 Activating Your SIRIUS Subscription 11 Specifications 12 Warranty 13 Package Contents A B C SIR PAN1 Tuner Mini Magnetic Ante...

Страница 4: ...N LOCATIONS THAT MIGHT HINDER VEHICLE OPERATION Doing so may obstruct vision or hamper movement which can result in a serious accident DO NOT INSTALLTHE UNIT TO HIGH LEVELS OF HUMIDITY MOISTURE OR DUS...

Страница 5: ...the wiring If the wiring must pass through a metal hole be sure to use a rubber grommet to prevent the wire s insulation from being cut by the metal edge of the hole USE THE SPECIFIEDACCESSORY PARTSA...

Страница 6: ...is free from moving parts fuel or break lines wire harnesses or any other items which may get damaged by drilling a mounting hole or using the supplied screws Installing the Antenna The antenna includ...

Страница 7: ...mounted in a good location Route the cable from the antenna to the vehicle s interior by tucking it underneath the rubber molding around the rear window if possible Route the cable from the lowest poi...

Страница 8: ...Panasonic headunit See System Connection Examples for more specific details Power Harness Connector After the wiring connections are complete plug the wiring harness into the connector Make sure to in...

Страница 9: ...OUT IN 2 5 meter Panasonic Bus Cable Connect to Panasonic SAT Ready Headunit Antenna 21 cable Mount on Roof of Vehicle Black Pin 3 Connect to Chassis Ground Yellow Pin 2 Connect to Battery Positive Ri...

Страница 10: ...DIO TUNER SIR PAN1 PANASONIC COMPATIBLE SIRIUS SATELLITE RADIO TUNER System Connection Examples System 1 Panasonic Headunit and SIR PAN1 Panasonic CD Changer System 2 Panasonic Headunit CD Changer and...

Страница 11: ...each of the Artist Song Title and Composer Fields of the Display Example ESN 123456789123 Write down the 12 digit SID in the location provided on the next page for future reference See the Panasonic...

Страница 12: ...3 8 WxHxD 105mm x 126mm x 35mm WxHxD Chassis Size with Mounting Tabs 4 7 8 x 5 x 1 3 8 WxHxD 127mm x 126mm x 35mm WxHxD Weight 0 528 kg 1 16 lbs Antenna Type Mini Magnetic Antenna Cable Length 21 sin...

Страница 13: ...s THE EXTENTOFTHE COMPANY S LIABILITYUNDERTHIS WARRANTY IS LIMITED TO THE REPAIR OR REPLACEMENT PROVIDED ABOVE AND IN NO EVENT SHALLTHE COMPANY S LIABILITY EXCEED THE PURCHASE PRICE PAID BY PURCHASER...

Страница 14: ...nc SIRIUS and the SIRIUS dog logo are registered trademarks of SIRIUS Satellite Radio Inc SIRIUS Satellite Radio 1221 Avenue of the Americas New York NY 10020 888 539 7474 www sirius com Panasonic SIR...

Отзывы: