background image

36


Singer Furura XL-550

Removing base , front and back covers cont.

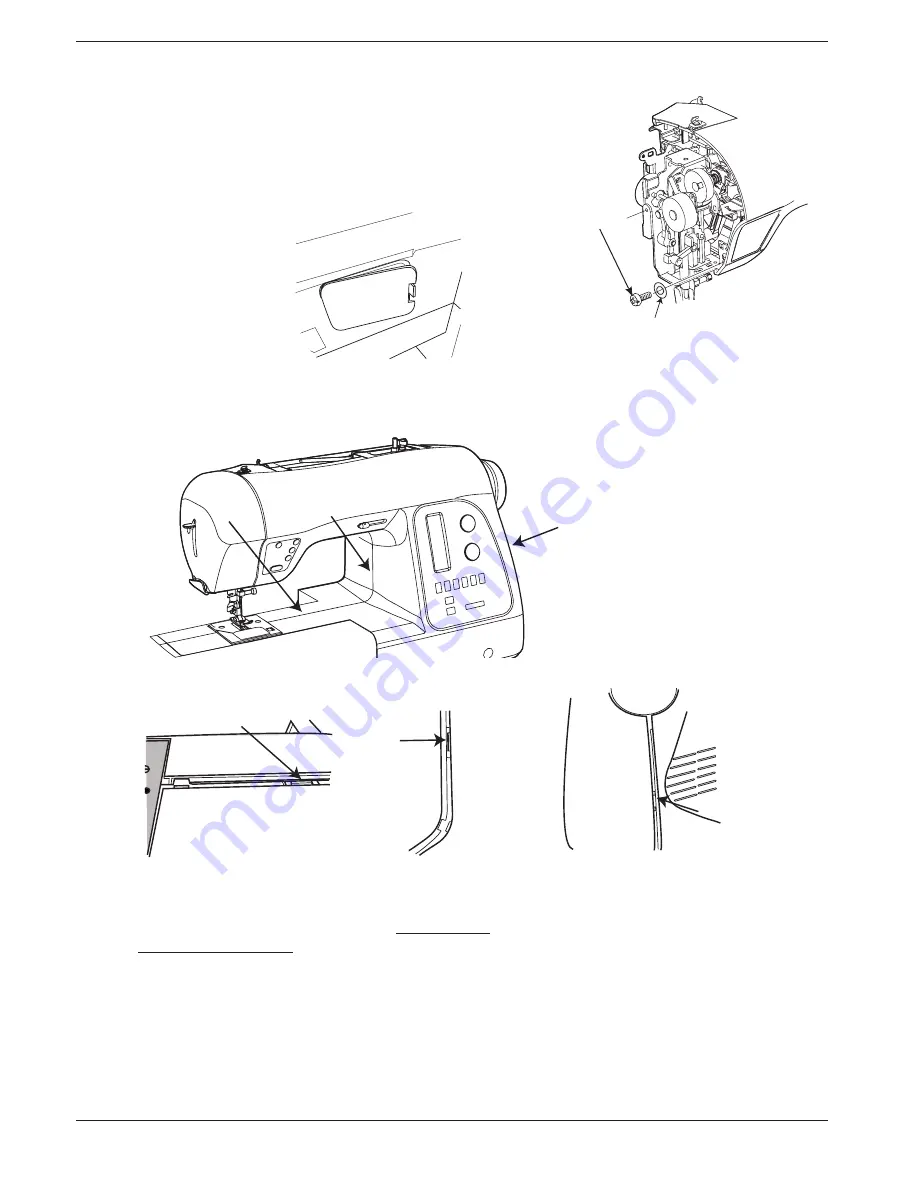
6. Remove the Screw (H) and washer (I) from the front cover.

7. Lay the machine down and remove the stitch balance cover,located on the free arms lower side
Usa Small Screw driver and push the rid located on the left side.

8. Us a small fl at screw driver and insert it from the back and at positions (J), (K) and (L)  
and lift up the Front Cover to un-hook the taps on the front cover from the back cover.
Once its a gap between the front and back cover at position  (J), (K) and (L) , the front cover can be remo-
ved.

9. Lift up the front cover a bit and disconnect the Multi cable from the Main PC Board.
To do this just pull the cable to the front to realese it from the PC board contact.

10. Presser foot lifter to its down position.

11. Remove the back cover. 

H

I

L

K

J

K

L

J

Содержание XL-550

Страница 1: ...Service Manual 104 73 19 26 12 May 2011 XL 550 2011 SVP Worldwide All Rights Reserved ...

Страница 2: ...ining bracket for bobbin case 20 16 The Timing of take up lever in relation to the hook 21 17 Play of gears for take up lever 22 18 Parallelity of needle bar swing 23 19 Needle clearance to hook 24 20 Alignment of needle plate to hook 25 21 Bobbin case thread tension 26 22 Upper thread tension unit 27 Function mode of sewing machine thread sensor deactivated 28 Test mode of sewing machine 29 Apply...

Страница 3: ...euillez noter qu en cas de destruction ce produit doit bénéficier d un recyclage sécurisé conforme à la législation nationale applicable aux produits électriques électroniques En cas de doute veuillez contacter votre distributeur agréé Bitte beachten Sie dass hinsichtlich der Entsor gung dieses Produkts vorschriftsmäßig entspre chend der gültigen nationalen Gesetzgebung für elektrische elektronisc...

Страница 4: ...oorer results on more normal fabrics How the different standard ratings are set can be seen from the description under each setting instruction The following list of setting gauges and service tools is intended as an instruction about the special service tools needed to servicing this machine 1 On several different occasions the needle is used as a setting gauge The setting ratings are adapted to ...

Страница 5: ...just touch the upper part of hook ring C The check is done with a gauge which is 28 95 mm long Adjustment The setting is done with a gauge which is 28 95 mm long 1 Remove face cover 2 Bring the needle bar to its highest position from the front loosen set screw A and retighten it lightelly 3 Bring the needle bar to its lower turning position 4 Move the needle bar until the correct distance is obtai...

Страница 6: ...ustment of threader hook hightways 1 Insert a new 70 needle 2 Remove the face cover 3 Turning the hand wheel by hand to so the needle bar comes to its highest position 4 Loosen screw A of the threader stopper 5 Go down with the threader hook into the needle eye 6 Move the threader holder so that the threader hook is on the upper side of the needle eye see Fig 1 7 Tighten the screw B Make sure to a...

Страница 7: ...o the needle bar comes to its highest position 4 Remove screw K that holds the Thread stop pipe 5 Loosen the nut F located under threader support shaft 6 Go down with the threader hook into the needle eye 7 Turn the hook until the tip of threader hook is approx 1 5 mm out side the needle on the front side 8 Tighten the nut F 9 Re position the Thread stop pipe and Enter the screw K Tip of needle sh...

Страница 8: ...th the feed dog drop mechanism so it is below the needle plate 3 Raise the presser foot to its heighest position 4 Loosen the set screw D and adjust the presser foot height by moving the presser bar up or down 5 Tighten the set screw D securely 6 Lower the presser foot and check so the presser foot is parallel with the needle plate slot B if not a Raise the presser foot b Loosen up set screw D and...

Страница 9: ... 3 The hole for needle C in the Needle plate should pe parallel front to back to the presser foot s A hole Adjustment Front to back 1 Lower the presser foot and check so the presser foot is parallel with the needle plate slot B if not a Raise the presser foot b Loosen up set screw D and adjust the parallelity of the presser foot by move the Presser bar to the front or to the back 7 Tighten the set...

Страница 10: ... on the left side as on the right side of the presser foot to the feed dog slot Adjustment side ways 1 Remove the face cover 2 Lower the feed dog with the feed dog drop mechanism so it is below the needle plate 3 Loosen the three set screws A and adjust the presser foot side setting by moving the presser bar unit B so it s same distance on the left side as on the right side of the presser foot to ...

Страница 11: ...og ishould now be 0 9 to 1 1 mm above the needle plate Adjustment 1 Bring the feed dog to its highest position 2 Remove the needle plate 3 Loosen up the nut A 4 Adjust by turning the screw B until a correct feed dog height 0 9 1 1 mm is obtained Turn clockwise It will be higher Turn counter clockwise It will be lower 5 Tighten the nut A 3 Mount the needle plate and Re check the feed dog height 0 9...

Страница 12: ...h 2 To adjust the Feed dog timing loosen up the 2 set screws A on the Lower shaft B 3 Insert a hex driver into one of the screws If feed dog motion too early Hold the hex screw in position and turn hand wheel towards you If feed dog motion too late Hold the hex screw in position and turn hand wheel away from you 4 Tighten the set screw A on the main shaft B 5 Turning hand wheel and set the needle ...

Страница 13: ...en ONLY screw 2 at feed step motor gear A which is fixed with stepping motor axis for feeding 4 Turn on machine and select button sewing Zero feed NOT If both screws are loose at this point error 6 will apper in display 5 Loosen screw 1 at pinion gear A The feed step motor gear is now disengaged from the motor 5 Rotate feed step motor gear A and then tighten screw 2 at a position where pinion gear...

Страница 14: ...emoving the front and the rear covers Only the base plate should be removed before adjustment Check of stitch balance After checking or setting the Zero feeding the fine tunning of the stich balance has to be done 1 Turn on the machine select a large key button hole in normal se wing mode 2 Thread up the machine 3 Sew larger size of keyhole buttonhole and the balance of the head portion should be ...

Страница 15: ...ition After needle position is shifted to center temporally fix the screw 1 4 Turn on the main power and pinion gear will move so that screw 1 may be located upward and then loosen screw 1 After above steps the motor shaft will be excited so the shaft will not move and pinion gear can be rotatable Rotate pinion gear A again until it hits with stopper B then tighten screw 2 by inserting tool from l...

Страница 16: ... 3 The needle position should now be in the centre of the middle slots of needle plate see illustation 1 Adjustment 1 Remove face cover 2 Break loose the 2mm hex set screw A 3 Turn eccentric screw B on needle bar until the needle is in the centre of the middle slots of needle plate see illustation 1 4 Tighten the 2 mm hex set screw A Needle position A B ...

Страница 17: ...ose Too weak tension may result in slippage between hook gear and lower shaft gear due to thread jamming bunching and fabric snagging Too strong tension may result in incorrect operation due to increased machine torque Adjustment 1 Loosen two screws A on support plate for idler pulley 2 Move the position of idler pulley ontil the correct belt tension is obtained 3 Tighten the two screws B A ...

Страница 18: ...ush it upwards against the needle bar frame C 3 Take then the timing clamp and put it on the needle bar and tighten its screw lightly 4 Take a 2 8 mm feeler gauge A and put its cutout on the needle bar above the clamp 5 Loosen the clamp a little and push both feeler gauge and clamp upwards against the spacer 6 Tighten the screw on the timing clamp 7 Remove the 2 8 mm feeler gauge A 8 Turn the hand...

Страница 19: ...k and forth with the finger tip to check the play a play should be found in two or three diffrant positions no play should be found on one position max two positions Adjustment 1 Remove backcover and frontcover 2 Loosen screw B holding the bearing clamp 3 By using the slot C and turn the eccentric bearing A the play can be adjusted NOTE The hole C in the bearing shall always be to the front B A C ...

Страница 20: ... the lower side of plate spring s alignment line D as illustrated below Adjustment 1 Loosen screws A and B 2 Move the retaining bracket in either direction as illustrated tighten screw B temporarily 3 Check if bobbin case stop C is aligned with the lower side of plate spring s alignment line D as illustrated below 4 Tighten screw A C ...

Страница 21: ...hould be in its upper turning position Adjustment 1 Remove front cover 2 Loosen two hex screws on main shaft gear which is engaged with take up operating gear B 3 Set the hook to its setting position A then should the needle bar be its in its upper turning position 4 While inserting screw driver into accessible hex screw turn main shaft in either way to get correct ti ming of take up lever to shut...

Страница 22: ...hould not be play at 4 positions of the gear and it should not be tightened too much 3 Also check to see if there is no play of gear A vertically Adjustment 1 Loosen screws C D fixing eccentric gear shaft Rotate gear clockwise to hit slightly to another gear this will be eccentric situation 2 Adjust by turning gear shaft B slightly while pushing it with screw driver as shown since the gear shaft t...

Страница 23: ...et 16 Needle clearance to hook Adjustment 1 Remove needle plate bobbin case and face cover 2 Set machine at test mode and select mode 2 for needle at L C R positions 3 Loosen the set screw A on the needle bar unit see illustrated below 4 Adjust by moving shifting bracket B If needle touches the hook at left side move the shifting bracket B to the right If needle touches the hooks at right side mov...

Страница 24: ... 0 15 mm Adjustment 1 Always check 14 Parallelity of needle bar swing before any adjustment is done 2 Remove needle plate bobbin case and face cover 3 Turn on machine and Select stitch number 33 Set Zigzag width to the maximum of 7mm 4 Turn screw A for support shaft and adjust needle position until the correct needle clearance is obtanied To decrease clearance turn screw A to clock wise To increas...

Страница 25: ...d to the needle hole as shown below Adjustment 1 Remove needle plate 2 Loosen the two hexagonal screws A 3 Adjust the needle plate position with the two plate stopper plates B located at either side of feed dog so that to needle is in its centre position of the needle hole in the needle plate when looking from the side of the machine 4 Tighten the the two screws A on the stopper plate securely A B...

Страница 26: ...se shall give a resistance of 10 14 g when pulling the thread slowly using normal polyester thread Adjustment 1 Insert a full bobbin into the bobbin case use normal polyester thread 2 Pull the thread slowly and turn screw A until the correct thread tension is obtained NOTE Remove any loose pieces of thread or fluff from the thread tension discs before any adjustment is done A ...

Страница 27: ...ard A 5 Remove screw C and then the adjustment dial 6 Rotate Thread tension wheel E to adjust tension to be set Standard is 55 65gr at S position Rotate anticlockwise to increase tension Rotate clockwise to decrease tension Adjust tension while measuring it by tension gauge 7 Fit the dial to Thread tension wheel after adjustment It is needed to fit the dial at same position as it was before taking...

Страница 28: ...he machine will run without thread Handling Go to the Function mode of the machine by pressing buttons 1 and 3 Arrow up and 5 while the main switch is switched on See illustration below Sewing function mode In Function mode all stitches are the same as in Normal sewing mode Embriodery function mode In Functions mode when operating the embroidery mode of machine it must be connect to a PC through a...

Страница 29: ...e by 1 Put on a bobbin 2 Move bobbin winder stop to the left for bobbin winding 3 Press the reverse stitch switch and turn on power switch at the same time 4 When the sand clock appers in the display 5 Move bobbin winder stop to the right and release the reverse button 6 In the it should say 101 in the display In case of embroidery sewing enter the Em briodery unit before enter the test menu 1 2 5...

Страница 30: ... zig zag stepmotor calibrates and takes its Centre position Display No 103 Mode 3 Balance check Machine will feed 2 mm at center position stitch 11 needles forward and backward Needle must always stop at the staring stitch Display No 104 Mode 4 Bobbin thread brake sensor Is for chrcking the bobbins sensor Machine will feed 0 5 mm at center position The top thread detection is deactivated Display N...

Страница 31: ...not be received 3 Rotate trimmer either way to adjust sensitivity of the sensor while checking number displayed on LCD It is needed to be set very close to 01 but not to 01 range 00 should be displayed on LCD This set ting will not stop the machine with bobbin A 4 Then replace bobbin A with bobbin B 5 Start the machine with bobbin B and check to see whether 01 will be displayed on LCD If 00 or 02 ...

Страница 32: ...isplay No 103 Mode 3 Sew 4 corners lower left upper left upper right lower right lower left and stop Display No 104 Mode 4 Sew 4 corners lower left lower right upper right upper left lower left and stop Display No 105 Mode 5 Sew diagonal from upper right lower left continuously Display No 106 Mode 6 Sew diagonal from upper left lower right continuously Display No 107 Mode 7 Sew large diamond shape...

Страница 33: ...lled Large hoop installed Small hoop installed No switches activated 3 switch activted 1 switch activated Circle hoop 40 installed Medieum hoop installed Endless hoop installed 1 and 3 switch activated 1 and 2 switch activted 2 and 3 switch activated Two station hoop installed at pos A Two station hoop installed at pos B 1 2 and 3 switche activated 2 switch activated ...

Страница 34: ...ether and remove the face cover 4 Remove screw cap D with and aid of needle 5 Remove the screw E then remove the Thread cutter cover F 6 Remove the screw G that holds the bobbin winding latch 7 Remove the bobbin winding latch H 8 Remove the screw I for the bobbin winding cover 9 Remove the bobbin winding cover J by push on the cover at marked area K to realese the hooks 10 Remove the two screws L ...

Страница 35: ...irst 1 Remove the two screws A and the screw B 2 Lay the machine down and remove the two screws C 3 Remove the two screws D located in the center of the base plate 4 Remove the two screws E located on the side and remove the base plate 5 Remove the two screws F and G located back cover of the machine A B D D C C E E G F ...

Страница 36: ...driver and insert it from the back and at positions J K and L and lift up the Front Cover to un hook the taps on the front cover from the back cover Once its a gap between the front and back cover at position J K and L the front cover can be remo ved 9 Lift up the front cover a bit and disconnect the Multi cable from the Main PC Board To do this just pull the cable to the front to realese it from ...

Страница 37: ...motor thread cutter with lever switch CN6 Step motor for feed material with lever switch CN7 Drawer connector for embroidery unit CN8 Bottom thread sensors In put sensor out put sensor LED CN9 Not use CN10 Needle plate detector CN11 Foot control jack CN12 USB connector CN13 Bobbin winder switch CN14 CAM sensor switch CN15 BH sensor CN16 BH lever switch CN17 Top thread sensor CN18 LDE lamp CN19 Mot...

Страница 38: ...then remove accessory drawer and three tapping screws at drawer side 1 2 and 3 And also remove another four screws 4 5 6 and 7 marked with symbol Push top cover along with an arrow shown below Top cover and embroidery unit are attached by hooks Release two hooks on each side to remove top 1 2 3 4 5 6 7 ...

Страница 39: ...a screw on side of carriage cover 2 Remove two screws on the back of carriage cover 3 Remove carriage cover by removing it from hooks Note Make sure to attach two square holes into projections correctly on the board at motor side when you attach carriage cover ...

Страница 40: ...xis Adjustment X axis 1 Loosen screw 1 and adjust position of braking plate B which passes through sensor A Then check the position again Adjustment Y axis 1 Loosen screw 2 and adjust position of braking plate D which passes through censer C Then check again the position 1 B A C 2 D ...

Страница 41: ...Singer Furura XL 550 41 ...

Страница 42: ... shaft and turn hook portion G in either way for adjustment Tighten the nut F securely after adjustment 4 Reassemble outer pipe J to correct position 5 After checking hook position adjust position of outer pipe J so that there may be a clearance 0 4 to 0 6 mm between screw K and bottom of long hole 6 Position of twin thread guide and hook is shown below with threading lever lowered K 1 5 mm 0 4 0 ...

Отзывы: