Singer PROFESSIONAL SEW-WARE 2.00A Скачать руководство пользователя страница 23

 21  

Setup of the computer in PSW 2.00a program 


6.  Open a design from the Library in the PSW as a “test” design. 


7. Click 

on 

File

.  Select the option 

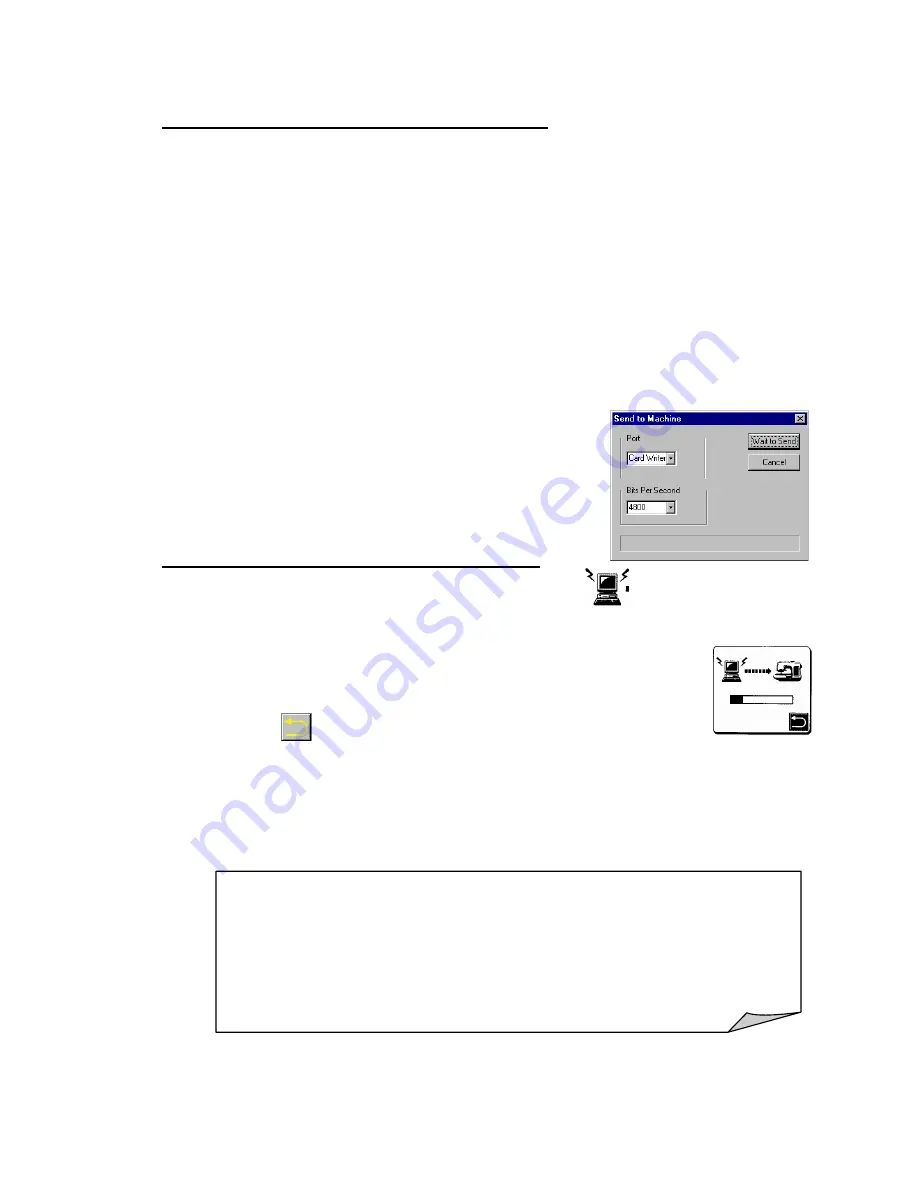
Transmit to machine


8. Dialog 

box 

Send to Machine

:  

 Select 

Port

.   

 Setup 

1) 

Card Writer 

(connected via the converter).  

 Setup 

2) 

COM Port #

 used on the PC (connected directly to PC). 

 Select 

the 

Bits per second

 value for the PC of 38400. 


To transfer data from PC to Quantum

®

 XL-6000 the same transfer rate must be 

selected.     


9. Click 

on 

Wait to Send


10.  Setup of the computer is done. 


Transfer data from PC to Quantum

®

 XL-6000 

11. On 

help screen

 in Quantum

®

 XL-6000 touch  

  pictogram (upper left 

hand corner). 


12.  Computer to sewing machine. Data being transferred from 

one to the other. 


13.  Touch   

  to get out of help screen. 


14.  Design transferred will appear on the LCD screen of the Quantum

®


XL-6000, ready to be used like any built-in designs.  


NOTE:  


Setup of Quantum

®

 XL-6000 and computer only has to be done 

once. 


If the design does not transfer at the “rate” selected. 


Change selection in the Quantum

®

 XL-6000 and the computer to a 

different number. 

Содержание PROFESSIONAL SEW-WARE 2.00A

Страница 1: ......

Страница 2: ...4 04 PROFESSIONAL SEW WARE 2 00a BASIC TRAINING GUIDEBOOK Singer and Professional Sew Ware are registered trademarks of the Singer Company limited 2002 Singer Sewing Company All rights reserved Part 6...

Страница 3: ...ower indicator Converter is plugged in 2 Transfer indicator Converter is transferring data when flashing 3 CANCEL Press to terminate a procedure before removing card 4 Press to copy data from SmartMed...

Страница 4: ...5 Click a sub category to access an interactive guide pertaining to that subject NOTE To set the PSW 2 00a to read in another language a Close the Tutorial b Go to Main Menu and select Parameters Syst...

Страница 5: ...2 Properties for selecting stitch type and defining respective parameters 13 Stitch Type 14 Density Size displays density or stitch length value 15 Number of Stitches displays current number of stitch...

Страница 6: ...Click on the design name then click OK 5 The Open Image dialog box appears Click Cancel and the selected design appears on screen IMPORTING IMAGE FILES FILE NEW To import a new image go to the Main M...

Страница 7: ...PSW format will enable resizing the design and automatically recalculating the stitch count keeping the selected density in tact Editing in the psw format is easy and unlimited editing either in block...

Страница 8: ...or viewing stitch data 1 Realistic View allows 3D simulation of the stitch data while still retaining the image file on screen It is also possible to edit designs while in the Realistic View mode Clic...

Страница 9: ...ensity settings for each pre digitized font located in the font preview box just to the right of the pull down font list TRUE TYPE FONTS True type fonts can be selected and automatically digitized in...

Страница 10: ...nly spaced The marks on the dotted frame control the shape of the frame INDIVIDUAL LETTER MANIPULATION 1 From the Vertical toolbar click the Point Mode icon 2 Click the diamond shaped mark within a le...

Страница 11: ...nce lines at various lengths and inclinations Outline Fill This method allows drawing around an area for filling with stitches at varying angles of inclination Complex Fill This method allows drawing...

Страница 12: ...ce points outlining the fill area of the head Notice that the holes for the eyes and nose areas were created automatically 10 Click the right mouse to access pop up menu 11 Click the left mouse on Bui...

Страница 13: ...ssary to adjust reference points once the autotrace procedure is complete 1 Select Edit Edit Outlines from the Main Menu 2 Place the mouse pointer within the bear body area click the left mouse once t...

Страница 14: ...mplex Fill Step Satin stitch is 5 0 Also the stitch block areas are created without underlay Underlay stitching is important in that it stabilizes the fabric and helps to lift the design The following...

Страница 15: ...nu select Edit Edit Outlines 2 Click the left mouse on the stitch block to be changed 3 Click on Properties icon from Horizontal toolbar 4 Click on Stitch Type then click on Appliqu 5 Click OK and the...

Страница 16: ...ange Edit Mode icon and the Prompt Line will read Edit the Inclination Click on either end of the Inclination Angle Line it will become an elastic line which can be moved to a new angle Drag the line...

Страница 17: ...en easier to follow around the fill stitch area click the Show Image icon bottom of Vertical toolbar to view just the stitch data Proceed to digitize design outline When digitizing is complete click S...

Страница 18: ...ign has all been transferred to the Smart Media Card the message Design successfully written appears click OK Attention should be given not to interrupt any copy read write procedure of the PSW Conver...

Страница 19: ...Click on Remove to eliminate the Dolphin outline color Click OK Image no longer has the black outline 7 From Vertical toolbar select Complex Fill From Horizontal toolbar click the drop down arrow sele...

Страница 20: ...tical tool bar click on Manual Input icon 14 Digitize the eye of the Dolphin as follows Using the left mouse click reference points around the eye area When finished inputting points click right to ac...

Страница 21: ...mbinations of threads and fabrics can affect embroidery designs It may be necessary to adjust a design for the fabric and thread combination of a given project The PSW 2 00a program offers an effectiv...

Страница 22: ...ith a computer icon on the Converter Box 2 Connect the Converter Box to the Quantum XL 6000 with second serial cable provided with PSW 2 00a Use the second port on the Converter Box marked with a sewi...

Страница 23: ...ate must be selected 9 Click on Wait to Send 10 Setup of the computer is done Transfer data from PC to Quantum XL 6000 11 On help screen in Quantum XL 6000 touch pictogram upper left hand corner 12 Co...

Страница 24: ...OK 6 From the Horizontal tool bar click on Choices Grid Choice of 2 kinds of grid points Set the Point Distance for the X and Y at 400 mm Click OK The Grid will aid in the placement of the design ele...

Страница 25: ...o move the entire circle click and drag To change letter size click the outside center reference point 15 Click the inside right and bottom center reference points to change the circle frame into an e...

Страница 26: ...ry Double click on 008 Click and drag to position above the first flower right click to access pop up menu then left click on Finish 27 From the Horizontal tool bar click Next Color icon to insert a c...

Страница 27: ...ign sections of the multiple hoop layout The complete multi hoop layout has become gray stored to transfer to card 10 From the Horizontal tool bar click the SmartMedia card icon Write multiple hoop da...

Страница 28: ...rom Vertical toolbar click on the Hoop icon 8 Click on the Singer XL 5000 Continuous 50x 120 Click OK 9 From Main Menu select File Write using Continuous Embroidery NOTE The option Write using Continu...

Страница 29: ...new position 8 Click the right mouse to access the pop up menu Click Finish to set the stitches MODIFY A DESIGN 1 From the Main Menu select Modify Dimensions 2 The Dimension text box appears 3 The de...

Страница 30: ...New 2 Open Image dialog box New 3 New dialog box OK 4 From the Vertical tool bar select the Library icon 5 Select the Flowers Category double click on 041 Right click to access pop up menu then left...

Страница 31: ...n 3 Place the mouse pointer within the top petal click the left mouse once to show the outline of the selected petal block Lower left corner give detail about the block Branches Satin 4 Click right mo...

Страница 32: ...n left click on Finish 5 From Horizontal toolbar click Next Color icon to insert a color stop 6 From Horizontal toolbar click Copy then click Paste 7 Click and drag second flower above the first flowe...

Страница 33: ...etals of the first flower Select the same color as color 2 Left click on the color number making sure that they are the same 14 Select color 6 Place the dropper on the brown center of the first flower...

Отзывы: