background image


Manual for Fixed Receiver 

Operating Instructions   
 

Number Registering 

1) Standby mode, press the key [FUN] for 3 seconds till [F1] appears on the screen. 
2) Press the key [ENT] till [01] [001] or [001-01] appears. 

3) Press the key [UP], [[MOVE]] or [DOWN] to choose the registration number you wanted. 

4) Press the call button, waiting for the number flashes on the screen with sound signals. 

5) Press the key [ESC], and [F1] appears. 

6) Press the key [ESC] again, back to standby mode. The registration is finished. 
7) Repeat step 3

~4

to register all the call buttons you need, and then press the key [ESC] twice 

back to standby mode.   
 

Sound    Setting 

1) Standby mode, press the key [FUN] for 3 seconds till [F1] appears on the screen. 

2) Use the key [UP] to choose [F2]. 

3) Press the key [ENT] and [01] appears. 
4) Use the key [UP], [DOWN] to choose a type of sound (12 kinds totally). 

5) Press the key [ENT], and [F2] appears 

6) Press the key [ESC] again and back to standby mode.   


Display Time Setting   

1) Standby mode, press the key [FUN] for 3 seconds till [F1] appears on the screen. 

2) Use the key [UP] to choose [F3]. 
3) Press the key [ENT], and [20] appears on the screen. 

4) Use the key [UP], [DOWN] to choose the  display time wanted. [00] means unlimited display, 

figures 01-99 mean the corresponding time from 1~ 99 seconds.   
5) Press the key [ENT], and [F3] appears. 

6) Press the key [ESC] and back to standby mode.   


Sound Length Setting 

1) Standby mode, press the key [FUN] for 3 seconds and [F1] appears on the screen. 

2) Use the key [UP] to choose [F4]. 

3) Press the key [ENT] and [01] appears on the screen. 

4) Use the key [UP] or [DOWN] to choose the length of sound you want. Numbers 01-15 mean 15 
kinds of the length. 01 means 2 seconds, 02 means 4 seconds, and so on. 

5) Press the key [ENT], and [F4] appears again. 

6) Press the key [ESC] and back to standby mode.   
 

Volume Adjusting   

For APE9000, APE9300, APE9500 and APE9600 only. (The volume of the other models can be 

changed with the volume controlling knob on the top of the receivers.) 

1) Standby mode, press the key [UP] or [DOWN] to choose the volume, 01~15 means 15 kinds of 

Содержание APE1200

Страница 1: ...1 User Manual 2 Anwendung 8 L utilisation de specification 14 istruzione 20 Usando las instrucciones 27 ...

Страница 2: ...standby mode Display Time Setting 1 Standby mode press the key FUN for 3 seconds till F1 appears on the screen 2 Use the key UP to choose F3 3 Press the key ENT and 20 appears on the screen 4 Use the key UP DOWN to choose the display time wanted 00 means unlimited display figures 01 99 mean the corresponding time from 1 99 seconds 5 Press the key ENT and F3 appears 6 Press the key ESC and back to ...

Страница 3: ...or DOWN to the right time 5 Press the key ENT and F5 appears again 6 Press the key ESC and back to standby mode Deleting the registered numbers or initializing the receiver 1 Standby mode press the key FUN for 3 seconds till F1 appears on the screen 2 Use the key UP to choose F6 3 Press the key ENT the registered minimum number appears 4 Use the key UP MOVE or DOWN to choose the number to be delet...

Страница 4: ...on the screen 4 Use the key UP or DOWN to choose a number 01 means the same sound for different buttons and 00 means different sounds for different buttons default setting 5 Press the key ENT and F8 or F9 appears on the screen 6 Press the key ESC and back to standby mode Special Instruction for APE8000 Register the remote controller 1 Press the key D on standby mode time display mode and F1 appear...

Страница 5: ...the call buttons at least 30cm away from the receiver and make sure no one else presses the call buttons during the registration It is normal if one or two pagers can not be registered successfully when so many pagers are registered at a time Register the failed ones again Check the receiving distance before fixing the registered pagers 5 Draw out the antenna of the registered receiver before use ...

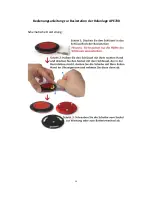
Страница 6: ...6 Instructions for Replacing Battery Pager APE560 Schematic diagram ...

Страница 7: ...7 Instructions for Replacing Battery Pager APE700 Schematic diagram ...

Страница 8: ...ichts ist nur für APE2000 und APE9000 HostComputer 5 Eingangtaste ENT noch mal drücken und das Bildschirm zeigt F2 6 ESC Taste drücken bis zum Stand By Modell Die Auswahl der Stimme ist fertig 3 Anzeige der Zeit anzeigen 1 Unter Stand By Modell FUN Funktionstaste für ca 3 Sekunden drücken bis F1 auf Bildschirm gezeigt 2 UP Taste benutzen um F3 auszuwählen 3 Eingangtaste ENT noch mal drücken und da...

Страница 9: ...ie Stimme ist fertig 10 Für Registierung mehrerer Nummer die Schritte 3 und 4 folgen ESC Taste zwei mal drücken und die Registierung ist fertig 7 Zeiteinstellung nur für APE8000 und APE 8200 geeignet 1 Bei Stand By Modell FUN Funktionstasten für ca 3 Sekunden drücken bis F1 auf LCD Bildschirm gezeigt ist 2 UP Taste benutzen um F5 auszuwählen 3 Eingangstaste ENT noch mal drücken Das Bildschirm zeig...

Страница 10: ...zen um F8 auszuwählen 3 ENT Taste drücken und das Bildschirm zeigt 01 4 UP Taste und DOWN Taste benutzen um die Nummer zwsichen 01 und 10 zu wählen Die Nummer zwischen 01 und 10 bedeuten all digital Typ Moderator standardmäßig auf alle Digital Art Fabrik Die Nummer zwischen 10 und 20 bedeuten Buchstaben der Alpabet Typ Die steigende Nachfolge der Alpahbet ist ABCDEFHPLJ 5 ENT Taste drücken und das...

Страница 11: ...ach die Leutchtung der Licht verbinden Sie der Haupt Computer Danach öffnen Sie Schalter und benuten 2 Wenn as Produkt abnormal gefundenist rufen Sie bitte anAftermarket Hersteller Bitte nehmen Sie das Produkt nicht willkürlich auseinander um unnötigen Ärger zu vermeiden 3 Unsere Produkte sind nach die ausgewählt Produktleistung auf die beste Konfiguration Zubehör Wie empfehlen Ihnen die Verwendun...

Страница 12: ...12 Ersetzen Sie die Batterie Beschreibung APE560 ...

Страница 13: ...13 Bedienungsanleitung zur Basisstation der Rufanlage APE700 Schematische Darstellung ...

Страница 14: ...ement à l hôte de série APE2000 et APE9000 5 Appuyer une fois bouton ENT F2 apparaît sur l écran 6 Appuyer encore une fois bouton ESC pour entrer en état de guetter l occasion finir le choix de genre de voix 3 Choix de durée d indication de numé ro 1 En état de guetter l occasion appuyer bouton FUN 3 minutes F1 apparaît sur l écran 2 Utiliser bouton UP choisir F3 3 Appuyer une fois bouton ENT 20 a...

Страница 15: ...asion 10 S il faut enregistrer plusieurs numéros on peut répéter le processus de 4 à 8 7 Ajustement de temps applicable uniquement à l hôte de type APE8000 et APE8200 1 En état de guetter l occasion appuyer bouton FUN 3 minutes F1 apparaît sur l écran 2 Utiliser bouton UP choisir F5 3 Appuyer une fois bouton ENT le temps actuel apparaît sur l écran par exemple 13 29 4 Utiliser bouton UP MOVE DOWN ...

Страница 16: ...choisir un chiffre libre entre 11 20 exprime les lettres anglais comme commencement sé quence croissante de lettres est ABCDEFHPJL 5 Appuyer une fois bouton ENT F8 apparaît sur l écran 6 Appuyer une fois bouton ESC pour entrer en état de guetter l occasion finir le choix de type d indication de numéro 3 Choix de multi bouton pour le mê me genre de musique ou diffé rents genres de musiques applicab...

Страница 17: ...uvrir le robinet et utiliser normalement 2 Si vous trouver l étrange du produit merci d appeler le service d après vente pour vous renseigner d abord il ne faut pas décharger le produit librement pour éviter le trouble non né cessaire 3 Les attachements du produit de notre socié téchoisissent la meilleure configuration on vous conseil d utiliser l attachement d origine comme adaptateur de source d...

Страница 18: ...18 ...

Страница 19: ...19 Étape d opération de charger et dé charger le socle de l appeleur APE700 de soucoupe volant ultramicro Le sché ma ...

Страница 20: ...o sopra UP 3 Premere il tasto di entrare una volta ENT si mostra 01 sullo schermo 4 Selezionare il tipo di musica via il tasto sopra UP e sotto DOWN Selezionare 00 11 per 12 tipi di musica polifonica e 12 per il numero vocale Il numero vocale si applica per mainframe di serie di APE2000 ed APE9000 solamente 5 Premere il tasto di entrare una volta ENT si mostra F2 sullo schermo 6 Premere il tasto d...

Страница 21: ...o per cercapersone diversa non applicabile per il mainframe APE8000 ed APE8200 1 Premere il tasto di selezione FUN per 3 secondi in modalità di standby si mostra F1 sullo schermo 2 Selezionare F5 via il tasto sopra UP 3 Premere il tasto di entrare una volta ENT si mostra 01 sullo schermo 4 Selezionare la musica desiderata via il tasto sopra UP sinistra destra MOVE e sotto DOWN 5 Premere il tasto d...

Страница 22: ...schermo 7 Premere il tasto di uscire ESC una altra volta per entrare lo stato di standby Cancellazione del numero è completato Le tre funzioni seguenti per clienti con esigenze speciali Ⅰ Selezione del tasto di cancellare con senza musica applicabile per cercapersone con multi tasto 1 Premere il tasto di selezione FUN per 3 secondi in modalità di standby si mostra F1 sullo schermo 2 Selezionare F7...

Страница 23: ...lla fabbrica via il tasto sopra UP e sotto DOWN 5 Premere il tasto di entrare una volta ENT si mostra F8 o F9 sullo schermo 6 Premere il tasto di uscire ESC una altra volta per entrare lo stato di standby selezione di multi tasto con la musica stessa o diversa è completata Istruzioni speciali APE8000 Registrazione di telecomando 1 Premere il tasto D stato di tempo per una volta in modalità di stan...

Страница 24: ...tazioni del prodotto si consiglia di utilizzare gli accessori originali come l adattatore d alimentatore batterie 4 Il mainframe e le cercapersone possono essere utilizzato dopo la registrazione mantenere una certa distanza per entrambe due parti al momento della registrazione è migliore superiore di 30CM non premere alle cercapersone al momento della registrazione il fallimento singolo è il fenom...

Страница 25: ...25 Istruzioni di Cambiare la batteria APE560 ...

Страница 26: ...26 Procedura di Montare Smontare Base di Ultra sottile UFO Cercapersone APE700 Illustrazione ...

Страница 27: ...vimiento arriba UP y la tecla de movimiento abajo DOWN para seleccionar los tipo de músicas Los números 00 11 significan 12 tipos de músicas polifónicas Si elige el número 12 significa el informe fonético de números El informe fonético de números sólo aplica en la serie de APE2000 y de APE9000 5 Pulse la tecla de entrada ENT en una vez En la pantalla se aparece F2 6 Pulse la tecla de salida ESC po...

Страница 28: ...a pantalla se aparece F1 2 Utilice la tecla de movimiento arriba UP para selección F5 3 Pulse la tecla de entrada ENT en una vez En la pantalla se aparece 01 4 Utilice la tecla de movimiento arriba UP las teclas de movimiento izquierda o derecha MOVER y la tecla de movimiento abajo DOWN para seleccionar las músicas necesarias 5 Pulse la tecla de entrada ENT en una vez En la pantalla se aparece 01 ...

Страница 29: ...s tres funciones siguientes para los clientes con necesidades especiales I Seleccione la tecla cancelación para ajustar la música se aplica el localizador con varias teclas 1 En el modo de espera pulse la tecla seleccionada FUN durado 3 segundos En la pantalla se aparece F1 2 Utilice la tecla de movimiento arriba UP para selección F7 3 Pulse la tecla de entrada ENT en una vez En la pantalla se apa...

Страница 30: ...a una misma música o diferentes músicas Instrucción especial de APE8000 registro de control remoto 1 En el modo de espera pulse la tecla D en una vez En la pantalla se aparece F1 2 Pulse la tecla D en una vez la pantalla llega el modo de espera 3 Pulse la tecla B en una vez en la pantalla se aparece F1 4 Pulse la tecla B por otra vez a estar en el modo de espera Ya ha terminado el registro de cont...

Страница 31: ...al su puede utilizarlos En el registro los dos debe mantener una distancia más de 30 metros es mejor Cuando se registra no puede pulsar el localizador Si registra varios números en una vez es un fenómeno normal que no hay registro del número individual sólo se puede registrar una vez más Después de registrar pruebe la distancia y luego peque el localizador 5 Saque la antena del equipo principal cu...

Страница 32: ...32 Instrucciónes de funcionamiento de cambio de baterí as de APE560 ...

Страница 33: ...33 Pasos de operación de carga y descarga de la base de APE700 localizador delgado con forma UFO Diagrama Esquemático ...

Отзывы: