background image


1

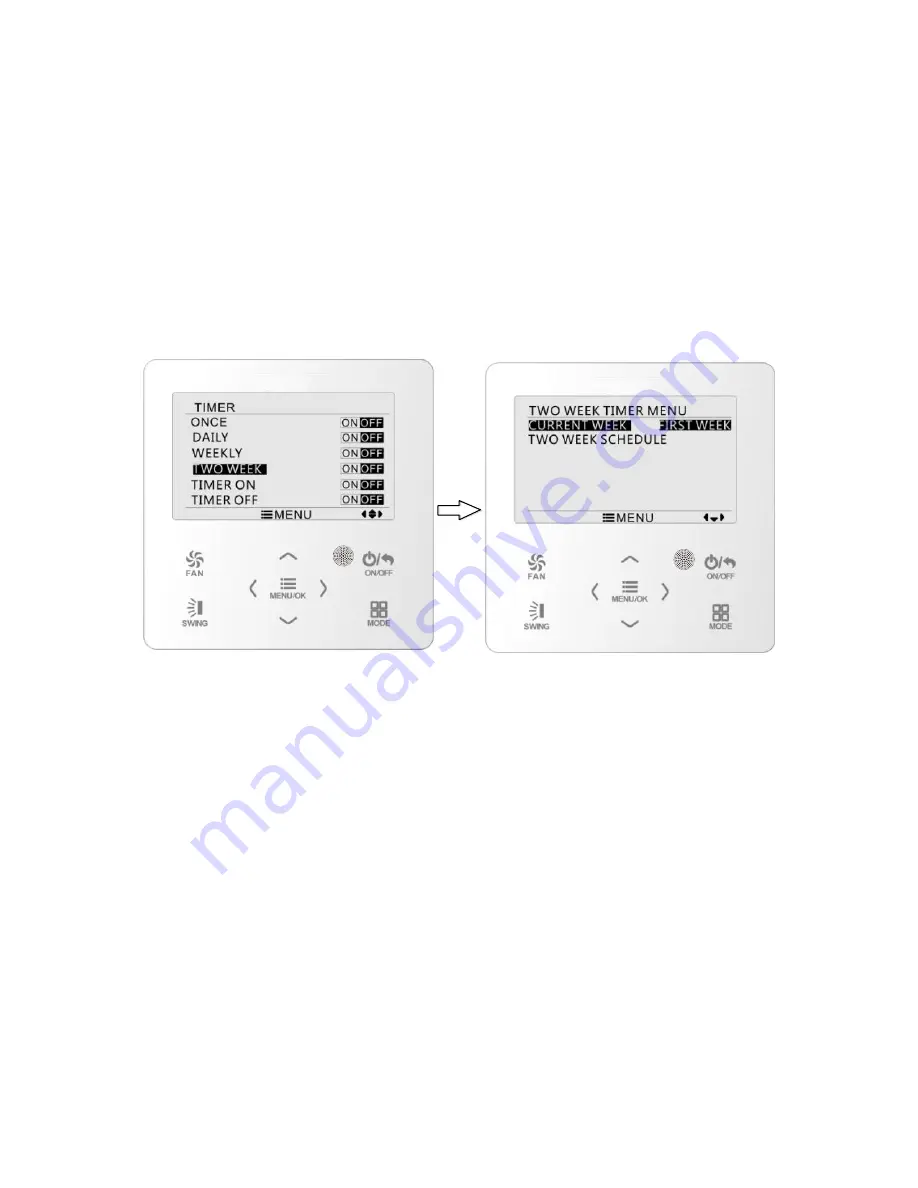
3.10.4 Two Week Timer 

The user can set the everyday timer content for two weeks. In each day, the user 

can  set  eight  segments  of  timer  content.  The  unit  will  execute  corresponding  timer 
setting in two weeks. 

In timer function setting page, press “

” or “

” button to select two week timer 

setting and then press MENU button to enter two week timer menu page. Press “

” or 

” button to select current week option and then press “

” or “

” button to set current   

week as first week or second week. Press MENU button to save current week setting. 

Please refer to Fig. 15. 


Fig. 15 Setting of current week 

After entering two week timer menu page, press “

” or “

” button to select the two 

week  schedule  option  and  then  press  MENU  button  to  enter  two  week  timer 
programming. After entering two week timer setting page, press “

” or “

” button to 

select the day to be set. Then press MENU button to enter timer programming of that 
day. Press “

” or “

” button to select the item to be set. Press “

” or “

” button to 

adjust the content. Press MENU button to save setting. Press BACK button to exit this 
page. The setting symbols please refer to weekly timer setting. 

3.10.5 Countdown Timer 

Countdown timer includes timer on and timer off. Unit On/Off after a desired hour 

can be set. In unit on status, timer off can be set, or timer off and timer on can be set 
simultaneously. In unit off status, timer on can be set, or timer off and timer on can be 
set simultaneously. If timer off in x hours and timer on in y hours are set simultaneously 
in unit on status, the unit will be off in x hours and then the unit will be on in y hours after 
timer off. 

Содержание SWC-02

Страница 1: ......

Страница 2: ...emove or install the wired controller by yourself If there is any question please contact our after sales service center 5 The wired controller is a general model applicable for several kinds of units...

Страница 3: ...2 On Off 5 3 3 Mode Setting 5 3 4 Temperature Setting 5 3 5 Fan Setting 5 3 6 Swing Setting 6 3 7 Functions Setting 8 3 8 Unit Status View 12 3 9 Current Error View 13 3 10 Timer Setting 15 3 11 Cloc...

Страница 4: ...1 1 Display 1 1 Appearance Fig 1 Appearance of wired controller...

Страница 5: ...unction 12 This device does not have Absence function 13 Shielding status Buttons temperature ON OFF mode or energy saving is shielded by remote monitor 14 Current set fan speed 15 Memory function Mem...

Страница 6: ...ight swing 5 1 Set related function on or off 2 Move option cursor 3 Set parameter 8 7 MENU OK 1 Enter menu page 2 Confirm setting 9 10 MODE Set auto cooling dry fan and heating modes for indoor unit...

Страница 7: ...setting Dry function setting Quiet function setting Fahrenheit Temperature Setting Air function setting Timer setting menu Once Clock setting menu Time format setting Daily Weekly timer Two week timer...

Страница 8: ...s not available COOLING DRY FAN HEATING 3 4 Temperature Setting Under unit on status pressing or button on the main page increases or decreases set temperature by 1 1 holding or button increases or de...

Страница 9: ...g is not available for the model fixed angle swing will be invalid when the wired controller turns on fixed angle swing mode Simple swing mode when fixed angle swing mode is turned off swing operation...

Страница 10: ...Fig 7 Swing setting 7...

Страница 11: ...s or or or button to select the function setting symbol Then press MENU OK button to enter user function setting page Press or button to select specific function item Press or button to turn on or tur...

Страница 12: ...on Setting Note cancelled while sleep function will be valid and vice versa function is set firstly and then sleep function is set I demand function will be aneously If I demand This function and slee...

Страница 13: ...g or heating limitation temperature After selecting cooling or heating limitation button to select cooling or After entering save function setting page press enter save function setting page button to...

Страница 14: ...2 After setting press MENU button to save the setting button to adjust the or After entering Air Function mode setting press adjust the mode of Air Function button to turn on or turn off air function...

Страница 15: ...r view function page Press or button to select status view function Press MENU button to enter unit status view page Press BACK button to return to the last page Please refer to Fig 9 The following st...

Страница 16: ...age to view the current error Press MENU button to enter the menu and select the function symbol to be viewed Then press MENU button to enter view function page Press or button to select error informa...

Страница 17: ...r demagnetization protection HE Over phase current protection P5 PFC protection Hc Compressor desynchronizing H7 IPM Temperature Protection P8 IPM Current protection H5 Over power protection L9 Compre...

Страница 18: ...er The wired controller can set one time clock timer If the unit is off timer on can be set If the unit is on timer off can be set This timer will be carried out for only once when timer time is reach...

Страница 19: ...it ON OFF set temperature in cooling it is valid only when the current mode is cooling set temperature in heating it is valid only when the current mode is heating Please refer to Fig 13 After enterin...

Страница 20: ...o select the day to be set Then press MENU button to enter timer programming of that day Press or button to select the item to be set Press or button to adjust the content Press MENU button to save se...

Страница 21: ...ENU button to enter two week timer programming After entering two week timer setting page press or button to select the day to be set Then press MENU button to enter timer programming of that day Pres...

Страница 22: ...ring timer on setting page press or button to increases or decreases timer time by 0 5h Press MENU button to save setting Press BACK button to return to the last page Please refer to Fig 16 19 Fig 16...

Страница 23: ...age Press or button to select time format and then press or button to select 12 hour system or 24 hour system Please refer to Fig 18 Fig 18 Time format selection Note If you need to use both the wired...

Страница 24: ...unlock Please refer to Fig 20 Items can be locked ON OFF mode setting temperature setting fan speed setting key lock After locking the corresponding item cannot be set through buttons If the keys are...

Страница 25: ...Instructions 4 1 Parts and Dimension of Wired Controller Fig 21 Dimension of wired controller Fig 22 Parts of wired controller No 1 2 3 Name Panel of wired controller Screw M4 25 Soleplate of wired co...

Страница 26: ...tion Methods Fig 23 Installation diagram for wired controller Fig 23 is the simple installation process of wired controller please pay attention to the following items 1 Before installation please cut...

Страница 27: ...abnormally 4 4 Disassembly Fig 24 Disassembly diagram for wired controller Separate the signal and communication lines of the wired controller from If the air conditioning unit is installed where is...

Страница 28: ......

Отзывы: