SimpliFire SF-WM36-BK Скачать руководство пользователя страница 11

11

SimpliFire  •  SF-WM36  •  2040-902  Rev. F  •  1/14


CAUTION! The unit’s power cord must be connected to 
a properly grounded and protected 120V outlet. Always 
use ground fault protection where required by the electri-
cal code.

WARNING! Risk of Electric Shock!  Do not operate the 
unit if it is damaged or has malfunctioned.  If you suspect 
the unit is damaged, call a qualifi ed service technician to 
inspect and replace any part of the electrical system if 
necessary.

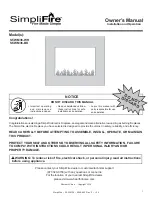
A.  Manual Switch Function

The appliance can be operated by both remote control 
and manual button.  Once the unit has been connected 
to a grounded electrical outlet, turn on the main power 
switch located on the right side of the appliance.  A beep 
should be heard when the power is fi rst applied. See 
Figure 5.1.

Main Power Switch

The POWER switch supplies power to all functions of 
the appliance.  This switch must be in the “ON” position 
for any of the functions including the remote.

Note: 

To use both remote and manual function, the main

power switch must in “ON” position.

Flame Button

By pressing the FLAME button, the unit will cycle 
through four fl ame effects.  

Heater Button

-   Press the heater button once to turn 750W power on.

  Appliance will beep and illuminate 1 red LED.

-   Press again turns 1500W power on.

 Appliance will beep and illuminate 2 red LEDs.

-   Press third time turns heater off. 

Note:

  A harmless slight brief odor may occur during fi rst 

use or after prolonged period of storage. 

Thermal Control Knob

The knob is marked with numbers to indicate the maxi-
mum and minimum temperature positions.  Start with 
setting 9, and to decrease the temperature, turn knob to 
lower settings.  To increase the temperature, turn knob 
to a higher setting.   

FLAME BUTTON

HEATER BUTTON

THERMAL CONTROL
KNOB

MANUAL ON/OFF
MAIN POWER SWITCH

Figure 5.1 Manual Operating Switches

OPERATING INSTRUCTIONS


Содержание SF-WM36-BK

Страница 1: ...PTING TO ASSEMBLE INSTALL OPERATE OR MAINTAIN THIS PRODUCT PROTECT YOURSELF AND OTHERS BY OBSERVING ALL SAFETY INFORMATION FAILURE TO COMPLY WITH INSTRUCTIONS COULD RESULT IN PERSONAL INJURY AND OR PROPERTY DAMAGE Congratulations Congratulations on selecting a SimpliFire Electric Fireplace an elegant and clean alternative to wood gas burning fireplaces The SimpliFire electric fireplace you have se...

Страница 2: ...oreign objects to enter any ventilaion or exhaust opening as this may cause an electric shock or fire or damage the appliance To prevent a possible fire do not block appliance connection fan air intakes or exhaust in any manner A appliance has hot and arcing or sparking parts inside Do not use it in areas where gasoline paint or flammable vapors or liquids are used or stored Use this appliance onl...

Страница 3: ...C Model and Serial Number Information 5 3 GETTING STARTED A Parts and Hardware 6 B Tools and Supplies Needed 6 C Appliance 6 D Location 7 E Clearance to Combustibles 7 F Electrical Supply Circuit Requirements 7 G Electrical Connection 7 4 INSTALLATION A Wall Mounting Bracket 8 B Installing Wall Mount Bracket 8 C Appliance Installation 9 D Faux Stone Installation 10 E Glass Front Installation 10 F ...

Страница 4: ...USULQWV DFFLGHQWV PLVXVH VFUDWFKHV PHOWHG LWHPV or other external sources and residues left on the plated surfaces from the use of abrasive cleaners or polishes 5HSDLU RU UHSODFHPHQW RI SDUWV WKDW DUH VXEMHFW WR QRUPDO ZHDU DQG WHDU GXULQJ WKH ZDUUDQW SHULRG 7KHVH SDUWV include paint batteries and the discoloration of glass DPDJHV UHVXOWLQJ IURP IDLOXUH WR LQVWDOO RSHUDWH RU PDLQWDLQ WKH DSSOLDQFH...

Страница 5: ...g the installation Follow these instructions carefully during the installation to ensure maximum safety and benefit This equipment uses and can radiate radio frequency energy and if not installed and used in accordance with the instructions may cause harmful interference to radio or television reception which can be determined by turning the equipment off and on The user is encour aged to try to c...

Страница 6: ...talling on masonry walls C Appliance B Tools and Supplies Needed Parts and Hardware List Part Quantity Fireplace 1 Instruction Manual 1 Remote Control 1 CR2032 Battery 1 Wall Mounting Bracket attached to unit 1 Masonry Anchor 4 Screw ST5 x 40 4 Bolt M4 x 8 2 Bolt M5 x 10 attached to unit 2 White Stones 1 Clear Faux Stones 1 3 16 Toggle Bolt Anchors 4 A Parts and Hardware Masonry Anchor Screw 5 x 4...

Страница 7: ... 3 2 WARNING Risk of Fire Keep electrical cords drapery furnishings or other combustibles at least 3 ft 0 9 m from the front of the appliance and away from the sides or rear F Electrical Supply Circuit Requirements Plan the location of the appliance so that it will have adequate electric power A 15 AMP 120V 60hz circuit is required Additional appliances on the same circuit as this appliance may ex...

Страница 8: ...arked locations drill four 5 16 in diameter x 2 in deep holes Insert the provided wall anchors into the holes Gently tap the anchors with a hammer until they are flush with the wall surface Attach the bracket to the masonry anchors with six 5 x 40 screws See Figure 4 2 WARNING Risk of Damage or Personal Injury Do not use supplied masonry anchors on hollow walls sheathed with wood sheetrock drywall...

Страница 9: ...or Personal Injury Al lowable pull out and shear strength are 25 of ultimate values or less as required by building authorities Framed Wall For each of the marked anchor point locations de termine which points align with a structural framing member At the points where a wood or metal framing mem ber exists the 5 x 40 screw can be installed directly into that structural member See Figure 4 3 Every ...

Страница 10: ...dge and ensure that the power cord is stored or secure to avoid tripping and snagging 2 1 Secure with Screw Here Figure 4 8 Attaching Front to Fireplace D Faux Stone Installation Arrange the white and clear faux stones along the inset window ledge at the front of the appliance Place clear stones over LED bulbs and fill remaining gaps with white stones Note Extra stones are provided and may be dist...

Страница 11: ...all functions of the appliance This switch must be in the ON position for any of the functions including the remote Note To use both remote and manual function the main power switch must in ON position Flame Button By pressing the FLAME button the unit will cycle through four flame effects Heater Button Press the heater button once to turn 750W power on Appliance will beep and illuminate 1 red LED...

Страница 12: ... the same settings by pressing the power button again FLAME By pressing the FLAME button the unit will cycle through three flame effects BACKLIGHT Pressing the button turns the firebox backlight through three lighting effects LOW Press once to turn heater on low Press again to turn heater off HIGH Press once to turn heater on high Press again to turn heater off POWER FLAME LOW BACKLIGHT HIGH C Res...

Страница 13: ...re To reduce risk of fire do not store or use gasoline or any other flammable vapors or liquids in the vicinity of the appliance WARNING Risk of Electrical Shock Any other servic ing needed must be performed by an authorized service representative Do not attempt to service the unit your self B Cleaning Cleaning Glass Dust particles can be removed by buffing lightly with a clean dry cloth Fingerpri...

Страница 14: ...r Stocked at Depot ITEM DESCRIPTION COMMENTS PART NUMBER 1 Black Glass GLA WM36 BK Y 2 White Glass GLA WM36 WH Y 3 Remote WM36 REMOTE Y 4 Power Cord CORD WM36 Y 5 Hanging Bracket BRACKET WM36 Y Rock Kit Contains both White and Clear Rock ROCKS WM58 36 Y Hardware Bag HRDW WM Y Includes Masonry Anchors Screw ST5 x 40 Bolt M4 x 8 Bolt M5 x 10 3 16 Toggle anchor Installation Manual 2040 902 1 14 36 El...

Отзывы: