background image

For Fastest Customer Service:

*If you’ve purchased from a retailer and you wish to return the product, please

contact the retailer directly.

Visit Us

Visit our site directly at

www.simpli-home.com

Call Us

1-866-518-0120

Monday to Friday

9am to 5pm EST

Email Us

[email protected]

Other ways to contact us…

1.

Open your phone’s camera.

2.

Point your phone’s camera at the QR code to scan.

3.

Click on the pop up.

4.

You’ll be taken to our customer service page.

5.

Fill the form with your order informa on and issue. 

6.

Submit form.

7.

A customer service associate will contact you. 

4

Содержание brooklyn+max WyndenHall AXCHOL005-72GR

Страница 1: ...Artisan Holden Stratford 72 inch TV Media Stand Model AXCHOL005 72GR 1 ...

Страница 2: ... s top brand for high value furniture It s time to register your product warranty It s quick and easy And you ll be happy you did ü Ac vate your 1 year warranty ü Automa c entry to win a 500 gi cer ficate ü Earn instant rewards and save simpli home com product registra on 2 ...

Страница 3: ...iew and get instant rewards simpli home com product review Review your product and collect rewards Send us images or share them on social and qualify for instant rewards You may even receive store credit on your en re purchase simpli home com share images Share photos and get your cash back 3 ...

Страница 4: ... com Call Us 1 866 518 0120 Monday to Friday 9am to 5pm EST Email Us customerservice simpli home com Other ways to contact us 1 Open your phone s camera 2 Point your phone s camera at the QR code to scan 3 Click on the pop up 4 You ll be taken to our customer service page 5 Fill the form with your order informa on and issue 6 Submit form 7 A customer service associate will contact you 4 ...

Страница 5: ... the wall Use the Furniture Anti Tipping Restraint provided with the product Consult our assembly instructions for help If the Furniture Anti Tipping Restraint kit is not in the box please contact our customer service department in order to obtain another kit before using the furniture Identify all the parts and hardware Do not discard of the packaging until you have checked that you have all of t...

Страница 6: ...ng distorted or breaking from their own internal stresses The response to relative humidity changes begins with determining the annual average RH for your particular space Then try to keep the RH in the space where your furniture is as close to that average as possible generally within about 10 up or down De humidify in the summer and humidify in the winter Be aware that raising the temperature lo...

Страница 7: ...pecifically designed to support audio and or video equipment Do not move furniture without shelves or drawers unloaded Furniture can collapse or tip over onto a child and cause physical injury or death WARNING Do not place a TV that exceeds the weight limits or size guidelines shown in the instructions specified for the furniture Do not overload shelves or place heavy items on top shelves or drawe...

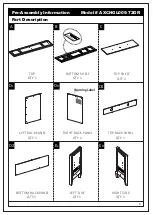
Страница 8: ...CK PANEL QTY 1 DL RIGHT BACK PANEL QTY 1 DR D1 TOP BACK PANEL QTY 1 D2 BOTTOM BACK PANEL QTY 1 LEFT SIDE QTY 1 EL RIGHT SIDE QTY 1 ER Front Avant Front Avant Front Avant Front Avant Warning Label 8 Pre Assembly Information Model AXCHOL005 72GR Part Description ...

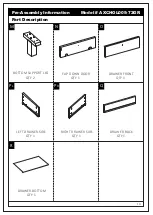
Страница 9: ...1 GL RIGHT MIDDLE DIVIDER QTY 1 GR TOP DIVIDER QTY 1 H CENTER SHELF QTY 1 I SHELF QTY 2 J LARGE DOOR L R Same QTY 2 K SMALL DOOR L R Same QTY 2 L Front Avant Front Avant Front Avant Front Avant Front Avant 9 Pre Assembly Information Model AXCHOL005 72GR Part Description ...

Страница 10: ...T LEG QTY 2 N O DRAWER FRONT QTY 1 FLIP DOWN DOOR QTY 1 PL LEFT DRAWER SIDE QTY 1 PR Q RIGHT DRAWER SIDE QTY 1 DRAWER BACK QTY 1 R DRAWER BOTTOM QTY 1 10 Pre Assembly Information Model AXCHOL005 72GR Part Description ...

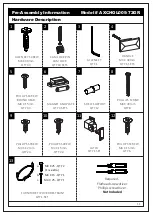
Страница 11: ...LIPS SCREW M4 X 15 mm QTY 6 ALLEN KEY QTY 1 SHELF SUPPORT QTY 12 LATCH QTY 1 SET CAM LOCK PIN CAM LOCK QTY 19 SETS MAGNET AND PLATE QTY 4 SETS PHILLIPS SCREW M3 X 15 mm QTY 20 Required Flathead screwdriver Phillips screwdriver Not Included FURNITURE TIP OVER RESTRAINT QTY 1 SET a M4 X 25 QTY 2 1 is extra b M4 X 15 QTY 1 c M4 X 25 QTY 1 11 Pre Assembly Information Model AXCHOL005 72GR Hardware Desc...

Страница 12: ...Front Avant Front Avant Front Avant Front Avant Front Avant Front Avant Front Avant DL A DR D1 D2 EL ER FL FR GL GR PL PR H C J K L J L K I N B M M Q O R 12 Components Key Diagram Model AXCHOL005 72GR ...

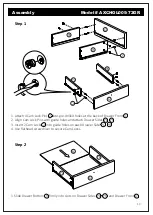
Страница 13: ...cks 2 into guide holes on each Drawer Side PL PR 4 Use flathead screwdriver to secure Cam Locks 2 Align Cam Lock Pins with guide holes and attach Drawer Sides PL PR 1 A ach 4 Cam Lock Pins 2 into pre drilled holes at the back of Drawer Front O O PR PL R PR PL O 2 Step 1 Step 2 Assembly Model AXCHOL005 72GR 13 ...

Страница 14: ...en Key Screws 1 through guide holes on each Side PL PR 3 Use Allen Key 3 to ghten screws Do not over ghten 1 Use Phillips screwdriver to a ach Handle 4 to Drawer Front O Step 4 NOTE The screwdriver is not included in the hardware pack PL PR Q O R 1 3 O 4 Step 3 Assembly Model AXCHOL005 72GR 14 ...

Страница 15: ...Centre Shelf I to each Middle Divider GL GR using 3 Allen Key Screws 1 2 Use Allen Key 3 to ghten screws Do not over ghten Front Avant Front Avant Front Avant I GL GR 1 3 Step 5 Assembly Model AXCHOL005 72GR 15 ...

Страница 16: ... 3 Insert 3 Cam Lock 2 into guide holes on each Middle Divider GL GR 4 Use flathead screwdriver to secure Cam Lock 5 A ach Top Divider H to Top Shelf C using 3 Allen Key Screws 1 NOTE The screwdriver is not included in the hardware pack Front Avant Front Avant Front Avant I GL GR C H 2 2 2 2 1 2 2 1 3 Step 6 Assembly Model AXCHOL005 72GR 16 ...

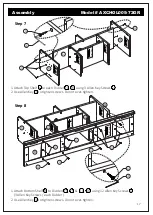
Страница 17: ...Avant Front Avant Front Avant Front Avant Step 8 1 A ach Bo om Shelf B to Dividers FL FR GL GR using 12 Allen Key Screws 1 3 Allen Key Screws each Divider 2 Use Allen Key 3 to ghten screws Do not over ghten 1 1 1 3 1 1 1 1 1 1 3 FL FR C FL FR GL Front Avant Front Avant Front Avant Front Avant Front Avant 1 GR B Step 7 Assembly Model AXCHOL005 72GR 17 ...

Страница 18: ... screwdriver secure Cam Locks 1 A ach 3 Cam Lock Pins 2 into pre drilled holes on each Side EL ER 3 Insert 6 Cam Locks 2 into guide holes on Bo om Shelf B 5 A ach 2 Bo om Support Legs M align with pre drilled holes at back of Bo om Shelf B Use to ghten 8 Screws 8 Phillips screwdriver Phillips Front Avant Front Avant 2 2 2 Assembly Model AXCHOL005 72GR 18 ...

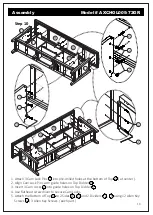
Страница 19: ...Cam Locks 2 into guide holes on Top Divider H 1 A ach 3 Cam Lock Pins 2 into pre drilled holes at the bo om of Top A at center 2 Align Cam Lock Pins with guide holes on Top Divider H 4 Use flathead screwdriver to secure Cam Locks Screws 1 3 Allen Key Screws each part 1 3 3 1 1 2 2 2 Front Avant Front Avant FL Step 10 Assembly Model AXCHOL005 72GR 19 ...

Страница 20: ...the back of Cabinet 2 Use Phillips screwdriver to ghten screws 1 Use Phillips screws Round Head 5 to a ach Back Panels DL DR D1 D2 through Front Avant A D1 D2 DL DR 5 Warning Label The back of the tv frame does not have pre drilled holes to a ach the back panels Note Assembly Model AXCHOL005 72GR 20 ...

Страница 21: ...N using Phillips Screws 12 Using Phillips screwdriver to attach Screws 9 at middle hole of hinges for both top 1 Attach hinges on Large Doors K to Sides EL ER and attach hinges on Small Doors L to bottom hinges into pre drilled holes Adjust the door to ensure they are aligned straight square with bottom shelf side 12 B L K EL FL A L K ER FR I N First Step Last Step after adjust the door 9 9 9 Asse...

Страница 22: ...f B pre drilled holes 1 A ach 4 Magnet Plates 6 to bo om corner of Doors K and Doors L using Phillips Screws 10 into pre drilled holes 3 A ach Latch 11 to Divider GR and Flip Down Door N using Screw 10 into 10 11 10 10 6 10 6 GR B L K K L 10 6 L B N K GR L K Assembly Model AXCHOL005 72GR 22 ...

Страница 23: ...Step 14 1 Use a Phillips screwdriver to a ach Handles 4 to Doors K L Flip Down Door N through guide holes 4 4 N K K L L 4 Assembly Model AXCHOL005 72GR 23 ...

Страница 24: ... level 3 shelf support anti tipping 7 7 2 2 Shelf Supports 7 may be used on back top of each Shelf J as a tipping restraint 1 Attach 4 Shelf Supports 7 for each Shelf J in desired location J J J J Step 15 Assembly Model AXCHOL005 72GR 24 ...

Страница 25: ...Step 16 1 Insert assembled drawers into glides on assembled TV Assembly Model AXCHOL005 72GR 25 ...

Страница 26: ... Serious or fatal crushing injuries can occur from furniture tip over If the furniture tip over restraint kit is not in the box please contact our customer service department in order to obtain another kit before using the furniture 13 13 26 Furniture Tip Over Restraint Assembly ...

Страница 27: ...gether and slide the smooth side upright brackets 4 Position the bracket over the anchor and use the longer screw to the wall 6 Lace an end of the nylon zip tie strap down through each bracket locked position DO NOT let children climb or hang on drawers doors or shelves 2 Determine where furniture is to be placed and mark location on below the bracket mounted to the furniture wall surface through ...

Отзывы: