


4/8
B
ASSEMBLY INSTRUCTIONS / INSTRUCTIONS D’ASSEMBLAGE
NOTICE / AVIS
Please use a screwdriver for the screws. The screwdriver is not included in the pack.
SVP utilisez un tournevis pour les vis. Le tournevis n’est pas fourni avec le produit.
Please use a screwdriver for the screws. The screwdriver is not included in the pack.
SVP utilisez un tournevis pour les vis. Le tournevis n’est pas fourni avec le produit.
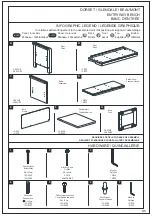
STEP 2
EÙTAPE 2
1. Insert 2 Dowels 4 into of each Sides A .
2. Align pre-drilled holes on Bottom panel D with Dowels 4 in Sides A .
3. Using 6 Allen Key Bolts 1 attach Bottom panel D to Side A .
4. Use Allen Key 3 to tighten screws. Do not over-tighten.
1. Inseùrer 2 goujons 4 dans les coins supeùrieurs de chaque Coâteùs A .
2. Aligner les trous preùperceùs infeùrieur au Panneau infeùrieur D avec des goujons 4 dans les Coâteùs A .
3. Utiliser des 6 Boulons allen 1 pour attacher le Panneau infeùrieur D dans les Coâteùs A .
4. Utiliser la Clef Allen 3 pour visser les vis . Ne pas trop serrer.
A
A
D
4
1
3
4
4
1
1
DORSET / GLENDALE / BEAUMONT
ENTRYWAY BENCH
BANC D’ENTRÉE


