background image

14

SD

KIT

OWNER’S MANUAL

advanced operations

Click/Metronome

Click Settings

The Click is the metronome. The click can be played during a song 

in song mode or on its own. 

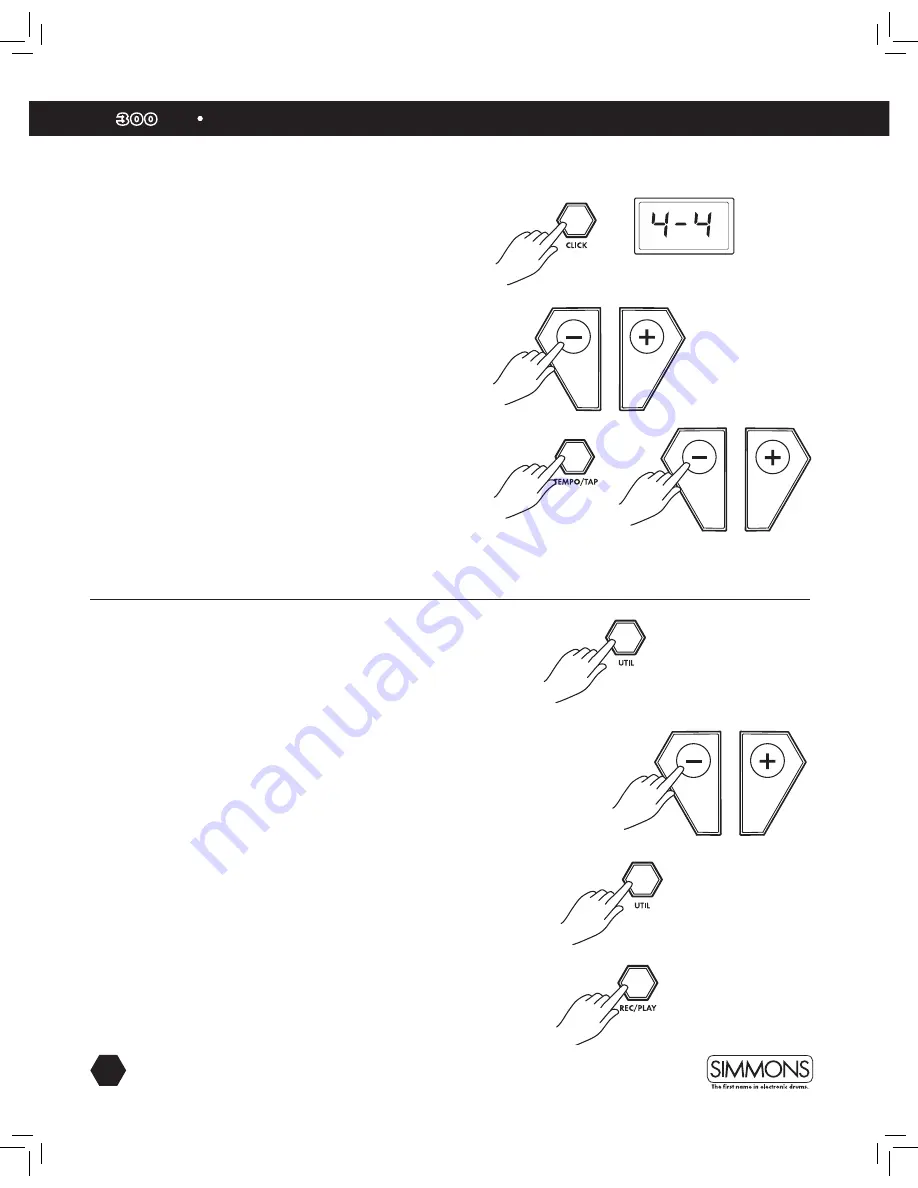
Press [CLICK] button to start and stop the metronome.

1.  To edit the Click settings press and hold the [CLICK]  

button for 2 seconds

2. The first parameter is the time signature 

3.  Press the [ - ] / [ + ] buttons to select the time signature  

that you want.

4.  To adjust the tempo of the click press the [TEMPO/TAP] button 

and use the [ - ] / [ + ] buttons to adjust.

5. You can also adjust the tempo by using the “TAP” function. Press 

and hold the [TEMPO/TAP] button. The LED screen will flash 

the current tempo. Strike Tom1 2-4 times consecutively to set the 

desired “TAP” tempo.

Utility Mode 

The Utility mode is for the main functions of the module such as 

trigger setup for the pads, effects, MIDI setup and saving global 
settings.

Trigger Settings

You can set the parameters of each drum and cymbal pad in the 
Trigger menu. While editing the settings, you can select each trigger 

by hitting the corresponding trigger pad.

1. Press the [UTIL] button.

2.  Strike the drum pad you want to edit to view the setting  

currently assigned

3. To recover factory settings perform the factory reset.  
    (See page 16)

4. Press the [ - ] / [ + ] buttons to change the parameter setting.

5.  To get to the next parameter press the [UTIL] button. See page 15 

for a list of parameters and their descriptions.

6.  After completing your settings Press the [REC/PLAY] button to  

save them.

Содержание SD300KIT

Страница 1: ...owner s manual www simmonsdrums net Electronic Drum Kit www SimmonsDrums net SD KIT...

Страница 2: ...pparatus during lightning storms or when unused for a long periods of time 13 Refer all servicing to qualified service personnel Servicing is required when the apparatus has been damaged in any way su...

Страница 3: ...g Headphones 8 Panel Controls Top Panel 9 LED Display 9 Rear and Back Panels 10 Getting Started Switching the Power On 11 Basic Operation and Navigation 11 Listening to the Demo Song 11 Selecting a Ki...

Страница 4: ...1 x Hi Hat Single Zone 1 x Ride Single Zone 1 x Crash Single Zone Hardware Drum Rack and Mounts Kick pedal Trigger Module Hi Hat pedal 8 Single Zone Snare Pad 8 Single Zone Tom Pads 10 Single Zone Hi...

Страница 5: ...le Harness 1 Pair Drumsticks AC Adaptor Cymbals Accessories S500PAD8S S300PAD8T Single Zone 8 Snare Pad Single Zone 10 Hi Hat Pad Single Zone 8 Tom Pads Single Zone 10 Crash Cymbal Pad Single Zone 10...

Страница 6: ...ar and the right side rack arm Place the tom pads into the mounts and tighten the wing screws Place the L arm into the drum mount clamp on the left side rack arm next to the Hi Hat Slide the snare pad...

Страница 7: ...r is switched OFF on the sound module and all related devices before making any connection See Appendix for Pad Triggers Name and MIDI chart To Hi Hat To Ride To Tom 3 To Tom 1 To Tom 2 To Crash To Hi...

Страница 8: ...USB class compliant host such as most modern MAC and PC computers as well as many tablet devices and it should be recognized immediately There are no drivers to install simply plug n play If you conn...

Страница 9: ...to song mode 3 START Button Plays the selected song 4 MUTE Button Mutes the drum part of selected song 5 TEMPO TAP Button Adjusts the tempo of songs and click 6 CLICK Button Turns the Click Metronome...

Страница 10: ...s the pads and the pedals to the module 1 AC Adapter Input Connection for the 9V DC power adapter 2 USB Port Used for connecting the SD300 module to a computer 3 AUX Input Stereo 1 8 jack to connect e...

Страница 11: ...ion Selecting Modes There are 3 main modes for the module KIT SONG and UTILTY To enter these modes press the corresponding buttons on the top panel of the module Adjusting Values 1 Select the paramete...

Страница 12: ...g you want to play Playing a Song 1 Press START to play a song 2 Press the START button again to stop playback of the song NOTE You can temporarily change the tempo of a song while playback is in prog...

Страница 13: ...he current voice the default is the Snare pad 3 Strike a drum pad to view the Voice currently assigned 4 Press the buttons to change the assigned voice 5 Press the REC PLAY button to save the assignme...

Страница 14: ...ent tempo Strike Tom1 2 4 times consecutively to set the desired TAP tempo Utility Mode The Utility mode is for the main functions of the module such as trigger setup for the pads effects MIDI setup a...

Страница 15: ...the response feels as natural as possible X Talk Pad Crosstalk When two pads are mounted on the same stand the vibration produced by hitting one pad may trigger the sound from another pad unintention...

Страница 16: ...module back to factory setup To Reset the Module to Factory Setup 1 Power off the module 2 Press and hold the buttons while simultaneously turning the pressing and holding the power button There are t...

Страница 17: ...Kit 5 Metal Kit 6 Simmons Kit 7 Jazz Kit 8 Latin Percussion Kit 9 LA Funk Rock Kit 10 Techno Kit 11 User Kit Style Style Name d 1 01 Demo Song Bonz Beat 02 Blues Beat 03 Black Magic 04 Alt Rock 05 Fun...

Страница 18: ...s_Kick1Cp EDRM_Simmons_Snare1Cp CYMBALS CYM_China CYM_Crash1 CYM_Crash2 CYM_Ride MetalPingA CYM_Ride1 BellA CYM_Ride1 BowA 0 CYM_Ride1 BowA CYM_Ride2 BellA CYM_Ride2 Bow CYM_Ride2 CrashEdge ECYM_808Cy...

Страница 19: ...1 O Bank Select Modulation Portamento Time Data Entry Volume Pan Expression Sustain Portamento Sostenuto Soft Pedal DSP TYPE DSP DEPTH RPN LSB MSB Reset all Controllers Program Change True member O 0...

Страница 20: ...ipment off and on the user is encouraged to try to correct the interference by one or more of the following measures Reorient or relocate the receiving antenna Increase the separation between the equi...

Отзывы: