background image

SilverCrest DS-1020T 

English 

65 

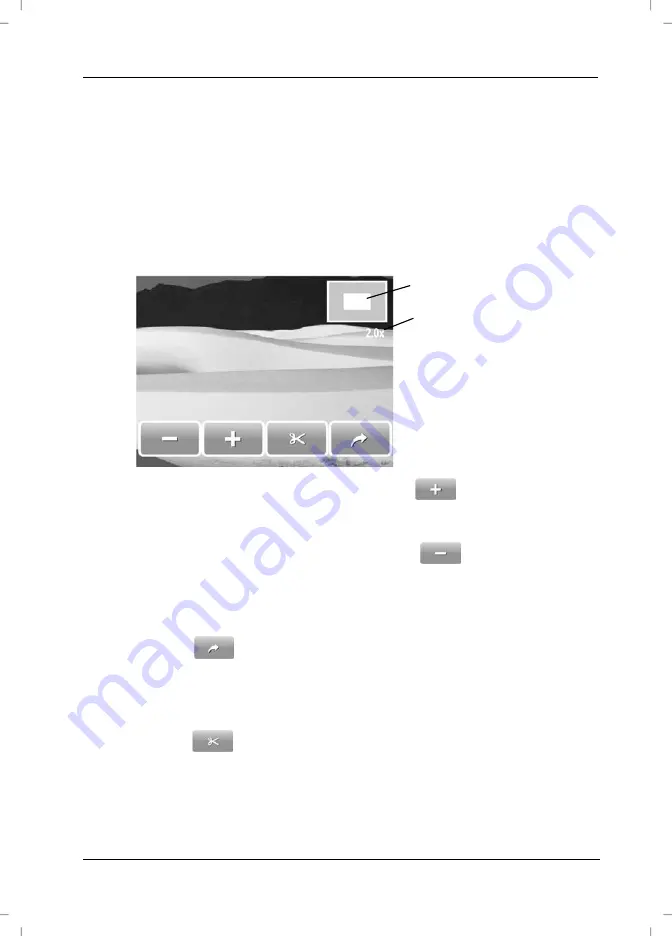
Trimming Pictures 

This function allows you to enlarge a specific picture portion and trim it, if 
required. The maximum enlargement sometimes depends on the captured 
picture's resolution. 

To select a specific portion of an image and save it as a new image: 

š

  Press the Zoom Tele button [5] while in Playback mode. The current 

picture will be enlarged (see figure). 

 Enlarged 

portion 

 Zoom 

factor 


š

  Press the Zoom Tele button [5] or tap the 

 icon to continue 

enlarging the view. 

š

  Press the Zoom Wide button [6] or tap the 

 icon to reduce the 

enlarged portion. 

š

  Tap the displayed frame to move it. 

š

 Use 

the 

 button to cancel this process without saving any 

changes 

or 

use the 

 button to trim the picture. 


Содержание DS-1020T

Страница 1: ...RGA GmbH Lange Wende 41 D 59494 Soest www silvercrest cc User manual and service information Digital Camera with video function 1 4 7 1 8 3 3 6 GB IE CY hb ds 1020_lb6_0903 qxd Layout 1 01 04 2009 8 15 Uhr Seite 1 ...

Страница 2: ...1 2 3 4 5 6 8 9 10 11 12 13 14 7 hb ds 1020_lb6_0903 qxd Layout 1 01 04 2009 8 15 Uhr Seite 2 ...

Страница 3: ... Introduction 11 Package Contents 11 Controls and buttons 12 Getting started 13 Charging the Battery 13 Inserting the Battery 14 Inserting the SD Card 15 Write Protecting a Memory Card 17 Switching the Camera On and Off 17 Power Saving Function 17 Toggling Between Recording and Playback Mode 18 LCD Display 18 Recording Mode 19 Playback Mode 20 Changing the Displayed Information 21 Setting the Menu...

Страница 4: ...nu 28 Resolution 31 Quality 32 ISO 32 Metering 33 White balance 33 Effect 35 AF Area 35 Flash Intensity 36 EV Compensation 36 Photo Frame 38 Sharpness 38 Saturation 39 Contrast 39 Date Stamp 40 Focus mode 40 Drive Mode 41 Flash 42 AF Lamp 42 Scene modes 43 Smile Capture 45 Recording Video Clips 46 Quick Guide 46 Video Menu 47 Movie Size 50 Quality 50 ...

Страница 5: ... Images and Video Clips 53 Quick Guide 53 Playback Menu 54 Saving Your Changes 56 Resize 56 Voice Memo 57 Protect 57 Delete 58 Rotate 58 Z Lighting 59 Add Memo 59 DPOF 59 My Drawings 62 Photo Frame 63 Red eye Correct 63 Effect 63 Using the Thumbnail View 64 Trimming Pictures 65 Advanced settings 67 Setup Menu 67 Memory Kit 68 Auto Review 68 Digital Zoom 69 ...

Страница 6: ...wing Recordings on a Television Screen 74 Copying Recordings to a Computer 75 Using the USB Cable 75 Using a Card Reader 77 Installing the Software 78 System Requirements 78 Supplied Software 78 Appendix 79 Tips for Taking Better Pictures 79 Subject 79 Background 79 Camera Angle 79 Golden Section 79 Lighting 79 Troubleshooting 80 Technical Specifications 82 Product Label 83 Details of Guarantee 84...

Страница 7: ...specially dangerous for children The flash is dangerous to your eyesight When using the flash stand at least one meter 3 feet away from your subject Keep the device away from water and other liquids Do not operate the camera with wet hands Do not use the camera in rain or snow Dampness can cause danger through fire or electric shock Keep the device out of the reach of children and animals to avoid...

Страница 8: ... the power cord with wet hands The device is not for use in rooms with a high temperature or humidity and must be kept free of dust Position the device on a stable even surface and do not place any objects on the device Always make sure that no direct heat sources e g heating can affect the device no direct sunlight or bright artificial light reaches the device contact with spray dripping water an...

Страница 9: ...ttery from the camera when the device is not to be used for a long time Danger of Explosion Non intended use may cause explosion and danger to life Only replace the rechargeable battery with an equivalent or a type recommended by the manufacturer Never replace the battery in an explosion sensitive environment While inserting or removing the battery a spark may be produced causing an explosion Expl...

Страница 10: ...ck Inspect the power cord from time to time Do not use any adapter plug or extension cable that does not meet the required safety standards Maintenance and Care Servicing is required when this device has been damaged in any way for example when the charger or the camera housing is damaged when liquid or objects have entered the device when the product has been exposed to rain or moisture when the ...

Страница 11: ...rectives Any changes to the equipment other than the recommended changes by the manufacturer may lead to the result that these directives are not met any more Only use the accessories recommended by the manufacturer If you are not using the device within the Republic of Germany you must observe the regulations and laws in the country of use Conformity This device has been tested and approved for c...

Страница 12: ...bodies With the proper disposal of old devices you avoid damage to the environment and your personal health For further information about proper disposal contact your local government disposal bodies or the shop where you bought the device Note on this Manual This symbol denotes further information on the topic This symbol denotes important notes On page 12 of this manual you can find the meanings...

Страница 13: ...est DS 1020T digital camera Please check that delivery contents are complete using the list below Package Contents Camera SilverCrest DS 1020T Rechargeable battery Emore NP40 Charger Scope DJ04V20500A with power cord SD memory card 2GB AV cable USB cable Strap Pouch CD ROM not shown User s manual not shown ...

Страница 14: ...ttons Figure of back 1 On Off button 2 Indicator 3 Picture stabilizer 4 Shutter 5 Zoom button Tele 6 Zoom button Wide 7 Eyelet for carrying strap 8 Playback mode 9 Display toggle button 10 Display Figure of Front Panel 11 Flash 12 Self timer lamp and auto focus assist lamp 13 Lens 14 Microphone Bottom 15 Speaker 16 Tripod mount 17 USB port 18 Battery and memory card compartment ...

Страница 15: ...radle will light orange whilst the battery is charging When the charging process is completed the status indicator will light green You can then insert the rechargeable battery into the camera Depending on the charge level the charging cycle can take up to 4 hours If after inserting the rechargeable battery the indicator remains green this means the rechargeable battery is already charged or it is...

Страница 16: ...on to the side and then place the rechargeable battery with the marking orientated towards the camera front panel into the battery compartment Insert the battery fully into the housing until the lock button locks into place The rechargeable battery should be inserted gently and without offering resistance 4 Close the battery compartment cover by pressing down the cover flap onto the housing of the...

Страница 17: ...from the camera when the device is not to be used for a long time Inserting the SD Card By using the supplied SD memory card you can increase the camera storage capacity for saving your photos videos and voice recordings When the memory card is inserted all the photos and videos you take will be saved onto it If there is no memory card inserted your photos and videos will be saved to the internal ...

Страница 18: ...down the cover flap onto the housing of the camera 5 Slide the lock outwards until it locks in place Now the battery compartment is locked To remove the memory card open the battery compartment cover and gently press on the inserted card This will protrude a little so that you can get a hold of it and remove it If the memory card or the internal memory is exhausted the message Memory full will app...

Страница 19: ...ppear on the display 10 and a multiple sound can be heard Switching the Camera On and Off Press the On Off button 1 to switch the camera on in capture mode Or press the Playback mode button 8 to switch the camera on in playback mode Press the On Off button 1 to switch the camera off Power Saving Function This camera is equipped with an automatic power saving function to extend the rechargeable bat...

Страница 20: ...record videos or audio files in Recording mode In Playback mode the recorded files can be seen on the display 10 Press the Playback mode button 8 to toggle between Recording and Playback mode LCD Display The LCD display 10 of your camera is used to configure the shooting parameters to check and adjust the camera settings and to display your captured images In Recording mode on screen icons inform ...

Страница 21: ...e 1 Capture mode 9 Focus area 2 Flash mode 10 Exposure Compensation 3 Macro mode 11 Display the menu 4 Drive Mode 12 ISO setting 5 Zoom bar 13 White balance 6 Remaining pictures 14 Measure area 7 Resolution 15 Histogram 8 Quality 16 Battery status ...

Страница 22: ... Playback Mode 1 Battery status 6 Next recorded item 2 7 Start slide show Current file number total number of files 8 Previous recorded item 3 Histogram 9 Voice Memo 4 Picture information 10 DPOF 5 Display the menu 11 File protection ...

Страница 23: ...yed Information Press the DISP button 9 to change the display mode of the LCD 10 as follows In Recording mode A Standard display B Full display C Minimum display D Grid on In Playback mode A Reduced icon display B Full icon display C All information off ...

Страница 24: ...ow in capture mode Tap the button to open the Record menu Tap the button to open the main menu Tap the button to open the Setup menu Use the or buttons to switch to menu page 4 4 Tap Language Tap on the desired language If necessary you can use the and buttons to change the displayed menu page Tap the button to exit the menus ...

Страница 25: ...d menu Tap the button to open the main menu Tap the button to open the Setup menu Use the or buttons to switch to menu page 2 4 Tap Date Time Tap on the entries Year Month Day Hours and Minutes and use the and buttons to edit the displayed values Tap the YY MM DD button then use or to set the date format Tap the button to save your changes Tap the button to exit the menus ...

Страница 26: ...ton 6 to zoom out the subject Press the shutter button 4 halfway down This will enable the auto focus The camera will try to focus the area contained within the focus area page 19 item 9 This will depend on the lighting conditions and the distance to the subject After the subject has been focused successfully the focus frame will become green and a double beep can be heard Now press the shutter bu...

Страница 27: ...Press the Zoom Tele button 5 to reduce the zoom factor and obtain a telephoto shot Press the Zoom Wide button 6 to enlarge the zoom factor and obtain a wide angle shot When pressing any of the zoom buttons the zoom bar see page 19 item 5 will appear on the display 10 When the maximum optical zoom factor has been reached zooming will pause Press the Zoom Tele button 5 again The camera switches to d...

Страница 28: ... a setting to select it Tap the button to exit the Record menu The following flash settings are available Icon Description The flash will fire automatically whenever the shooting conditions require extra lighting A pre flash will be sent in order for people s eyes to adapt to the flash This will reduce the red eye effect in your pictures The flash will fire again to take the photo but only when ne...

Страница 29: ...layback mode see page 20 item 3 If the graphic is accentuated on the left the picture is very dark if it is accentuated on the right the picture is very bright Histogram examples Dark picture Average picture Bright picture In recording mode you can optimise the brightness distribution before capturing the picture If the picture is too dark you can set a positive value for exposure correction If th...

Страница 30: ...arned how to capture a picture by using the default settings In this case your camera will adjust many settings automatically to allow you to take a quick snapshot In the Record menu however you may adjust many settings manually in order to meet special conditions All settings made here will prevail until you change them again This will also be the case after changing the battery How to open the R...

Страница 31: ...ons Scene mode page 43 Flash mode Hot Key 1 page 26 page 71 Focus mode Hot Key 2 page 40 page 71 Drive Mode Hot Key 3 page 41 page 71 Main Menu Minimise Menu In this menu you can assign any of the recording options to three buttons Hot Keys To do so use the Hot Key function see page 71 ...

Страница 32: ...camera settings icons or on the Setup menu to toggle between the menus Camera settings Setup menu Displaying Menu Pages You can use the and buttons to toggle between the menu pages To exit the main menu tap For more information about the different main menu items see the following pages Depending on the chosen scene mode it is possible that not all the options are available Whenever an option is n...

Страница 33: ... quality 3648 x 2432 3 2 aspect ratio the typical format for paper prints 3264 x 2448 Enhanced quality 2592 x 1944 Average quality 2048 x 1536 Low quality 1920 x 1080 HDTV resolution 640 x 480 Suitable for e mails As a general rule The higher the resolution the larger the picture size and the higher the storage size requirements The lower the resolution the more pictures can be stored Please note ...

Страница 34: ...nes the sensitivity of the photographic material film Equivalent to these values the sensitivity of the sensor of your camera can be set Use a smaller value for a lower sensitivity or select a higher value to obtain a higher sensitivity to light The set value will be displayed on the LCD see page 19 item 12 A higher ISO value allows it to take pictures under bad lighting conditions However the pic...

Страница 35: ...ects an exposure according to the metering at different places in the capture area Center The light is measured in the entire capture area but is weighted more in the centre of the picture Spot Selects an exposure based on a single measurement in the picture centre White balance White balance is used in photography to determine a colour temperature suitable for the current lighting conditions The ...

Страница 36: ...ial light Corrects the orange tint of normal bulb lamps Fluorescent Adjusts the white balance for fluorescent light Manual Manual white balance for a detailed description see below Manual White Balance Select Manual with the icon from the White Balance menu see above A new icon will appear Orientate the focus frame onto a white surface near the subject and then tap the icon The white surface will ...

Страница 37: ...a vintage look Vivid The picture will have more contrast and more saturation Red The image is tinted red Green The image is tinted green Blue The image is tinted blue AF Area Here you change the properties of the auto focus function You can adapt the focus area according to your needs The Touch Shot function even allows you to control the focusing area The following settings are available Icon Des...

Страница 38: ...Description High The picture is lightened with the maximum flash intensity Normal Normal setting Low The flash will fire at lower intensity EV Compensation You can set the exposure value manually The proper setting depends on the lighting conditions around the subject Select a positive value between 0 3EV and 2 0EV if you want to capture a subject located in a dark area Select a negative value bet...

Страница 39: ... use the selected value or tap to disregard all changes and quit the menu Option Description 2 0 EV 1 7 EV 1 3 EV 1 0 EV 0 7 EV 0 3 EV Sensitive exposure setting Recommended for subjects in dark environments 0 EV No exposure correction 0 3 EV 0 7 EV 1 0 EV 1 3 EV 1 7 EV 2 0 EV Less sensitive exposure setting Recommended for bright subjects or for backlight photography ...

Страница 40: ... 3 2 and 16 9 HD resolutions Sharpness You can select whether you want your pictures to have soft or hard contours The contour sharpness can be set in the following three levels Icon Description High The contours are sharpened but the image will contain more picture noise This setting is suitable for prints Normal The contours are sharpened but a slight noise can be perceived in the captured image...

Страница 41: ...available Icon Description High The picture will show vivid colours Normal Normal setting Low The picture will show natural colours Contrast You can determine if you want to capture the picture with a higher or a lower contrast Select one of the following three options Icon Description High The picture will show a higher contrast Normal Normal setting Low The picture will show a lower contrast ...

Страница 42: ...us mode The focus mode determines how the camera focuses the subject The corresponding icon from the table will be displayed on the LCD see page 19 item 13 Select one of the following options Icon Description Auto focus The camera will focus a subject within the focus frame Macro The camera will focus a very close subject If the function is enabled the icon will show on the display Pan Focus The c...

Страница 43: ...re a picture sequence The camera will shoot in sequence while you keep the shutter button 4 pressed The shutter sound will be generated only for the first capture Auto Exposure This function will capture an exposure sequence Three pictures with different exposure settings will be captured in series normal exposure underexposed and overexposed This is a useful function when shooting under lighting ...

Страница 44: ...his lamp helps you to take sharp pictures even under dark lighting conditions The auxiliary light allows the camera to focus the subject properly whenever the environmental light is not sufficient The following options are available Option Description Automatic If required e g under adverse lighting conditions the auto focus lamp will be used automatically Off The auto focus lamp is disabled ...

Страница 45: ...rent scene mode When enabling a scene mode the corresponding icon will be displayed on the LCD see page 19 item 1 You can choose from the following preset programmes Icon Description The camera will adjust automatically to the shooting conditions and performs the required settings Program Aperture and shutter speed will be set automatically Portrait The background will result slightly blurred whil...

Страница 46: ...rs rich in contrast under artificial light Candlelight Expressive pictures with soft flash Night Scene Portrait Portrait in front of a dark background reducing the red eye effect Soft Skin Matching colours for obtaining natural skin tints reducing the red eye effect Soft Flowing Water Slow shutter speed for flowing movements Food A higher colour saturation improves the look of food Building Enhanc...

Страница 47: ...ction allows the camera to focus a smiling face automatically Proceed as follows Press the shutter button 4 to enable the function The scene mode icon will blink on the display As soon as the camera detects a face it will be marked with a frame The camera will continue capturing pictures as soon as the next smile is detected To disable the function press the shutter button 4 again ...

Страница 48: ...ng time will be shown on the display Focus the desired subject area by using the LCD 10 Press the shutter button 4 to start recording The indicator 2 will blink during recording and the recording time will appear on the display Press the shutter button 4 again to stop recording During recording you can also press the Zoom buttons 5 6 to enlarge or reduce the scene During the zooming process no sou...

Страница 49: ... menu Power the camera on by pressing the On Off button 1 The device is now in capture mode Tap the button to open the Record menu Tap the icon for the current scene mode Select the Video option icon The menu disappears and the camera shows the Video menu For more information about the different Video menu items see the following pages ...

Страница 50: ...T 48 The Video menu consists of the following key functions Scene mode in this case Video mode Movie Size Quality page 50 page 32 Frame Rate Focus mode page 50 page 40 White balance Effect page 33 page 35 Main Menu Minimise Menu ...

Страница 51: ...ultiple video settings and the Setup menu see the following figure Tap on the video settings icons or on the Setup menu to toggle between the menus Video settings Setup menu Displaying Menu Pages You can use the and buttons to toggle between the menu pages To exit the main menu tap For more information about the different main menu items see the following pages ...

Страница 52: ...ee below YouTube Mode When recording videos with this setting all parameters are optimised for uploading the video file The resolution for this mode is 640 x 480 pixels Recording will stop automatically as soon as the video file reaches 100MB of size The video file will be saved in a separate UTUBE folder Quality For the settings available for Quality please see the Record menu page 32 Frame Rate ...

Страница 53: ...ngs available for White Balance please see the Record menu page 33 Effect For the settings available for Effect please see the Record menu page 35 Sharpness For the settings available for Sharpness please see the Record menu page 38 Saturation For the settings available for Saturation please see the Record menu page 39 Contrast For the settings available for Contrast please see the Record menu pag...

Страница 54: ... camera is in Audio mode Confirm your selection by pressing the shutter button 4 As soon as the device is ready for audio recording the available recording time will appear in the upper right corner of the display Press the shutter button 4 or use the icon to start recording The indicator 2 will blink during recording and the recording time will appear on the display Press the shutter button 4 or ...

Страница 55: ... If the last recorded item was a video or audio recording a corresponding icon will appear in the centre of the display see the following figure Photo Video Audio You can use the and buttons to toggle between the recorded items Use the button to start a slide show This will show all pictures in sequence For video clips the first frame will be shown voice recordings are skipped Tap the display 10 t...

Страница 56: ... Playback mode by pressing the Playback button 8 or toggle to Playback mode by pressing the Playback button 8 Tap the icon to open the Playback menu The Playback menu consists of the following key functions Drawing Voice Memo page 62 page 57 Rotate Photo Frame page 58 page 63 Brightness DPOF page 59 page 59 Protect Delete page 57 page 58 Main Menu Minimise Menu ...

Страница 57: ...iple playback settings and the Setup menu see the following figure Tap on the playback settings icons or on the Setup menu to toggle between the menus Playback settings Setup menu Displaying Menu Pages You can use the and buttons to toggle between the menu pages To exit the main menu tap For more information about the different main menu items see the following pages ...

Страница 58: ...ve the edited picture under a new name or tap the NO button to disregard all changes and to not save the edited picture or tap Overwrite to overwrite the original picture with the edited one Resize You can reduce the resolution of a saved picture to free up some memory on the memory card or to convert the image to send it via e mail Select the desired resolution by tapping on it It is only possibl...

Страница 59: ...diting The following options are available Option Description Yes Protects the current recording No Cancels the process without any changes If the recording is already protected answer the following safety prompt with YES to unprotect it Select Shows an overview of all recorded items Tap on an individual picture to protect or unprotect it Use the arrow icons to switch between the displayed pages T...

Страница 60: ...elete it here Select Shows an overview of all recorded items Tap a recorded item to delete it Use the arrow icons to switch between the displayed pages Tap the Delete button and select Yes to confirm to save your changes All Deletes all saved recordings Tap the Yes button to confirm Rotate You can rotate recorded images in 90 degree steps This is a very useful function if you have captured picture...

Страница 61: ...ith this option you can attach a graphical memo to a picture Proceed as follows The following buttons are available Icon Description Pen Freehand drawing tool Memo sticker Attaches a Postit type sticker to the picture Eraser Removes the drawing Text bubble Opens different text bubbles for selection Colour Opens a selection with 12 different colours Undo Undoes the last action Undo All Undoes all a...

Страница 62: ...ect an image to be printed and then specify how many prints or which image you would like This is extremely convenient for sending the images to a photo developing service or for printing on a direct print function compatible printer The following options are available Option Description Yes Prepares the current recorded item for DPOF No Cancels the process without any changes If the recording alr...

Страница 63: ...n the next step you can set the number of copies and if you want a date stamp to be printed with the picture Use the arrow icons to set the number of copies Use the arrow icons to determine if you want a date stamp to be printed select Yes or if you don t want the capture date to appear on the printout select No ...

Страница 64: ...mp Changes the font size button into a collection of icons that you can insert Eraser Removes the drawing Pen size Select the desired pen size Colour Opens a selection with 12 different colours Undo Undoes the last action Undo All Undoes all actions Save Saves the edited image either as a new file or under the existing name Quit Exits the picture editing without saving any changes ...

Страница 65: ...ease see the Record menu page 38 Red eye Correct When performing a night shot of a human eye with the flash the pupil does not close quickly enough This gives the impression that the person in the picture has red shining eyes This function will look for any red coloured eyes on the existing picture and will remove them automatically Effect For a description of the Effects please see the Effect opt...

Страница 66: ...s a row of pictures that you can browse by using the left right arrow buttons Press the Zoom Wide button 6 again to enable the thumbnail view Tap on a recorded item to view it in full screen mode The following icons may appear on the thumbnails Icon Description Protected The recorded item is protected DPOF The recorded item has been marked for DPOF printing Video This recorded item is a video file...

Страница 67: ... image and save it as a new image Press the Zoom Tele button 5 while in Playback mode The current picture will be enlarged see figure Enlarged portion Zoom factor Press the Zoom Tele button 5 or tap the icon to continue enlarging the view Press the Zoom Wide button 6 or tap the icon to reduce the enlarged portion Tap the displayed frame to move it Use the button to cancel this process without savi...

Страница 68: ...1020T 66 Tap the YES button to save the trimmed picture under a new name or tap the NO button to disregard all changes and to not save the edited picture or tap Overwrite to overwrite the original picture with the edited one ...

Страница 69: ...handling and functionality of your camera This menu can be accessed from any of the main menus and can be recognised by a tool icon see the figure The menu contents depend on whether you open it from the Record or from the Playback menu For more information about the different Setup menu items see the following pages ...

Страница 70: ...nt medium Copy to card You can copy pictures stored in the internal memory of your camera onto the SD card A memory card with disabled write protection must be inserted into the memory card slot first Select Yes to copy all the contents from the internal memory to the memory card or select No to go back to the Setup menu without applying any changes Auto Review Here you can choose if you want your...

Страница 71: ...m there is an intelligent setting This will use the digital zoom up to an enlargement that will still be acceptable in the sense of picture graininess The value will depend on the distance from the subject and the environmental lighting conditions Please make sure you hold the camera completely still and stable in order to avoid shaky captures We recommend using a tripod System Sound Determine if ...

Страница 72: ...n to re activate the LCD display If the camera is left unused another minute after the display has powered off the camera will switch off completely Select a power off time of 1 minute 3 minutes or 5 minutes Date Time You have already read about this feature in the Getting Started chapter Please read page 23 Setting Date and Time TV Out This menu allows you to select the TV standard of your televi...

Страница 73: ...nction to these buttons Hotkeys Proceed as follows to program the hotkeys Tap on the hotkey that you want to change Select the desired function that you want to assign to the hotkey Repeat this procedure if you want to program more hotkeys Confirm the programming by tapping the button or tap to cancel the process without any changes ...

Страница 74: ...will automatically assign a unique name to your recordings This file name is a combination of the prefix DSCI followed by a sequential four digit number starting at 0001 You can select Yes from this menu to reset the sequential number back to 0001 To avoid double names your camera will automatically create a new folder on the memory card Reset All camera parameters will be reset to their factory d...

Страница 75: ...SilverCrest DS 1020T English 73 Language You have already read about this feature in the Getting Started chapter Please read page 22 Setting the Menu Language ...

Страница 76: ... yellow connector to VIDEO IN white connector to AUDIO IN Please also consult the User Manual of your TV set for more information Select the AV channel corresponding to the above input connectors on your TV set This is a device specific setting If necessary read the User Manual of your TV set for more information on how to do this Power the camera on in Playback mode by pressing the Playback butto...

Страница 77: ... ways to copy recordings from the camera to a computer by connecting the camera to a computer via the USB cable by inserting the SD memory card into a card reader Using the USB Cable Windows XP and Windows Vista operating systems will detect the camera automatically as a mass storage device Please make sure that your camera is powered off Insert the USB cable connection jack into the connection po...

Страница 78: ...r 2 will light green while the connection is established Open My Computer on your PC and double click on the new Removable disk drive All recorded files can be found in the folder DCIM on this disk drive Now you can copy the recorded files from the camera into a folder of your choice of the computer s hard disk ...

Страница 79: ...nto the card reader of your computer normally labelled SD MMC The PC will add the memory card contents under the drive letter in My Computer representing the card reader Open My Computer on your PC and double click on the disk drive representing the card reader All recorded files can be found in the folder DCIM on this disk drive Now you can copy the recorded files from the memory card into a fold...

Страница 80: ...The supplied CD ROM contains software for your camera Insert the CD ROM into your CD ROM drive The menu should appear automatically Note If the menu isn t displayed automatically after inserting the CD ROM you can run the file Setup exe from the CD ROM manually Select the software you want to install Then follow the on screen instructions to install ...

Страница 81: ...t no interfering objects are located in the background Camera Angle Experiment with the angle Change your position relative to the subject and try both a wide angle or a telephoto setting Golden Section The camera allows you to display a grid while in Record mode see page 21 Changing the Displayed Information Place important subject parts onto the grid lines or on their intersections e g the horiz...

Страница 82: ...ry or recharge it The camera does not record any pictures The flash is still charging indicator on display Wait until the flash has been charged The memory is full Insert an empty memory card or delete some recordings The memory card isn t properly formatted Format the memory card or try with a different memory card The maximum number of files 9999 has been exceeded Reset the file number The flash...

Страница 83: ...a still The subject was located outside the focus range of the camera Change your position relative to the subject Use the Macro mode when capturing very close subjects Recorded images haven t been saved The camera has been powered off before any picture could be saved Do not power the camera off before the storage process has been completed ...

Страница 84: ...DPOF Video MJPEG Audio WAV Resolution Photo 3648x2736 3648x2432 3264x2448 2592x1944 2048x1536 1920x1080 640x480 Video 848x480 640x480 320x240 Scene mode Auto Program Video Voice recording Portrait Landscape Sunset Backlight Smile Capture Kids Night Scene Fireworks Winter Sports Party Candlelight Night Portrait Skin Tones Soft Flowing Water Food Building Text Sales Auction Sensitivity Auto 100 200 ...

Страница 85: ...al 32 MB flash memory partially used by the operating system External SD memory card SD max 4GB SDHC max 8GB TV Out PAL NTSC Power Supply Rechargeable Li Ion battery 3 7V 720 mAh Type Emore NP40 with charger Scope DJ04V20500A Environmental temperature Operating temperature 0 C 35 C Storage temperature 20 C 60 C Microphone Built in mono capacitor microphone Speaker Built in Dimensions 9 8 x 5 8 x 2...

Страница 86: ...English SilverCrest DS 1020T 84 Details of Guarantee ...

Страница 87: ...SilverCrest DS 1020T English 85 ...

Страница 88: ...omagnetic Compatibility 2004 108 EC and the Council Directive relating to Low Voltage 2006 95 EC The measurements were carried out in accredited laboratories For the evaluation of above mentioned Council Directives for Electromagnetic Compatibility and for Low Voltage standards were consulted EMC EN 55024 1998 A1 2001 A2 2003 EN 55022 2006 limit class B EN 61000 3 2 2006 EN 61000 3 3 1995 A1 2001 ...

Отзывы: