background image

SGB 1200 B5

■ 

8 

GB

IE

NI

CY

Operating the appliance

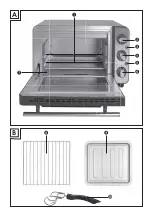
Function switch

You can switch on the appliance using the function 
switch 

4

, and can also set three different functions:

Symbol

Meaning

"Top heat"  

e.g. for grilling

"Bottom heat"  

e.g. for baking cakes

"Top & bottom heat"  

e.g. for baking pizza

OFF

"OFF"  

The appliance is switched off.

Temperature control


Use the temperature control 

2

 to set the  

desired temperature.

Timer

User the timer 

6

 to set the cooking time.


Set the timer 

6

 to the desired cooking time. 

The red control lamp 

lights up. Once the set 

time has elapsed, you will hear a beep and 
the appliance stops heating. The red control 
lamp 

goes out.

NOTE

You can also use the timer 

6

 as a short-period 

timer without the heating function.


Set the function switch 

4

 to 

OFF

.


Set the desired time on the timer 

6

.

The switch of the timer 

6

 now rotates 

anticlockwise to "OFF". A beep sounds when the 
set time has elapsed. The appliance does not 
heat up.

Grilling and baking

CAUTION! MATERIAL DAMAGE!


Never place any containers or food directly 
onto the floor of the appliance, the heating 
elements or the crumb tray 

7

1)  Place the crumb tray 

7

 in the appliance.

2)  Remove the rack 

8

 and baking tray 

9

 from 

the appliance. If required, cover these with 
baking paper or grease the baking tray 

9


with fat/oil that is suitable for baking.

NOTE


The oven must be pre-heated appropriate 
to each dish. Refer to the guidelines in the 
respective recipe. Pre-heating is useful for:


very short baking times,


crisp crusts,


delicate dishes that require a constant 
temperature, such as soufflés.


If no pre-heating is required, skip step 3).

3)  Allow the appliance to heat up to the desired 

temperature:


Close the glass door. 


Select the required temperature using the 
temperature control 

2


Select the required function with the function 
switch 

4

.


Use the timer 

6

 to set a preheating time of 

at least 15 minutes.

The red control lamp 

5

 indicates that the appliance 

is switched on. The switch of the timer 

6

 now 

rotates anticlockwise to the “OFF” position.

IB_346016_SGB1200B5_GB-IE-NI-CY.indb   8

14.08.2020   10:59:34

Содержание 346016_2004

Страница 1: ...MINI OVEN SGB 1200 B5 MINI BACKOFEN Bedienungsanleitung MINI OVEN Operating instructions ΦΟΥΡΝΑΚΙ Οδηүίες χρήσης IAN 346016_2004 ...

Страница 2: ...ge containing the illustrations and familiarise yourself with all functions of the device Πριν ξεκινήσετε την ανάγνωση ανοίξτε τη σελίδα με τις εικόνες και εξοικειωθείτε με όλες τις λειτουργίες της συσκευής Klappen Sie vor dem Lesen die Seite mit den Abbildungen aus und machen Sie sich anschließend mit allen Funktionen des Gerätes vertraut ...

Страница 3: ...9 0 B 2 3 4 6 7 A 5 1 8 ...

Страница 4: ...on 6 Using the appliance 6 Glass door 6 Inserting the crumb tray 6 Using the rack 6 Using the baking tray 7 Before initial use 7 Operating the appliance 8 Function switch 8 Temperature control 8 Timer 8 Grilling and baking 8 Cleaning and care 9 Storage 10 Troubleshooting 10 Disposal 11 Kompernass Handels GmbH warranty 11 Service 12 Importer 12 Recipes 13 ...

Страница 5: ... food This appliance is intended solely for use in private households Do not use it for commercial applications All other uses are deemed to be improper and may result in property damage or even in personal injury Package contents Mini oven 1 baking tray 1 rack 1 pair of tongs 1 crumb tray Operating instructions NOTE Check contents for completeness and damage immediately after unpacking Contact Cu...

Страница 6: ...not allow any liquids to penetrate the housing Do not expose the appliance to humidity and do not use it outdoors Additionally do not place liquid filled receptacles such as vases on the appliance There is a risk of fire and of receiving an electric shock If liquids permeate into the housing unplug the appliance immediately and arrange for it to be repaired by a qualified technician Never touch the a...

Страница 7: ...from the appliance and the power cable Route the power cable in such a way that no one can tread on it or trip over it Never touch the glass door or the housing during use as these can get very hot Use oven gloves or something similar to open the glass door to avoid being burnt Never touch the heating elements or the viewing window when the appliance is in use or before it has cooled down complete...

Страница 8: ...e the appliance with the original accessories supplied Do not kink or crush the power cable To disconnect always remove the plug itself from the mains power socket do not pull on the power cable Ensure that there are no highly inflammable materials in the immediate vicinity of the automatic oven and grill e g dishcloths oven cloths etc when the appliance is in use Never dry textiles or other object...

Страница 9: ...teel worktops or natural stone worktops such as granite Ensure there is sufficient ventilation around the appliance Push the appliance up against the wall with its rear side facing the wall The spacers on the back must touch the wall Ensure that the wall is made of heat resistant material e g tiles natural stone or granite Clean all components as described in the section Cleaning and care Using the ...

Страница 10: ...mperature control 2 clockwise to the maximum temperature to the limit stop 3 Turn the function switch 4 to top and bottom heat 4 Open the glass door and leave it open for this operation 5 Remove any installed accessories from the cooking chamber 6 Turn the timer 6 to 20 minutes NOTE The first time the appliance heats up a small amount of smoke and odour may be generated due to production related re...

Страница 11: ...lapsed The appliance does not heat up Grilling and baking CAUTION MATERIAL DAMAGE Never place any containers or food directly onto the floor of the appliance the heating elements or the crumb tray 7 1 Place the crumb tray 7 in the appliance 2 Remove the rack 8 and baking tray 9 from the appliance If required cover these with baking paper or grease the baking tray 9 with fat oil that is suitable for...

Страница 12: ...g the appliance disconnect the power plug from the mains power socket There is a risk of electric shock Never immerse the appliance in water or any other liquid WARNING RISK OF INJURY Always allow the appliance to cool down before cleaning it Otherwise there is a risk of sustaining burns It is best to clean the appliance and accessories as soon as they have cooled down This makes food residues eas...

Страница 13: ...lamp 5 is lit but the appliance does not heat up The function switch 4 is set to OFF Turn the function switch 4 to the desired function The cooking time of the food seems overly long The glass door has been opened often to check the cooking progress Do not open the glass door any more often than is absolutely necessary The wrong temperature level has been set Check the temperature settings Smoke a...

Страница 14: ...as any faults you the buyer have certain statutory rights Your statutory rights are not restricted in any way by the warranty described below Warranty conditions The warranty period starts on the date of purchase Please keep your receipt in a safe place This will be required as proof of purchase If any material or manufacturing fault occurs within three years of the date of purchase of the product...

Страница 15: ...ber e g IAN 123456_7890 available as proof of purchase You will find the item number on the type plate on the product an engraving on the product on the front page of the operating instructions below left or on the sticker on the rear or bottom of the product If functional or other defects occur please contact the service department listed either by telephone or by e mail You can return a defective...

Страница 16: ...ts chocolate flakes or mashed bananas 4 Place the prepared dough into standard muffin moulds and place them on the baking tray 9 5 Bake the muffins at 220 C on the bottom rail using top bottom heat for about 15 minutes Hawaiian toast Ingredients for 4 pieces of toast 4 slices of toasting bread 1 2 tablespoons of remoulade 120 g cooked ham 1 2 tin of pineapples 4 slices of cheese for gratinating Curry P...

Страница 17: ...ough is sufficient for several baking trays 9 Bread rolls Ingredients 300 g flour or wholemeal flour 2 heaped teaspoons of baking powder 200 g linseeds 1 egg 500 g quark or curd cheese 1 teaspoon of salt Subject to taste caraway seeds onions bacon Preparation 1 Knead all ingredients together well and then shape into small rolls 2 Line the baking tray 9 with baking paper and place the rolls on this 3 B...

Страница 18: ...around 7 10 minutes turn the bread cubes and continue baking them for another 7 10 minutes until they are golden brown NOTE You can also use herb or garlic butter instead of regular butter Baking time is then reduced by about 5 minutes Minced meat baguettes Ingredients 2 baguette rolls 250 g minced meat half and half 2 tomatoes 1 onion diced 2 tbsp tomato purée 40 g grated Parmesan cheese 4 slices...

Страница 19: ...epared dish at 200 C in a pre heated oven using top and bottom heat for about 20 minutes on the bottom rail Salmon filled flaky pastries burek Ingredients 1 pack of flaky pastry slices approx 8 pieces 1 pack of smoked salmon sliced about 200 g 1 lemon 1 onion 1 pack of cream cheese 200 g Fresh dill Salt and pepper 1 egg yolk Preparation 1 Separate the puff pastry sheets and if necessary allow them to ...

Страница 20: ... 22 Γυάλινη πόρτα 22 Τοποθέτηση δίσκου συλλογής ψίχουλων 22 Χρήση σχάρας 22 Χρήση ταψιού 23 Πριν την πρώτη χρήση 23 Χρήση της συσκευής 24 Διακόπτης λειτουργίας 24 Ρυθμιστής θερμοκρασίας 24 Χρονοδιακόπτης 24 Ψήσιμο στο γκριλ και ψήσιμο στο φούρνο 24 Καθαρισμός και φροντίδα 25 Αποθήκευση 26 Διόρθωση σφαλμάτων 26 Απόρριψη 27 Εγγύηση της Kompernass Handels GmbH 27 Σέρβις 28 Εισαγωγέας 28 Συνταγές 29 ...

Страница 21: ...ια χρή ση σε νοικοκυριά Μην τη χρησιμοποιείτε για επαγ γελματικό σκοπό Κάθε άλλη χρήση ισχύει ως μη σύμφωνη με τους κανονισμούς και μπορεί να οδηγήσει σε υλικές ζημιές ή ακόμη και σε σωματικές βλάβες Παραδοτέος εξοπλισμός Φουρνάκι 1 ταψί 1 σχάρα 1 λαβίδα 1 δίσκος συλλογής ψίχουλων Οδηγίες χρήσης ΥΠΟΔΕΙΞΗ Ελέγξτε τον παραδοτέο εξοπλισμό ως προς την πληρότητα και για ζημιές απευθείας μετά την αποσυσ...

Страница 22: ... υγρά να διεισδύουν μέσα στο περίβλημα της συ σκευής Απαγορεύεται η έκθεση της συσκευής σε υγρασία καθώς και η χρήση της σε εξωτερικούς χώρους Επίσης δεν επιτρέπεται να τοποθετείτε επάνω στη συσκευή αντικείμενα γεμάτα με υγρά όπως π χ βάζα Υπάρχει κίνδυνος πυρκαγιάς και ηλεκτροπληξίας Στην περίπτωση που ωστόσο εισχωρήσουν υγρά μέσα στο περί βλημα αποσυνδέστε αμέσως το βύσμα της συσκευής από την πρ...

Страница 23: ... και το καλώδιο σύνδεσης Τοποθετείτε το καλώδιο έτσι ώστε να μην μπορεί να το πατήσει κανείς ή να σκοντάψει σε αυτό Ποτέ μην αγγίζετε τη γυάλινη πόρτα ή το περίβλημα κατά τη διάρκεια της χρήσης διότι μπορεί να είναι πολύ ζεστά Για το άνοιγμα της γυάλινης πόρτας χρησιμοποιείτε ένα πανί κουζίνας ή κάτι παρόμοιο ώστε να αποφεύγετε εγκαύματα Ποτέ μην αγγίζετε τις θερμαντικές ράβδους ή το παράθυρο παρα...

Страница 24: ...ίτε τη συσκευή μόνο με τα παραδοτέα γνήσια εξαρτήματα Μη διπλώνετε ή μαγκώνετε το καλώδιο Πιάνετε πάντα το βύσμα κατά την αποσύνδεση από την πρίζα μην τραβάτε ποτέ από το ίδιο το καλώδιο Κατά τη διάρκεια της λειτουργίας δεν επιτρέπεται να υπάρχουν εύφλεκτα υλικά πολύ κοντά στον αυτόματο φούρνο με γκριλ π χ πετσέτα πανιά κουζίνας κλπ Ποτέ μη στεγνώνετε υφάσματα ή αντικείμενα επάνω ή μέσα στη συσκευ...

Страница 25: ... Φροντίζετε για επαρκή αερισμό γύρω από τη συσκευή Σπρώξτε τη συσκευή με την πίσω πλευρά μέχρι τον τοίχο Οι αποστάτες στην πίσω πλευρά πρέ πει να αγγίζουν τον τοίχο Φροντίζετε ώστε ο τοίχος να αποτελείται από θερμανθεκτικό υλι κό π χ επένδυση από πλακάκια φυσική πέτρα ή γρανίτη Καθαρίζετε όλα τα εξαρτήματα όπως περιγρά φεται στο Κεφάλαιο Καθαρισμός και φροντίδα Χρήση της συσκευής Γυάλινη πόρτα ΠΡΟ...

Страница 26: ...ερμοκρασί ας 2 στην υψηλότερη θερμοκρασία 3 Γυρίστε το διακόπτη λειτουργίας 4 στη θέση Επάνω και κάτω αντίσταση 4 Ανοίξτε τη γυάλινη πόρτα και αφήστε την ανοιχτή για αυτή τη διαδικασία 5 Απομακρύνετε τυχόν τοποθετημένα εξαρτήματα από το χώρο ψησίματος 6 Γυρίστε το χρονοδιακόπτη 6 στα 20 λεπτά ΥΠΟΔΕΙΞΗ Κατά το πρώτο ζέσταμα της συσκευής μπο ρεί να προκύψουν υπολείμματα από τη διαδι κασία ετοιμασίας...

Страница 27: ...FF Ακούγεται ένας ήχος σήματος όταν έχει λήξει ο ρυθμισμένος χρόνος Η συσκευή δε ζεσταίνει Ψήσιμο στο γκριλ και ψήσιμο στο φούρνο ΠΡΟΣΟΧΗ ΥΛΙΚΕΣ ΖΗΜΙΕΣ Ποτέ μην τοποθετείτε ακουμπάτε δοχεία ή τρόφιμα απευθείας στον πάτο της συσκευής στις θερμαντικές ράβδους ή στο δίσκο συλ λογής ψίχουλων 7 1 Τοποθετήστε το δίσκο συλλογής ψίχουλων 7 στη συσκευή 2 Απομακρύνετε τη σχάρα 8 και το ταψί 9 από τη συσκευή...

Страница 28: ... τη βοήθεια της λαβί δας 0 Καθαρισμός και φροντίδα ΚΙΝΔΥΝΟΣ ΗΛΕΚΤΡΟΠΛΗΞΙΑΣ Πριν από κάθε καθαρισμό αποσυνδέετε το βύσμα από την πρίζα Υπάρχει κίνδυνος ηλε κτροπληξίας Ποτέ μη βυθίζετε τη συσκευή σε νερό ή σε άλλα υγρά ΠΡΟΕΙΔΟΠΟΙΗΣΗ ΚΙΝΔΥΝΟΣ ΤΡΑΥΜΑΤΙΣΜΟΥ Αφήνετε πάντα πρώτα τη συσκευή να κρυώ νει προτού την καθαρίσετε Σε αντίθετη περί πτωση υπάρχει κίνδυνος εγκαύματος Κατά προτίμηση καθαρίζετε τη σ...

Страница 29: ...ακόπτης λειτουργίας 4 είναι στη θέση OFF Γυρίστε το διακόπτη λειτουργί ας 4 στην επιθυμητή λειτουργία Ο χρόνος ψησίματος των φαγητών φαίνεται πολύ μεγάλος Η γυάλινη πόρτα άνοιξε πολλές φορές για να ελεγχθεί η πρόοδος του ψησίματος Μην ανοίγετε τη γυάλινη πόρτα συχνότερα από ότι χρειάζεται Έχει ρυθμιστεί λάθος θερμοκρασία Ελέγξτε τις ρυθμίσεις θερμοκρα σίας Κατά τη χρήση εμφανίζεται καπνός και θόρυ...

Страница 30: ...έτει 3 χρόνια εγγύηση από την ημερομηνία αγοράς Στην περίπτωση ελ λείψεων στο προϊόν έχετε νομικά δικαιώματα έναντι του πωλητή του προϊόντος Αυτά τα νομικά δικαιώ ματα δεν περιορίζονται μέσω της κατωτέρω αναφε ρόμενης εγγύησης Προϋποθέσεις εγγύησης Η περίοδος εγγύησης ξεκινά την ημερομηνία αγο ράς Φυλάσσετε την απόδειξη αγοράς Απαιτείται ως αποδεικτικό αγοράς Εάν εντός τριών ετών από την ημερομηνί...

Страница 31: ...έτοιμη την από δειξη αγοράς και τον κωδικό προϊόντος π χ ΙΑΝ 123456_7890 ως απόδειξη για την αγορά Για τον κωδικό προϊόντος ανατρέξτε στην πινα κίδα τύπου στο προϊόν σε μια ετικέτα στο προ ϊόν στο εξώφυλλο των οδηγιών χρήσης κάτω αριστερά ή σε ένα αυτοκόλλητο στην πίσω ή κάτω πλευρά του προϊόντος Εάν προκύψουν σφάλματα λειτουργίας ή άλλες ελλείψεις επικοινωνήστε κατ αρχήν με το ακό λουθο αναφερόμε...

Страница 32: ...θυμείτε αναμιγνύετε με καρύδια νιφάδες σοκολάτας ή ψιλοκομμένες μπανάνες 4 Βάζετε την έτοιμη ζύμη σε συνήθεις φόρμες για μάφιν και τις τοποθετείτε επάνω στο ταψί 9 5 Ψήνετε τα μάφιν στους 220 C στην επάνω και κάτω αντίσταση για περίπου 15 λεπτά στην κάτω ράγα Τοστ Χαβάη Υλικά για 4 τοστ 4 φέτες ψωμί του τοστ 1 2 ΚΣ γαλλική πικάντικη σάλτσα 120 γρ βρασμένο ζαμπόν 1 2 κονσέρβα ανανά 4 φέτες τυρί για...

Страница 33: ...άγα έως ότου γίνουν χρυσοκίτρινα ΥΠΟΔΕΙΞΗ Η ποσότητα ζύμης επαρκεί για περισσότερα τα ψιά 9 Ψωμάκια Υλικά 300 γρ αλεύρι ή αλεύρι ολικής άλεσης 2 γεμάτες ΚΓ μπέικιν πάουντερ 200 γρ λιναρόσπορος 1 αυγό 500 γρ άσπρο μαλακό τυρί 1 ΚΓ αλάτι Εάν επιθυμείτε κύμινο κρεμμύδια μπέικον Ετοιμασία 1 Ανακατεύετε όλα τα υλικά καλά και σχηματίζετε μικρά ψωμάκια 2 Τοποθετείτε τα ψωμάκια επάνω στο ταψί 9 με χαρτί ψ...

Страница 34: ...νω αντίσταση στην επά νω ράγα Μετά από περ 7 10 λεπτά γυρίζε τε τους κύβους ψωμιού τοστ και τους ψήνετε άλλα 7 10 λεπτά έως ότου γίνουν χρυσοκί τρινοι ΥΠΟΔΕΙΞΗ Μπορείτε επίσης να χρησιμοποιήσετε σκορδο βούτυρο ή βούτυρο με βότανα αντί του σκέτου βουτύρου Ο χρόνος ψησίματος μειώνεται τότε περ κατά 5 λεπτά Μπαγκέτες με κιμά Υλικά 2 ψωμάκια μπαγκέτες 250 γρ κιμάς μισός μοσχάρι και μισός χοιρινός 2 το...

Страница 35: ...ε το ογκρατέν περ στους 200 C σε προθερμασμένο φούρνο στην επάνω και κάτω αντίσταση περ για 20 λεπτά στην κάτω ράγα Πουγκάκια φύλλου με γέμιση σολομού Υλικά Υλικά 1 πακ φύλλα ζύμης περ 8 τεμάχια 1 πακ σολομός καπνιστός σε φέτες περ 200 γρ 1 λεμόνι 1 κρεμμύδι 1 πακ νωπό τυρί 200 γρ Φρέσκος άνηθος Αλάτι και πιπέρι 1 κρόκος Ετοιμασία 1 Ξεχωρίζετε τα φύλλα ζύμης μεταξύ τους και τα αφήνετε εάν χρειάζετ...

Страница 36: ...en 38 Benutzung des Gerätes 38 Glastür 38 Krümelblech einlegen 38 Gitterrost benutzen 38 Backblech benutzen 39 Vor dem ersten Gebrauch 39 Bedienen des Gerätes 40 Funktionsschalter 40 Temperaturregler 40 Timer 40 Grillen und Backen 40 Reinigung und Pflege 41 Aufbewahrung 42 Fehlerbehebung 42 Entsorgung 43 Garantie der Kompernaß Handels GmbH 43 Service 44 Importeur 44 Rezepte 45 ...

Страница 37: ...ses Gerät ist ausschließlich für die Benutzung in privaten Haushalten bestimmt Nutzen Sie es nicht gewerblich Jede andere Verwendung gilt als nicht bestimmungs gemäß und kann zu Sachschäden oder sogar zu Personenschäden führen Lieferumfang Mini Backofen 1 Backblech 1 Gitterrost 1 Zange 1 Krümelblech Bedienungsanleitung HINWEIS Kontrollieren Sie den Lieferumfang direkt nach dem Auspacken auf Vollst...

Страница 38: ... Sie dürfen das Gerät keiner Feuchtigkeit aussetzen und nicht im Freien benutzen Darüber hinaus dürfen Sie keine mit Flüssigkeiten ge füllten Gegenstände wie z B Vasen auf dem Gerät abstellen Es besteht Brandgefahr und Gefahr eines elektrischen Schlags Falls doch einmal Flüssigkeit in das Gerätegehäuse gelangt ziehen Sie sofort den Netzstecker des Geräts aus der Netzsteckdose und lassen Sie es rep...

Страница 39: ...eitung fernzuhalten Verlegen Sie das Netzkabel so dass niemand darauf treten oder darüber stolpern kann Berühren Sie niemals die Glastür oder das Gehäuse während der Benutzung da diese sehr heiß werden Verwenden Sie zum Öffnen der Glastür einen Topflappen o Ä um Verbrennungen zu vermeiden Berühren Sie niemals die Heizstäbe oder das Sichtfenster während des Betriebs oder bevor das Gerät abgekühlt ist...

Страница 40: ...s Gerät ausschließlich mit dem mitgelieferten Originalzubehör Knicken oder quetschen Sie das Netzkabel nicht Ziehen Sie das Netzkabel stets am Stecker aus der Steckdose ziehen Sie nicht am Kabel selbst Es dürfen sich während des Betriebs keine leicht brennbaren Materialien in unmittelbarer Umgebung des Grill und Backauto maten befinden z B Geschirrhandtuch Topflappen etc Trocknen Sie niemals Textili...

Страница 41: ...ten wie Granit auf Sorgen Sie für ausreichende Belüftung rund um das Gerät Schieben Sie das Gerät mit der Rückseite bis an die Wand Die Abstandhalter an der Rückseite müssen die Wand berühren Achten Sie darauf dass die Wand aus hitzebeständigem Material besteht z B ein Fliesenspiegel Naturstein oder Granit Reinigen Sie alle Teile wie im Kapitel Reinigung und Pflege beschrieben Benutzung des Gerätes...

Страница 42: ...eraturregler 2 bis zum Anschlag im Uhrzeigersinn auf die höchste Temperatur 3 Drehen Sie den Funktionsschalter 4 auf Ober und Unterhitze 4 Öffnen Sie die Glastür und lassen Sie diese für diesen Vorgang geöffnet 5 Entnehmen Sie eventuell eingesetztes Zubehör aus dem Garraum 6 Drehen Sie den Timer 6 auf 20 Minuten HINWEIS Beim erstmaligen Aufheizen des Gerätes kann es durch fertigungsbedingte Rückstän...

Страница 43: ...ät heizt dabei nicht Grillen und Backen ACHTUNG SACHSCHADEN Legen Stellen Sie niemals Behälter oder Lebens mittel direkt auf den Boden des Gerätes die Heizstäbe oder das Krümelblech 7 1 Legen Sie das Krümelblech 7 in das Gerät 2 Nehmen Sie den Gitterrost 8 und das Backblech 9 aus dem Gerät Legen Sie diese gegebenenfalls mit Backpapier aus bzw bestreichen Sie das Backblech 9 mit zum Backen geeignet...

Страница 44: ...e GEFAHR ELEKTRISCHER SCHLAG Ziehen Sie vor jeder Reinigung den Netzste cker aus der Netzsteckdose Es besteht die Gefahr eines elektrischen Schlages Tauchen Sie das Gerät niemals in Wasser oder andere Flüssigkeiten WARNUNG VERLETZUNGSGEFAHR Lassen Sie das Gerät immer erst abkühlen bevor Sie es reinigen Es besteht sonst Verbren nungsgefahr Reinigen Sie das Gerät und die Zubehörteile am besten sofor...

Страница 45: ...heizt nicht Der Funktionsschalter 4 steht auf OFF Drehen Sie den Funktionsschalter 4 auf die gewünschte Funktion Die Garzeit der Speisen erscheint sehr lang Die Glastür wurde sehr oft geöffnet um den Garfortschritt zu kontrollieren Öffnen Sie die Glastür nicht öfter als unbedingt notwendig Es ist eine falsche Temperatur eingestellt Überprüfen Sie die Temperatur einstellungen Während der Benut zung t...

Страница 46: ...rodukts gesetzliche Rechte zu Diese gesetzlichen Rechte werden durch unsere im Folgenden dargestellte Garantie nicht eingeschränkt Garantiebedingungen Die Garantiefrist beginnt mit dem Kaufdatum Bitte bewahren Sie den Kassenbon gut auf Dieser wird als Nachweis für den Kauf benötigt Tritt innerhalb von drei Jahren ab dem Kaufdatum dieses Produkts ein Material oder Fabrikationsfeh ler auf wird das P...

Страница 47: ...eit Die Artikelnummer entnehmen Sie bitte dem Ty penschild am Produkt einer Gravur am Produkt dem Titelblatt der Bedienungsanleitung unten links oder dem Aufkleber auf der Rück oder Unterseite des Produktes Sollten Funktionsfehler oder sonstige Mängel auftreten kontaktieren Sie zunächst die nachfol gend benannte Serviceabteilung telefonisch oder per E Mail Ein als defekt erfasstes Produkt können S...

Страница 48: ...oflo cken oder zerdrückten Bananen mischen 4 Den fertigen Teig in typische Muffin Formen geben und diese auf das Backblech 9 stellen 5 Die Muffins bei 220 C mit Ober und Unter hitze etwa 15 Minuten auf der unteren Schiene backen Hawaiitoast Zutaten für 4 Toasts 4 Scheiben Toast 1 2 Esslöffel Remoulade 120 g gekochter Schinken 1 2 Dose Ananas 4 Scheiben Käse zum Überbacken Curry Zubereitung 1 Die Toastsc...

Страница 49: ...ebeln Speck Zubereitung 1 Alles gut durchkneten und kleine Brötchen daraus formen 2 Die Brötchen auf das mit Backpapier ausgelegte Backblech 9 legen 3 Bei ca 200 C Oberhitze ungefähr 30 Minuten auf der oberen Schiene backen HINWEIS Die Teigmenge reicht für mehrere Backbleche 9 Baiser Zutaten 1 Eiweiß Salz 45 g Zucker Zubereitung 1 Das gekühlte Eiweiß in eine fettfreie Rührschüs sel geben Es darf k...

Страница 50: ...ngen Sie das Gehackte das Tomaten mark die Zwiebel den Parmesan etwas Salz und etwas Pfeffer 3 Formen Sie das Hackfleisch zu 4 gleich gro ßen möglichst flachen Frikadellen und legen Sie sie auf die Baguette Hälften 4 Schneiden Sie die Tomate in Scheiben und verteilen Sie sie auf den Baguettes 5 Verteilen Sie den Käse auf den Baguettes 6 Legen Sie die Baguettes auf ein Backblech 9 und backen Sie sie b...

Страница 51: ...ll Salz und Pfeffer 1 Eigelb Zubereitung 1 Nehmen Sie die Blätterteigplatten auseinander und lassen Sie sie gegebenenfalls auftauen 2 Vermischen Sie den Frischkäse mit Salz Pfeffer und dem Saft einer Zitrone 3 Schneiden Sie die Zwiebel in feine Würfel 4 Geben Sie die Hälfte des Lachses und die Zwiebeln zu der Frischkäsemasse und pürieren Sie alles grob mit einem Stabmixer 5 Schneiden Sie den restlic...

Страница 52: ...KOMPERNASS HANDELS GMBH BURGSTRASSE 21 44867 BOCHUM GERMANY www kompernass com Last Information Update Έκδοση των πληροφοριών Stand der Informationen 08 2020 Ident No SGB1200B5 052020 2 IAN 346016_2004 ...

Отзывы: