


SBT 3.6 B1
GB
│
57
■
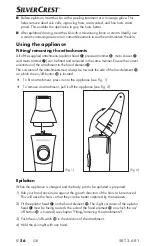
5) Place the appliance perpendicular to the skin and, without exerting any pressure,
move it
against
the direction of the hair growth. Do not make back and forth or
circular movements. Move the appliance slowly with calm and gentle movements.
Always start anew and pass over the body part to be epilated several times, so that
all of the hair is removed.
NOTE
►
It is possible that some hairs will grow back after a few days. The reason for this
is that these hairs were too short to be removed during the last epilation session.
6) When you are finished with the treatment, push the on/off switch
3
in the opposite
direction to switch off the appliance.
7) Clean the epilator head
as described in the section "Cleaning and Care".
NOTE
►
If the epilator head
is damaged, do not use it any more! To order a new epilator
head
, please contact the service department (see chapter "Guarantee and
service"). Please have the IAN number ready (see operating manual cover).
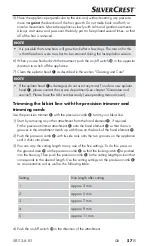
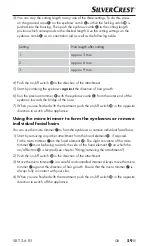
Trimming the bikini line with the precision trimmer and
trimming comb
Use the precision trimmer
with the precision comb
to trim your bikini line.
1) Start by removing any other attachment from the hand element
-
, if required.
Fit the precision trimmer attachment
onto the hand element
-
so that the two
grooves in the attachment match up with those on the back of the hand element
-
.
2) Push the precision comb
with its side rails onto the two grooves on the appliance
until it clicks into place.
3) You can vary the cutting length to any one of the five settings. To do this, press on
the grooved area
on the precision comb
so that the locking catch
is pushed
into the housing. Then push the precision comb
to the cutting length position that
corresponds to the desired length. Use the cutting settings on the precision comb
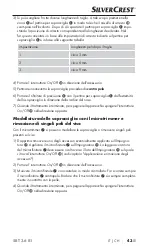
as an orientation aid as well as the following table:
Setting
Hair length after cutting
1
approx. 3 mm
2
approx. 5 mm
3
approx. 7 mm
4
approx. 9 mm
5
approx. 11 mm
4) Push the on/off switch
3
in the direction of the attachment.
Содержание 273442
Страница 3: ...B A C ...


