background image

9

MOTOR INSTALLATION

Most outboard motors can be mounted directly onto the transom engine mounting plate. Read the
instruction manual supplied by separate outboard motor manufacturer. All outboards are slightly different,
and some require special installation procedures. Below is a general outline:
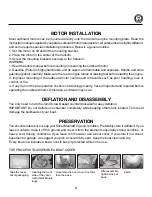
1. Set the motor on tilt and tilt the mounting bracket.
2. Place the motor in the center of the transom.
3. Screw the mounting brackets securely to the transom.
WARNING
1. Read the entire manual before mounting or operating the outboard motor.
2. Gasoline (Petrol) is highly flammable, and its vapors are flammable and explosive. Handle and store
gasoline (petrol) carefully. Make sure there are no gas fumes or leaking fuel before starting the engine.
3. Improper mounting of the outboard motor could result in hazards such as poor handling, loss of
control, or fire.
4. If any item in the pre-operation check is not working properly, have it inspected and repaired before
operating the outboard motor. Otherwise, accidents may occur.

DEFLATION AND DISASSEMBLY

You only need to turn the Joint Screw Gasket counterclockwise for easy deflation.
IMPORTANT: Do not deflate one chamber completely while keeping others fully inflated. This could
damage the bulkheads of your boat.

PRESERVATION

You should endeavour to keep your Silver Marine® in good condition. Preferably store it deflated. If you
leave it outside, raise it off the ground and cover it from the elements especially strong sunshine, or
heavy, cold, raining, conditions. If you leave it in the water, use a boat cover. If you store it in a closet,
basement or garage, we suggest you pick a cool and dry spot. Keep the boat clean and dry.
Every boat now includes a boat cover to keep it protected while not in use.
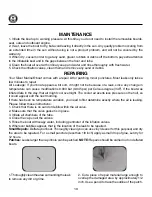
Take the cover
out of packaging.

Indentify the front
side of the cover.
(with Silver Marine
logo).

Assemble the boat cover front first,
then the back.

After assembly,
tighten clasp at
back.

Finish

THE PROCESS TO ASSEMBLE A BOAT COVER

Содержание Calypso 300 WD

Страница 1: ...Calypso 300 WD Calypso 330 WD Owner s manual www silvermarine com ...

Страница 2: ...O INFLATION 6 STEP THREE FLOORBOARD SEAT AND BENCH BAG ASSEMBLY 7 STEP FOUR OAR FITTING AND ASSEMBLY 8 STEP FIVE SELF BAILING DRAIN VALVE 8 MOTOR INSTALLATION 9 DEFLATION AND DISASSEMBLY 9 PRESERVATION 9 MAINTENANCE 10 REPAIRING 10 FOLDING STORAGE 11 OPERATION ON YOUR SILVER MARINE 12 Rowing 12 Motoring Safety 12 Towing 12 Stability and buoyancy 12 TROUBLESHOOTING CHART 13 ...

Страница 3: ...r s manual is not a detailed maintenance or trouble shooting guide The boat builder cannot be held responsible for modifications that he has not approved In some countries a driving license or authorizations are required or specific regulations are in force Always maintain your craft properly and make allowance for any deterioration that might occur in time as a result of heavy use or misuse of th...

Страница 4: ... DIMENSIONS Inflated hull length x beam MAX MOTOR POWER MAX PASSENGER CAPACITY MAX PAYLOAD RECOMMENDED WORKING PRESSURE WEIGHT Calypso 300 WD C TYPE V EN ISO6185 2 2001 2 94 x 1 53m 9 9HP 7 5kw 4 794lbs 360kg 0 25 bar 88 2lbs 40kg Calypso 330 WD C TYPE V EN ISO6185 2 2001 2 94 x 1 53m 9 9HP 7 5kw 4 794lbs 360kg 0 25 bar 88 2lbs 40kg Designed working pressure for each buoyancy chamber is 0 25 bar m...

Страница 5: ...4 PARTS TERMINOLOGY ...

Страница 6: ...plastic wrench included in the accessories Tip 6 In case you find difficulty when installing the bench seat put your knees on one of the inflated tubes to add pressure to the bench HOW TO SET UP THE BOAT STEP ONE STARTING UP 1 Unfold the hull Clear a flat area make sure it is clean and free of sharp objects Remove the hull from box and take off the plastic bag Unroll the hull and lay it out flat 2...

Страница 7: ...D SEAT ASSEMBLY Calypso 300 WD 330 WD are equipped with an interlocking floorboard system which has 4 pieces wooden floorboard 1 Install Bow Floorboard Start by fitting the wooden bow board between air tubes and bottom Slide and push it forward as far as possible until it has reached the top of the bow and the air valve of the inflatable keel fits into the hole of the bow board 2 Install Floor Boa...

Страница 8: ... fit in the respective side positions 5 Seat Installation When the wood deck is in position hook the plastic brackets at the bottom of the seat onto the PVC straps on your Silver Marine boat Connect the last board to the back of board 3 per picture lift and connect to the rear board s lifted side Push down the two boards at the joint 4 3 6 Seat bag assembly After the Seat Assembly attach the bench...

Страница 9: ...N After inflating the tubes insert the barometer against the valve Check if the pressure in the air chambers reaches 0 25 bars then remove the barometer and screw the cap on STEP FOUR OARS FITTING AND ASSEMBLY 1 Press the clasp at one end of the oar and insert it into blade end 3 Screw the cap back to lock the oar into position 2 Press the screw on the oarlock through the hole on the oar 4 Secure ...

Страница 10: ...tion check is not working properly have it inspected and repaired before operating the outboard motor Otherwise accidents may occur DEFLATION AND DISASSEMBLY You only need to turn the Joint Screw Gasket counterclockwise for easy deflation IMPORTANT Do not deflate one chamber completely while keeping others fully inflated This could damage the bulkheads of your boat PRESERVATION You should endeavou...

Страница 11: ... minor punctures Most leaks only take a few minutes to repair Air Leakage If your boat appears a bit soft it might not be because of a leak since any change in temperature can cause modifications 0 003 bar 0 045 psi per Celsius degree 34F If the boat was inflated late in the day that air might cool overnight The cooler air exerts less pressure on the hull so it could appear soft the next morning I...

Страница 12: ...ds the center of the boat 5 Close the caps over the valves in order to avoid any damage to the hull material 6 Fold the boat around the transom from the back 7 Fold the bow section on top of the previously folded rear part of the boat Place the boat inside your Silver Marine carry bag or protective coving When storing your inflatable boat ensure protection against rodents and other vermin as they ...

Страница 13: ...ould like to go over a few fundamentals It is your responsibility to be aware of and comply with all relevant safety regulations In all water sports you should have reasonable swimming ability Always respect the water and weather both can change rapidly and have surprised even the most seasoned mariner Always carry enough approved personal floatation devices Life jackets for every passenger We str...

Страница 14: ...lly before using 2 Please retain owner s manual for future reference 3 Follow the instructions in the Owner s Manual including the data given on the capacity plate Uneven distribution of people or loads in the boat could result in danger 4 Please refrain from using the boat at winds above 6 level and waves above 2 m 5 Please pay attention to suspicious liquid such as leaking oil It may lead to dan...

Страница 15: ...14 ...

Страница 16: ...15 Designed in USA by Silver Marine International Co Ltd 2008 All rights reserved www silvermarine com ...

Отзывы: