2
OPERATION
Initial startup:
After satisfying the installation requirements, the milk dispenser is ready to start. The unit will start when the power cord
is connected to a live electrical receptacle. If the compressor is not running when the unit is initially plugged in, check
to make sure that the Temperature Control is not set to the off position. Allow the unit to run a minimum of two hours
before loading it with product.
Preparation For Use:
Once the unit has achieved proper operating temperature, observe the procedures noted in the label on the door liner
for loading milk into the milk dispenser. When removing an empty milk krate, be sure to raise the valve arm fully before
pulling the milk tube out of the valve. The last half inch of upward valve travel will lock the valve jaw in place and prevent
it from coming out of the valve.
Temperature Control:
The Temperature Control, located on the front of the unit behind the valve splash guard (see label on door liner), is
factory set at the midpoint position, which will maintain an average product temperature of around 36 - 38 Deg F. To
access the temperature control, follow the instructions on the door liner. To obtain cooler temperatures turn the Tem-
perature Control stem clockwise and vise versa with a flat blade screwdriver. Allow the unit a minimum of six (6) hours
to respond to a control setting adjustment if the product is in the cabinet.
Temperature Indicator:
The Temperature Indicator, mounted on the door, is factory set to indicate the temperature of the product within two (2)
degrees. Should the Temperature Indicator read inaccurately there are instructions for recalibrating it located on the
door liner.
Defrost:
The Silver King Majestic milk dispenser is a manual defrost unit. The unit should be defrosted whenever the walls
accumulate a frost bank that is 1/2 inch thick. To defrost the unit, either turn the Temperature Control knob to the off
position or disconnect the power cord from the electrical receptacle, and open the door. After the frost has melted or
come loose from the cabinet walls, wipe out the cabinet interior. Do not attempt to scrape or chisel off the frost as you
could do irreparable damage to the unit.
Mixers
(Optional Equipment/Factory Installed):
The optional malt mixers for the Silver King Majestic milk dispensers have 3 speeds. The speed is adjusted by the 3
position knob on the top of the mixer. To operate the mixer put a mixer cup with product in it under the mixer shaft and
raise it until the lip of the cup engages the cup guide on the mixer. The mixer shaft and impeller will spin when the cup
guide is raised.
MAINTENANCE
Preventative maintenance is minimal although these few steps are very important to continued operation and maximiz-
ing the life of the appliance.
Cabinet Surfaces:
The cabinet interior and exterior are stainless steel and should be cleaned periodically with a solution of warm water
and a mild soap, rinsed and wiped dry with a clean soft cloth. A stainless steel cleaner can also be used. Should a
surface become stained or discolored, do not attempt to clean with an abrasive cleaner or scouring pad. Use a soft
cleaner and rub with the grain of the metal to avoid scratching the surface. Do not use chlorinated cleaners.
Valves:
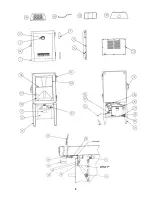
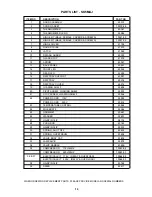
To clean the valve start by removing the bottom valve body cap (item 32) by prying it down and off. Remove the valve
jaw (item 33) by pushing up through the bottom of the valve and pulling it out the top of the valve. Clean all loose parts
and the valve (in place) with a solution of warm water and mild soap or a sanitizing solution and rinsing afterwards.
Replace the valve jaw by sliding it into the valve from above and pressing down on the valve jaw until it snaps firmly
onto the valve push rod. Replace the bottom valve body cap.
Leaking Valves:
To stop a valve from dripping milk start by removing the splash guard (item 10) by hand and the apron (item 12) with a
Phillips screwdriver. Locate and loosen the adjustment nut and bolt shown in the valve cross section on page 3.
Remove the milk tube from the valve. Raise and drop the valve arm (item 34) several times until the valve jaw (item 33)
is tight to the front of the valve opening when the valve arm is fully lowered. Re-tighten the adjustment nut and bolt and
replace the apron and splash guard. Also make sure that the milk tube is cut as close as possible to the valve.
90037
MODEL____________________ SERIAL NO.____________________ DATE INSTALLED____________________


