background image

3

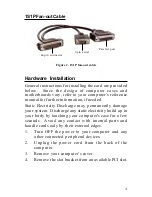
1S1P Fan-out Cable

44-pin connector

9-pin serial

Parallel port

Figure 2.  1S1P fan-out cable

Hardware Installation

General instructions for installing the card are provided
below.  Since the design of computer cases and
motherboards vary, refer to your computer’s reference
manual for further information, if needed.
Static Electricity Discharge may permanently damage
your system.  Discharge any static electricity build up in
your body by touching your computer’s case for a few
seconds.  Avoid any contact with internal parts and
handle cards only by their external edges.

1.

Turn OFF the power to your computer and any

other connected peripheral devices.

2.

Unplug the power cord from the back of the

computer.

3.

Remove your computer’s cover.

4.

Remove the slot bracket from an available PCI slot.

Содержание CyberPro 1S1P

Страница 1: ...PCI and PCI X slots One high speed 16550 UART serial port 9 pin supports data rate up to 230 Kbps Built in 32 byte FIFO buffer dramatically increase data transmit receive speed especially under Windows multitasking environment The serial port can be configured for either 5V or 12V output for serial devices that require power IEEE 1284 compliant SPP EPP ECP parallel port SystemRequirements Pentium ...

Страница 2: ...ther a full or a low profile bracket Figure 1 Layout Connecting the 4 pin power connector provides stable power to the PCI board This connection is optional and not needed in most systems JumperSetting JP1 Open 0 Volts default Short 1 2 5V Short 2 3 12V Note Most serial devices do not require additional power through the serial port Refer to your serial device s manual for more information Full pr...

Страница 3: ...formation if needed Static Electricity Discharge may permanently damage your system Discharge any static electricity build up in your body by touching your computer s case for a few seconds Avoid any contact with internal parts and handle cards only by their external edges 1 Turn OFF the power to your computer and any other connected peripheral devices 2 Unplug the power cord from the back of the ...

Страница 4: ...tor This connection is optional see Figure 1 on page 2 for more information 8 Replacethecomputercoverandreconnectthepower cord 9 Connect the Fan out cable to the board s 44 pin connector Hardware installation is now complete Software Installation This section provides information on how to install the CyberPro 1S1P drivers Windows95 1 At the Update Device Driver Wizard click Next 2 Insert the driv...

Страница 5: ...zard choose Specify the location of the driver Advanced then click Next 2 Insert the driver CD check Specify a location uncheck the other box type in D ME then click Next Change D to match your CD ROM drive letter 3 Click Next and Finish 4 Repeat steps 1 3 5 Restart Windows to complete the installation To Verify Installation In Windows 95 98 98SE ME 1 Right click My Computer click Properties then ...

Страница 6: ...e desktop click Start then Run 7 Type in D NT4 Install_Parallel exe then click OK Change D to match your CD ROM drive letter 8 Repeat steps 3 5 9 Click Yes to restart Windows to complete the installation To Verify Installation In Windows NT 4 0 1 Click Start Settings Control Panel double click Ports icon 2 AnewCOMportwillbeassignedwhensuccessfully installed 3 Click Start Programs Administrative To...

Страница 7: ...times 7 Restart Windows to complete the installation WindowsXP 1 At the Found New Hardware Wizard select Install from a list or specific location Advanced then click Next 2 Insert the driver CD check Include this location in the search uncheck the other box type in D XP and click Next Change D to match your CD ROM drive letter 3 At the Hardware Installation window click Continue Anyway then click ...

Страница 8: ...the Hardware Installation window click Continue Anyway then Finish Our driver has beentestedforstabilityandcompatibility 4 Repeat steps 1 3 two more times 5 Restart Windows to complete the installation ToVerifyInstallationInWindows2000 XP Server2003 1 Right click My Computer click Manage then click Device Manager 2 Double click Ports COM LPT CyberSerial PCI 16Cxxx andCyberParallel PCI should be di...

Страница 9: ...ngs tab at the Port Name box click the down arrow and select a COM port that is not currently in use then click OK 3 Click OK to close Device Manager to save the changes Windows2000 XP Server2003 1 From Device Manager double click Ports COM LPT then double click the CyberSerial PCI serial port you want to change 2 Click Settings tab and click Advanced 3 At the COM Port number box click the down ar...

Страница 10: ...yberParallel PCI 2 Click Settings tab check Enable use of I O location 278h then click OK 3 Click OK to close Device Manager and click Yes to restart Windows to save the changes Windows2000 XP Server2003 1 From Device Manager double click Ports COM LPT then double click CyberParallel PCI 2 Click Port Settings tab 3 At the LPT Port Number box click the down arrow and select an LPT port that is not ...

Страница 11: ...se steps to have the product repaired or replaced Step 1 Submit your RMA request Go to www siig com click Support then RMA to submit a request to SIIG RMA If the product is determined to be defective anRMAnumberwillbeissued SIIGRMAdepartment can also be reached at 510 413 5333 Step 2 After obtaining an RMA number ship the product Properly pack the product for shipping All software cable s and any ...

Страница 12: ...erference received including interference that may cause undesired operation THE PARTY RESPONSIBLE FOR PRODUCT COMPLIANCE SIIG Inc 6078 Stewart Ave Fremont CA 94538 3152 About SIIG Inc Foundedin1985 SIIG Inc isaleadingcomputerupgrademanufacturer ofI Oconnectivityproducts includingPCI ISAserialandparallel ports USB Serial ATA UltraATA controllers FireWire 1394a b Networking SoundCards andotheracces...

Отзывы: