background image

58

Periodic maintenance

< Checking the wiper blade for contamination>

Visually check the wiper blade for contamination and 

scratches.

If the wiper blade is scratched, replace it.

1

Open the front cover, and then open the wipe 

cover.

2

Visually check the wiper blade for 

contamination and scratches.

Wiper blade

Wiper blade

Note

Check the level of the remaining wiper cleaning liquid. If 
small amount of wiper cleaning liquid is remaining, replenish 
it.

-

3

Close the wipe cover and the front cover.

<Replenishing wiper cleaning liquid>

When the remaining wiper cleaning liquid becomes little, 

replenish it.

1

Open the front cover, and then open the wipe 

cover.

2

Visually check the wiper cleaning liquid level 

through the cleaning liquid port at the lower 

right of the top face of the wipe unit.

Liquid level

Cleaning liquid port

If the liquid lever is below the top of the "

" mark that 

can be seen inside the cleaning liquid port, replenish 
wiper cleaning liquid to a level below the top of the 
"

" mark.

Wiper cleaning liquid

3

Close the wipe cover and the front cover.

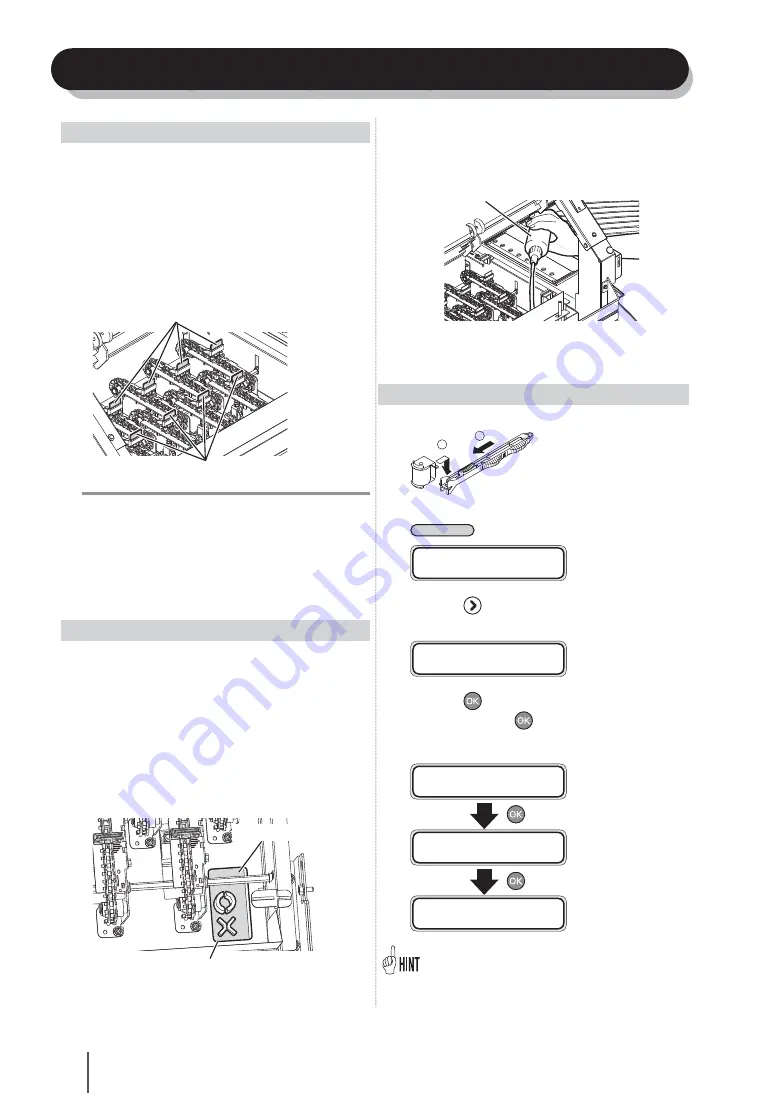
<Cleaning the capping unit>

1

Attach the cleaning roller to the cleaning stick.

1

2

2

Set the printer to the offline state and press the 

M E N U

 key to display PH.MAIN MENU.

I N K                     M E D I A   R E G

M E D I A                         M . A D V

3

Press the 

 key to enter PH.MAIN MENU. The 

cap cleaning menu is displayed. 

# C A P   C L E A N I N G

>

4

Press the 

 key. When the confirmation screen 

appears, press the 

 key again.

The carriage moves.

# C A P   C L E A N I N G

>


# C A P   C L E A N I N G

* O K ?


C A R R I A G E   M O V I N G

P L E A S E   W A I T

When the carriage moves, the warning beeps.

-

Содержание IP-7700

Страница 1: ...NKJET 0RINTER 5 1UICK 2EFERENCE UIDE UIDE DE RÏFÏRENCE RAPIDE UIDA DI RIFERIMENTO RAPIDO 3CHNELLREFERENZ UÓA DE CONSULTA RÉPIDA ANUAL DE ONSULTA 2ÉPIDA クイックリファレンスガイド 日本語 ENGLISH FRANÇAIS ITALIANO DEUTSCH ESPAÑOL PORTUGUÊS ...

Страница 2: ...の調整 19 テンションバーの長さ調整 20 プリントヘッドのクリーニング 20 メディアを送る フィード 21 メディアを戻す バックフィード 22 加圧操作ノブの使い方 22 ヘッド上下機構の使い方 23 メディアエッジガードの使い方 23 毎日の点検 保守 24 メニューツリー 28 設定できるメニュー 29 故障 と思う前に 32 エラーメッセージ 33 サービスコールエラー 33 オペレータコールエラー 33 警告メッセージ 34 LCD に表示されるメッセージの言語を選択します ファンクション システム メカチョウセイ ヒータ LANGUAGE JAPANESE パラメータ 選択肢入力 JAPANESE LCD メッセージを日本語で表示します ENGLISH LCD メッセージを英語で表示します FRENCH LCD メッセージをフランス語で表示します ITALIAN LCD ...

Страница 3: ...プリンタを移動するときにロックを解除し 固定するときはロックします 加圧操作ノブ メディアを押さえる力を切り換えます フロントカバー 印刷するときは必ず閉じておきます 廃インクボトルユニット 廃インクを収容するユニットです キャップカバー キャッピングユニットの清掃やキャリッジ部の清掃をするときなどに開けま す ワイプカバー ワイパーブレードの交換を行う際に開けます 巻き取り方向スイッチ メディアを巻き取る方向を決めるスイッチです 送り出しスイッチ メディアを自動で送り出すスイッチです 巻き取りスイッチ メディアを自動で巻き取るスイッチです フットスイッチコネクタ フットスイッチ オプション をつなぐためのコネクタです スクローラフランジ メディアを送り出したり 巻き取るために 紙管の両端に取り付けて軸を回 転させるためのフランジです メディア乾燥ファン 印刷後のインクを乾燥させるファンで...

Страница 4: ...タ電源スイッチ ヒータ電源インレット ヒータ電源スイッチ USB コネクタ プリンタサーバーと接続します サブカートリッジ インクを交換しているときでも 印刷できるようにするた めの補助インクです 注意 LCD 表示では サブタンクと表示されます 巻き取りスイッチ 送り出しスイッチ 加圧操作ノブ メディアを押さえる力を切り換えます スクローラフランジ メディアを送り出したり 巻き取るために 紙管の両端に 取り付けて軸を回転させるためのフランジです 引き剥がしローラ ...

Страница 5: ...ATER CANCEL プリンタヒータ部 プリンタには 印刷メディアへのインクの定着 画質の安定化のために3つのヒータを搭載しています メディア ヘッド 1 2 3 給 紙 側 背 面 排 紙 側 前 面 LED 点灯 点減 消灯によって プリンタの状態を表示しま す キー プリンタのメニュー操 作などに使用します ブザー プリヒータ 背面 メディアを予熱します プリントヒータ 前面 メディアにインクを浸透させ インクを定着させ ます アフターヒータ 仕上げ インクを乾燥し 画質を安定させます 3 つのヒータは各々独立にコントロールされます ヒータ温度はパネルおよびホスト PC RIP からコ ントロールできます 警 告 各ヒータ面は熱くなりますので 決して触らないで ください 火傷をするおそれがあります ...

Страница 6: ...ない E オンライン 緑 プリンタのオンライン オフライン状態を表示します 点灯 オンライン 点滅 プリントポーズモード 消灯 オフライン キー ONLINE キー プリンタのオンライン オフラインの切り換えに使用します MENU キー パラメータの入力補助 メニューの階層表示の切り換え キー として使用します CANCEL キー 入力したパラメータをキャンセルするときに使用します OK キー メニューの確定 パラメータの確定に使用します HEATER キー ヒータコントロールメニューに入るときに使用します キー メニューグループの選択 メニューの切り換え 選択 数 値のアップ ダウン などに使用します キー キー キー 電源スイッチ 電源スイッチ プリンタの電源をオン オフする電源スイッチとして使用しま す LCD LCD 英数字 カタカナ 記号表示 20 桁 2 行 でプリンタの各種メ...

Страница 7: ...ジスペーサは B の面にセットするように作 られています 無理に押し広げて変形させないようご注意くださ い A B ロールメディアの取り付け手順 メディアの種類や重量 巻き取り方向などによって スクローラフランジの取り付け方法が異なります 下表を参照して 正しく取り付けてください ここでは スクローラシャフトを使用しない場合の取り付け手順を説明します スクローラシャフトの使い方については P 15 をご参照ください 一般メディアを使用する場合 メディア重量 35kg 未満 35kg 50kg メディア印刷面 内巻きメディア 外巻きメディア 内巻きメディア 外巻きメディア フランジスペーサ 必要 必要 必要 必要 スクローラシャフト 不要 不要 必要 P 15 必要 P 15 塩化ビニールメディアを使用する場合 メディア重量 35kg 未満 35kg 50kg メディア印刷面 内巻きメディア...

Страница 8: ...ラフランジ 4 キャップ側 ワイプ側 フランジ押さえを取り付けます 注 意 フランジ押さえは左右で形が異なりますので ご注意く ださい 5 防護バーを取り外し フロントカバーを開け ます フロントカバー 防護バー 6 メディアエッジガードがメディアの下になら ないように 両サイドに移動させておきます メディアエッジガード 7 加圧操作ノブを時計方向へ回して 加圧ロー ラを上げます 排紙側 給紙側 または 加圧操作ノブ 8 メディアにシワが入らないように手で伸ばし ながら メディアの先端を給紙部に挿入しま す プリンタ背面 給紙側 給紙部 メディアに巻き癖があって給紙部に差しづらい場合 は 別紙 間紙 を使用してメディアを差し込んで ください 下図参照 メディア メディア 間紙 間紙 アップカール ダウンカール ...

Страница 9: ...ないか確認します メディアエッジガードが正しくセットされてい ることを目視確認し キーを押します 13 ロールメディアかカットメディア シート の選択をします メテ ィアセンタク シート メテ ィアヲセンタクシテクタ サイ メテ ィアセンタク ロール キー キーで ロール か シート が 選択できます ここでは ロール を選択し キーを押します CANCEL キーでメディア選択を元に戻しま す 14 メディアの種類を選択します キー キーで登録されているメディアの種 類を選択し キーを押します シュルイセンタク XXXXX シュルイヲセンタクシテクタ サイ シュルイセンタク PAPER メディアを新たに登録するには 登録済みメディアの最後に メディアヲトウロクシテ クダサイ が表示されます キーを押すと メディア登録メニューに入ります メディア登録方法は トウロクメニューから登録する 場合...

Страница 10: ...ィアの種類 幅により調節してください テンションバー組み合わせ例 使用サイズ テンションバーの長さ L 48 インチ 123cm L S 64 インチ 164cm L S S 80 インチ 204cm 一般メディアでテンション巻きをする場合 通常は メディア幅に合わせたテンションバーを使い ます ただし例外もあります 一般メディアで巻き取りをしない場合 メディア幅の半分のテンションバーを使います 塩化ビニールメディアの場合 S サイズのテンションバー フランジなし を たる みの中央に乗せます 引き剥がしローラ スクローラ 給紙側たるみセンサー 給紙側たるみセンサーより下まで たるませてくださ い たるみがセンサーに反応する位置までくると パネル から ピッ と音がします 注 意 引き剥がしローラを 手で回さないでください 無理に回 転させると 故障の原因となる場合があります 引き剥がしロ...

Страница 11: ...面にセットするように作 られています 無理に押し広げて変形させないようご注意くださ い A B スクローラフランジを奥まで押し込み 紙管に 固定されるまでハンドルを時計方向に回しま す スクローラフランジ ハンドル フランジスペーサを抜きます 2 巻き取り方向スイッチを オフ にします 注 意 巻き取り方向スイッチを オフ にしないで次の操作に進む と スクローラが固定されないため 手をはさむ原因となり ます 巻き取り方向スイッチ OFF 外巻き オフ 内巻き 3 スクローラフランジ ロール溝 スクローラフランジをプリンタのロール溝に 合わせて取り付けます 注 意 テンションバーはあらかじめテンションバーフックに掛けて おいてください テンションバーフック テンションバー 4 操作パネルのフィードメニューで メディア を巻き取れる程度まで送ります フランジスペーサ フランジスペーサ スクロ...

Страница 12: ...パネルのフィードメニューでメディアを 送り 紙管に 1 周分巻き付けます 再度巻き 取り方向スイッチを オフ にします 注 意 メディアを 1 周分巻き取らずにテンションバーを取り付 けると テープがはがれてしまいます 8 操作パネルのフィードメニューで たるみ が作れる程度までメディアを送ります テンションバーがガイドの底部にのせられるく らいに 十分なたるみを作ってください 9 テンションバーガイドのカバーを開けます 10 テンションバーをテンションバーガイドの 底に置きます 注 意 たるみが足りず テンションバーが底に届かない場合は 操 作パネルのフィードメニューでメディアを送り テンション バーがテンションバーガイドの底に確実に届くようにメディ アを送り出してください 11 テンションバーガイドのカバーを閉じます 12 巻き取り方向に合わせて 巻き取り方向ス イッチを押します 巻き...

Страница 13: ... メディアをカットする際はペーパーガイドネットを傷 つけないようにしてください 印刷済みのメディアが床に落下して汚れないように ご注意ください 装置からのメディアロールの取り外し手順 5 プリンタをオフラインにします O N L I N E キーを押します インク トウロク メテ ィア オクリ 6 キーを押します メディアを選択し 巻き取り装置の巻き取り方向 スイッチをオンにすることにより 巻き取りス イッチが有効となります 7 排紙側の巻き取りスイッチ 黒 を使ってメ ディアを巻き取ってください 巻き取りスイッチ 黒 8 防護バーを取り外します 防護バー 9 可動式のメディア乾燥ファン横のツマミネジ 左右2本 をゆるめます メディア乾燥ファン ツマミネジ 10 メディア乾燥ファンを手前に引いてから 上へ 90 度回転させます メディア乾燥ファン 注 意 メディア乾燥ファンを上へ回転させる...

Страница 14: ... トウロク メテ ィア オクリ 2 キーを押します メディアを選択する事により 巻き取り装置の 巻き取りスイッチが有効となります 3 引き剥がしローラの逆転スイッチ 白 を押 して たるみ部分を持ち上げ 給紙側のテン ションバーを取り外します 引き剥がしローラ スクローラ 一般的なメディアの場合 テンションバー 塩化ビニールメディアの場合 プリンタ背面 給紙側 引き剥がしローラ テンションバー Sサイズテンションバー スイッチ 注 意 引き剥がしローラを手で回そうとしないでください 無理に回すと故障の原因になる場合があります 4 加圧操作ノブを右方向へ回して 加圧ローラ を上げます 排紙側 給紙側 または 加圧操作ノブ 5 手動でスクローラを回転させてメディアを巻 き取ります 6 スクローラフランジを本体から取り外しま す プリンタ背面 給紙側 スクローラフランジ ...

Страница 15: ...ヒンイ 4 キーを押してラフの印刷モードを選 択し キーを押します オクリチョウセイハ ターン OK 5 キーを押すと メディア送り調整パターン ラフ が印刷されます 選択された印刷モードで メディア送り調整パ ターン ラフ が印刷されます オクリチョウセイハ ターン シ ッコウチュウ 6 印刷結果から おおよそのメディア送り補正 値を選びます 99 00 101 00 の範囲を 0 5 刻みで 9 つのパ ターンが印刷されますので その中からおおよそ の補正値を選びます 7 キーを押し キーを押して メディア 送り補正値の入力表示にします オクリホセイチ 100 00 8 メディア送り補正値を入力し キーを押し ます キーで桁を合わせ キーで数 値を設定します 9 キーを押し キーを押して メディア 送り調整パターンの表示にします オクリチョウセイハ ターン ラフ ヒョウシ ュン 10 ...

Страница 16: ...がメディアロールの中央にくるよ うに合わせてください 3 メディアロールの両端に スクローラフラン ジを取り付けます 紙管の両端にスクローラフランジを挿入しま す スクローラフランジとメディアロールの間にフ ランジスペーサを差し込みます スクローラフランジを奥まで押し込み 紙管に 固定されるまでハンドルを時計方向に回します スクローラフランジ ハンドル フランジスペーサを抜きます 4 スクローラシャフトの留め具を取り付けます スクローラシャフトの留め具をスクローラシャ フトに通します ノブを回して固定します 2 1 メディアロールへの取り付け手順 ロールスペーサ スクローラシャフト スクローラフランジ フランジスペーサ ノブ スクローラシャフトの留め具 ...

Страница 17: ...フック 爪2ヶ所を押す インクパック インクトレイ インクパックの装着 交換手順 4 新しいインクパックを箱から取り出し イン クトレイにセットします インクトレイのフック2ヶ所をインクパックの穴 末端の2ヶ所 に通します その後 プレー トをインクトレイに カチッと音がするまで差し 込みます 2 1 新しいインクパック プレート フック インクトレイ 5 インクトレイをインクボックスのスロットに 差し込みます 注 意 奥までしっかりと差し込んでください 色ごとに装着場所が決まっています 必ず所定のスロットに 差し込んでください インクトレイ 6 インクボックスカバーを閉めます インクボックスカバー 7 交換終了 正常に終了した場合は オンラインの状態 また はオフラインの状態に戻ります 正常に終了しなかった場合は エラーメッセージ が表示されます 手順1に戻ってやり直してください インク...

Страница 18: ...れたインク を拭き取ります 5 レバーを上にスライドさせ 新しい廃インク ボトルをセットします 6 レバーを下げます チューブ レバー 廃インクボトル 7 廃インクカウンタのリセット クリア を選 択するメッセージが表示されます ハイインクカウンタリセット NO ハイインクカウンタリセット YES 8 ハイインクカウンタリセット YES を選択し キーを押します 廃インクボトルが一杯になった場合の処置 廃インクボトルが未装着の場合の処置 1 ガイダンスメッセージが表示されます ホ トルカ ミソウチャクテ ス ホ トルヲセットシテクタ サイ 2 新しい廃インクボトルを取り付けます 廃インクボトルが一杯になった場合の処置 を 参照 3 廃インクカウンタのリセット クリア を選 択するメッセージが表示されます ハイインクカウンタリセット NO ハイインクカウンタリセット YES 4 ハイインクカ...

Страница 19: ... フロントカバーとワイプカバーを開けます 2 ワイパーブレードの下の縁をピンセットで挟 み プラスチックの突起部分の引っかかりを 外します 3 上に持ち上げるようにしてワイパーブレード を抜き取ります 4 新しいワイパーブレードのゴム部分をピン セットで挟んで上からまっすぐ差し込み ゴ ム部分の穴にプラスチックの突起部分が引っ かかるように取り付けます ワイパーブレード肩部両側が図のように突き当 たっていることを確認してください ゴム部分 注 意 ワイパーブレードの上部はプリントヘッドに直接触 れる部分なので ワイパーブレードを取り扱う際に 手で触ったり ピンセットで挟んだりしないでくだ さい 5 ワイプカバーとフロントカバーを閉めます ワイパーブレード上部 ...

Страница 20: ...ョウセイハ ターン ジ ッコウチュウ 6 キーを押します 508 ノズル 偶数ヘッド分 空白 508 ノズル 全ノズル 15mm 7 印刷結果を判定します 印字結果の余白部分を金尺で測定します 仕様 15mm に対しての誤差を求めます 誤差が 15mm であれば終了とします 誤差が 15mm でない場合は 以下の手順で補正 します 8 キーを押して メカチョウセイ メニュー に入ります エッジ センサ イチホセイチ Y Ymm 9 エッジセンサイチホセイ が表示されるまで キーを押します 10 センサ調整パターンの印刷結果をもとに エッジセンサ位置の補正値を入力します エッジ センサ イチホセイチ Y Ymm Y Y 11 キーを押して入力を確定します エッジ センサ イチホセイチ 0 0mm 12 キーを押して 上位メニューに戻ります 補正値の求め方 15mm を基準値として余白...

Страница 21: ...ウリョク ツウジョウ で回復しない場合の印字抜けの回復 1 プリンタをオフラインにします O N L I N E キーを押します インク トウロク メテ ィア オクリ 2 M E N U キーを押し クリーニングメ ニューを表示します インク トウロク メテ ィア オクリ M E N U ハ ックフィート フィート クリーニンク サーヒ ス 3 キーを押すと ヘッドクリーニングメ ニューへ入ります クリーニンク ツウシ ョウ 注 意 インクトレイからのインク充填が完了していない場合 ク リーニングメニューではなく インク供給メニューが表示 されます インクパックを用意し インク供給を実施してください 4 キーを押して パラメータを変更できる 状態にします クリーニンク ツウシ ョウ 5 キー キーでクリーニング選択オプ ションを選びます キョウリョク クリーニンク ツウシ ョウ 6 キーを...

Страница 22: ...ニングが終了する と 3 の状態に戻ります クリーニンク ツウシ ョウ 11 キーを押すと オフライン状態 メニュー モード 表示に戻ります ハ ックフィート フィート クリーニンク サーヒ ス メディアを送る フィード メディアを送る フィードする 機能です 1 プリンタをオフラインにします O N L I N E キーを押します インク トウロク メテ ィア オクリ 2 M E N U キーを押し メニューグループを フィードメニューが含まれるグループに切り 換えます ハ ックフィート フィート クリーニンク サーヒ ス 3 キーを押し続けます キーを押し続けている間 メディアが送られ ます フィート チュウ 4 キーから手を離すとフィードが止まり オフライン状態 メニューモード 表示に戻 ります ハ ックフィート フィート クリーニンク サーヒ ス オンライン状態 アイドルモード 表...

Страница 23: ...を押すと バックフィードメニュー に入らなくてもメディアを戻すことができま す 注 意 給紙装置は 長いバックフィードには対応していま せん 長い距離をバックフィードさせる時は 供給 側のメディアのたるみが床につかないように注意し てください また 巻き取り装置はバックフィードに対応してい ません 巻き取り装置を使用の際には バックフィードを行 わないでください 加圧操作ノブの使い方 加圧操作ノブの使い方 加圧操作ノブは ご使用になるメディアに合わせて メディア搬送用グリットローラのメディア押さえ加圧 力の調整を行います ご使用のメディアに合わせて 適切に設定してくださ い 加圧力は 弱 中 強 の3段階で調整が可能です メディア取り付け時などに使用する 開放 を合わせ て4つのポジションがあり 左右どちらにも回すこと ができます 加圧操作ノブは 給紙側 排紙側にそれぞれあります 操作は連...

Страница 24: ...YPE01 3 キーを押し キーを押して ヘッ ドタカサチョウセイ を表示します ヘット タカサチョウセイ XX 0 0mm 4 キーを押し キーでヘッド高さの 調整値を入力します 調整可能範囲は 0 3 1 0mm です ヘット タカサチョウセイ XX 0 1mm 5 キーを押して調整値を決定します メディアエッジガードの使い方 メディア搬送中にメディアの左右両エッジの そりか えり や けば からヘッドを保護するために メディ ア幅に合わせてスライドさせてご使用ください メディアエッジガード ワイプ側 キャップ側 メディアエッジガードの仕様 メディア厚み 1mm まで対応します メディアエッジガードの使用により 印刷 領域幅は減少します 吸着ファンの影響をなくす効果もあります 注 意 操作パネルから トウロクメニュー中のエッジ ガードの使用設定を合わせて設定してください 操作パネルから...

Страница 25: ...ー を開けます 2 ワイプユニット上面右下のクリーニング液補 充穴から ワイプクリーニング液の液面の高 さを目視確認します 液面 クリーニング液補充穴 クリーニング液補充穴内に見える マーク上 面より液面が下がっていたら マーク上面 より上にならない範囲でワイプクリーニング液を 補充してください クリーニング液 3 ワイプカバーとフロントカバーを閉めます キャッピングユニットのクリーニング 1 クリーニングスティックにクリーニングロー ラを取り付けます 1 2 2 プリンタをオフラインにして M E N U キー を押し サービスメニューを表示します ハ ックフィート フィート クリーニンク サーヒ ス 3 キーを押し サービスメニューへ入ると キャップクリーニングメニューが表示されま す キャッフ クリーニンク 4 キーを押し 確認画面が表示されたら再 度 キーを押します キャリッジが移...

Страница 26: ...ッドが元の位置に戻ります 注 意 キャッピングユニットからプリントヘッドを離し た状態で 放置しないでください プリントヘッ ドが乾燥して故障の原因となります 上記清掃をしても印字抜けが起こる場合は ク リーニング棒にキャップクリーニング液をつけ 目視で確認しながらキャップ上の異物やインク汚 れを取り除いてください キャップクリーニング液がキャップ以外に付着し ないように注意してください スピット液の補充 1 フロントカバーを開けてから キャップカ バーを開けます 2 スピットユニット内の スピット液の液面の 高さを目視確認します 液面が下がり 液量を測る突起が見えるように なっていたら 突起とおなじ高さまでスピット液 を補充します スピットユニット 液面 突起 3 キャップカバーとフロントカバーを閉めま す 廃インクボトルのチェック 廃インクボトルが一杯になっていないかを確認しま す 一...

Страница 27: ... 確認画面が表示されたら再 度 キーを押します キャリッジが移動します キャッフ クリーニンク キャッフ クリーニンク OK キャリッシ イト ウチュウ シハ ラクオマチクタ サイ キャリッジが移動する際 警告音が鳴ります 4 フロントカバーを開けてから キャップカ バーを開けます カハ ーヲアケテ キャッフ ヲセイソウシテクタ サイ 5 スピットユニットのツマミネジ1本を外し スピットユニットを取り外します スピットユニット ツマミネジ 注 意 スピットユニット内にはクリーニング液が入って います こぼさないようにご注意ください 6 クリーニング棒をキャップクリーニング液に 浸けます 注 意 清掃に使用したクリーニング棒を キャップクリー ニング液ボトルの中に入れないでください キャッ プクリーニング液が汚れてしまいます 7 スピットユニットを外した位置に手動でキャ リッジを移動させ キ...

Страница 28: ...ッドが 乾燥して故障の原因となります メディアエッジガードの清掃 注 意 本作業は手袋をつけて行ってください 1 フロントカバーを開けます 2 クリーニング棒にキャップクリーニング液を つけ メディアエッジガードの汚れ部分に擦 りつけます 3 柔らかい布で汚れを拭き取ります 4 フロントカバーを閉めます ツウジョウクリーニングの実施 操作パネルからクリーニングメニューを選択し ツウ ジョウを選択してクリーニングを行います テストプリントの実施チェック 操作パネルからメカチョウセイメニューを選択し テ ストプリントを選択して テストプリントを行います 印字抜け プリントミスがないか確認します テスト プリントは 毎日の最初の印刷前に あるいはキャッ プのクリーニングなどのためにヘッドをキャッピング ユニット外へ出した後などにヘッドの確認をするため にも行います テストプリントで印字抜けがある...

Страница 29: ...サーヒ ス ファンクション システム メカチョウセイ ヒータ XXXインクサ ンリョウ ZZZ セイソ ウヒ YY MM DD ロール PAPER XXXXmm メテ ィアセンタク 01 TYPE01 オクリチョウセイハ ターン ラフ ヒョウシ ュン ハ ックフィート チュウ クリーニンク ツウシ ョウ フィート チュウ キャッフ クリーニンク メニューインサツ チョウセイハ ターン ノス ルフ リント LANGUAGE JAPANESE スタンハ イシ カン 30フン フ リントテ キマス ロール 1625 PAPER インク メニュー トウロク メニュー オクリ メニュー 表示画面 1 表示画面 2 表示画面 3 表示画面 1 へ M E N U M E N U M E N U M E N U ...

Страница 30: ...温度を設定します ただし が設定された場合は ヒータはオフになります カラーストライフ XX オン カラーストライプを印刷するか否かを選択します ヘット タカサチョウセイ XX 0 0mm ヘッド高さの調整を行います カ シツモート XX オン 印字画質の自動補正を行うか否かを選択します クリーニンク モート XX モート 1 プリントヘッドの状態を保つために プリンタが自動で実行するクリーニングのモードを選択します モト シホセイチ XX 0000ハ ルス メディアの戻し補正値を設定します 印刷中のオートクリーニング クリーニングモード モード 2 で画像 が分割された場合に つなぎ目部分の補正を行ないます タイキカンカク XX 0000スキャン 印刷中に一定の印刷長さごとにプリントヘッドのスキャンを待機します プリントヘッドの印字抜けの予防のた めに設定します 通常は 0スキャン に設...

Страница 31: ...がメンテナンスエリアまで移動します サーヒ ス サーヒ スクリーン サービス クリーニング 操作を実行します イロキリカエ 8ショク 4ショク 装置を8色機モードから4色機モードまたは 4色機モードから8色機モードに切り換える場合に使用します ヘット カクニン ヘッド確認やキャリッジ部の清掃をする場合に使用します フィルキャッフ キャップ内にインクを充満させてプリントヘッド ノズル面 をインクで浸し ノズル詰まりを解消させる機 能です ファンクション メニュー メニュー 機能の概要 メニューインサツ プリンタ情報 パネル設定情報などを印刷します エラーロク インサツ プリンタに保存されているエラーログ情報を印刷します リレキインサツ プリンタに保存されているインクシステムの清掃状況およびプリントヘッドの交換ログを印刷します メカチョウセイ メニュー メニュー 機能の概要 チョウセイハ ター...

Страница 32: ...を設定します ケイコクオン インクエラー オン インクエラーが発生した状態で警告音を発するかどうかを設定します BOOTハ ーシ ョン X XX BOOT のバージョンを表示します F Wハ ーシ ョン X XX YY システム F W のバージョンを表示します IPBハ ーシ ョン XX YYZ IPB 基板のバージョンを表示します ACTハ ーシ ョン XX YYZ ACT 基板のバージョンを表示します HCBハ ーシ ョン XX YYZ HCB 基板のバージョンを表示します BTCハ ーシ ョン XXX BTC FPGA のバージョンを表示します USBアト レス 000 USB アドレスを表示します USB スヒ ート HIGH SPEED USB 接続の転送スピードを表示します ショキセッテイ すべてのパラメータを工場出荷時の初期設定にします アッフ テ ート オンラインアップデ...

Страница 33: ...ください ソフト RIP の テス トパターン が印刷できることを確認する プリントヘッドのクリーニング プリントヘッドのクリーニングを実施してください 印刷を開始したのに 操作パ ネルに プリヒートチュウ と表示されたまま なかなか 印刷されない 室温 室温をあげてください 推奨温度 20 25 風の影響 ペーパーガイドにエアコン等の風が当たっている場合は 風 が当たらないようにしてください 風向きの変更 装置の 向き 配置の変更など 送信したデータがなかなか印 刷されない オンライン LED 点滅してい るか コンピュータとの通信条件を確認してください 白紙がでる 印刷しているデータの確認 白紙データを送信していないか 印刷しているデータを確認 してください メディアジャム メディア詰 まり が多発する メディアの種類が合ってい るか メディアの種類の設定がセットしたメディアと合ってい...

Страница 34: ...カクニンシテクタ サイ XXXサフ タンクヲ イロ カクニンシテクタ サイ XXXサフ タンクヲ シュルイ カクニンシテクタ サイ サフ タンクカハ ーヲ トリツケテクタ サイ 廃インクボトル関係 ホ トルカ ミソウチャクテ ス ホ トルヲセットシテクタ サイ ハイインクカ イッハ イテ ス ホ トルヲコウカンシテクタ サイ メディアジャム メディア詰まり ク リッフ ヲカイシ ョシテ 0 カハ ーヲアケテクタ サイ ク リッフ ヲカイシ ョシテ 1 カハ ーヲアケテクタ サイ ク リッフ ヲカイシ ョシテ 2 カハ ーヲアケテクタ サイ メディア関係 ク リッフ ヲカイシ ョシテ メテ ィアヲセットシテクタ サイ メテ ィアヲセットシテクタ サイ ク リッフ ヲカイシ ョシテ メテ ィアヲカクニンシテクタ サイ ク リッフ ヲカイシ ョシテ メテ ィアヲサイセットシテクタ サイ スキュー...

Страница 35: ...施していない場 合に表示されます 処 置 日常メンテナンスを実施してください キョウキュウホ ンフ ノ コウカンシ キテ ス 意 味 供給チューブポンプ ASSY の寿命が近づいてきたときに表示され ます 処 置 サービス拠点に連絡し 供給ポンプの交換を実施してください インクハ ックヲセットシ インクキョウキュウシテクタ サイ 意 味 インクトレイからのインク充填が完了していません 処 置 インクパックを用意し クリーニングメニューを実行してくださ い クリーニングを選択すると 自動的にインク供給のメニューが 表示されます インク LED が点滅 意 味 インク残量が少ない またはインク使用期限切れ間近であること を知らせています ワーニング 処 置 新しいインクカートリッジを用意してください ...

Страница 36: ...rom the printer 46 Setting media advance correction values 48 How to use the scroller shaft 49 Procedure for installing the scroller shafts in the media roll 49 Ink pack installation and replacement 50 Ink pack installation replacement procedure 50 Waste ink bottle installation and replacement 51 Procedure when the waste ink bottle becomes full 51 Procedure when no waste ink bottle is installed 51...

Страница 37: ...lize it Pressure control knob A knob to switch the media press force Front cover Must be closed during printing Waste ink bottle unit A unit to contain a waste ink bottle Cap cover Opened when cleaning the capping unit or replacing the wiper blade Wipe cover Opened when maintaining the print head replacement height adjustment Take up direction switch A switch to select media takeup direction Media...

Страница 38: ...tch Heater power inlet Heater power switch USB connector Connected to the printer server Subcartridge An auxiliary ink for printing even during replacement of ink Take up reel switch P 43 Media feed switch P 43 Pressure control knob P 56 Scroller flange P 40 Peel roller P 43 ...

Страница 39: ...ree heaters for ink fusing and image quality stabilization Media Head Supply side rear Takeup side front LEDs Indicate printer status with ON OFF and blinking Keys Used for menu operation and other purposes of the printer Buzzer Preheater rear Preheats media Print heater front Penetrates ink into media to fuse the ink Afterheater finishing Dries ink to stabilize print quality These three heaters a...

Страница 40: ...ded E ONLINE LED Green Indicates online or offline state of the printer ON Online Blink Online pause mode OFF Offline Key ONLINE key Used to select online or offline of the printer MENU key Used for auxiliary parameter input switching menu layer display CANCEL key Used to cancel entered parameters OK key Used to fix the selected menu and parameters HEATER key Used to enter heater control menu key ...

Страница 41: ...5kg to 50kg Media print surface Inner take up media Outer take up media Inner take up media Outer take up media Flange spacer Required Required Required Required Scroller shaft Not required Not required Required P 49 Required P 49 Vinyl chloride media Media weight Less than 35kg 35kg to 50kg Media print surface Inner take up media Outer take up media Inner take up media Outer take up media Flange ...

Страница 42: ...erent from the left one 5 Remove the protection bar and open the front cover Front cover Protection bar 6 Move the media edge guards to each side so that they are not under the media Media edge guards 7 Rotate the pressure control knob clockwise to raise the pressure roller Takeup side Supply side or Pressure control knobs 8 Insert the media end into the paper feeder while smoothing out the media ...

Страница 43: ...y that the media edge guards are properly set press the key 13 Select roll media or cut sheet media R O L L S H E E T S H E E T S E L E C T M E D I A R O L L S H E E T R O L L Either roll or sheet can be selected with the key or key Here select roll and press the key To return to the media selection press the CANCEL key 14 Select the type of media Select the registered type of media with the and k...

Страница 44: ...nsion bar combinations Size used Tension bar length L 48 inches 123 cm L S 64 inches 164 cm L S S 80 inches 204 cm General media in TENSION winding mode Put a tension bar suitable for the media width Usually put a tension bar suitable for the media width with a few exceptions General media without take up reel unit Put a tension bar which is half the width of the media Vinyl chloride media Put an ...

Страница 45: ...A B 3 Push the scroller flange until it stops and turn the handle clockwise until the flange is fixed to the paper tube Scroller flange Handle 4 Remove the flange spacers 2 Set the take up direction switch to OFF Note If the printer processing proceeds to the next step with the take up direction switch set to ON your hand may be caught as the scroller is not secured Take up direction switch Outer ...

Страница 46: ...hen set the take up direction switch to OFF Note If the tension bar is attached without winding the media by one turn the tape will peel off 8 Advance the media with the FORM FEED MENU on the operation panel to an extent where a slack can be created Be sure to create a sufficient slack so that the tension bar is placed at the bottom of the tension bar guide 9 Open the tension bar guide s cover 10 ...

Страница 47: ...ng up the floor Procedure to remove media from the printer 5 Set the printer to the offline state by pressing the O N L I N E key I N K M E D I A R E G M E D I A M A D V 6 Press the key The TUR s take up switch is activated by selecting media and setting the take up direction switch to ON 7 Rotate the scroller the wind switch black at the supply side to take up the media Take up reel switch Black ...

Страница 48: ...e TUR s take up switch is activated by selecting media 3 Lift the slackened part and remove the tension bar at the supply side Peel roller Scroller Media in general Tension bar Vinyl chloride media Printer rear supply side Peel roller Tension bar S size tension bar Switch Caution Do not ratate the peel roller or the printer may be damaged 4 Rotate the pressure control knob clockwise to raise the p...

Страница 49: ...h media advance correction value from the print result Nine patterns are printed with 0 5 increments within a range of 99 00 to 101 00 Select a rough media advance correction value from them 7 Press the key and then the key to display the media advance correction value M E D I A A D V V A L U E 0 1 0 9 9 8 0 8 Enter the media advance correction value and press the key Align the digit with the and ...

Страница 50: ...of the media roll 3 Install the scroller flange into each end of the media roll 1 Insert the scroller flange into each edge of the paper tube Scroller flange 2 Insert the flange spacer between the scroller flange and the media roll Flange spacer 3 Push the scroller flange until it stops and turn the handle clockwise until the flange is fixed to the paper tube Scroller flange Handle 4 Remove the fl...

Страница 51: ... holes at the end of the ink pack on the ink tray s two protrusion Then insert the plate into the ink tray until a click is heard 2 1 New ink pack Plate Protrusion Ink tray 5 Insert the ink tray into the slot of the printer Note Insert the ink tray as far as it will go The location of ink tray is determined by color Be sure to insert each ink tray into the specified slot Ink tray 6 Close the ink b...

Страница 52: ...ttle Note Do not hit the external cover s upper part or the waste ink may spill 7 The message to select the waste ink counter reset clear is displayed B O T T L E E M P T Y N O B O T T L E E M P T Y Y E S 8 Select BOTTLE EMPTY YES and press the key Procedure when the waste ink bottle becomes full Procedure when no waste ink bottle is installed 1 Confirm that the printer recognizes no waste ink bot...

Страница 53: ...cover 2 Nip the bottom edge of the wiper blade with tweezers and release the hook of the plastic projection 3 Remove the wiper blade upward 4 Nip the rubber of the new wiper blade with the tweezers and insert it straight downward and install it by hooking the hole in the rubber to the plastic projection Note When handling the wiper blade do not touch its upper part by hand or nip it with tweezers ...

Страница 54: ...the measured margin and the value 15mm shown in the specifications If the difference is 15mm complate this procedure If not follow the prcedure below to correct the value 508 nozzles Blank by the even number of heads 508 nozzles All nozzles 15mm 8 Press the key to enter the ADJUST menu E D G E S E N S O R A D J V A L Y Y m m 9 Press the key to display the EDGE SENSOR ADJ VAL menu and press the key...

Страница 55: ...offline state Press the O N L I N E key I N K M E D I A R E G M E D I A M A D V 2 Press the M E N U key to display PH REC MENU I N K M E D I A R E G M E D I A M A D V M E N U R E W I N D F O R M F E E D P H R E C P H M A I N 3 Press the key to enter the head cleaning menu P H R E C O V E R Y N O R M A L Note If ink filling from the ink tray is not yet completed the ink supply menu is displayed ins...

Страница 56: ...the key to return to the offline state menu mode R E W I N D F O R M F E E D P H R E C P H M A I N Feedingthemedia Feed This function feeds the media 1 Set the printer to the offline state Press the O N L I N E key I N K M E D I A R E G M E D I A M A D V 2 Press the M E N U key to display the menu group that includes FORM FEED MENU R E W I N D F O R M F E E D P H R E C P H M A I N 3 Keep pressing ...

Страница 57: ...hat the take up reel unit does not perform the backfeed operation Do not backfeed media with the take up reel unit s operation Howtousethepressurecontrolknob How to use the pressure control knob The pressure control knob is used to adjust the media pressing force of the media feeding grid roller according to the media to be used Set the pressure control knob properly according to the media The pre...

Страница 58: ...T VAL P H H E I G H T V A L 0 1 0 0 m m 4 Press the key and enter the head height adjustment value with the or key P H H E I G H T V A L 0 1 0 1 m m The adjustment value range is 0 3 to 1 0 mm 5 Press the key to determine the adjustment value Howtousemediaedgeguards To protect the print head from warp and feathering at both ends of media use media edge guards in the media feed path and slide it to...

Страница 59: ...l through the cleaning liquid port at the lower right of the top face of the wipe unit Liquid level Cleaning liquid port If the liquid lever is below the top of the mark that can be seen inside the cleaning liquid port replenish wiper cleaning liquid to a level below the top of the mark Wiper cleaning liquid 3 Close the wipe cover and the front cover Cleaning the capping unit 1 Attach the cleaning...

Страница 60: ...ve cleaning is performed remove foreign matters and ink stains on the cap with a cleaning swab dampened with cap cleaning liquid while checking visually Be careful so that the cap cleaning liquid does not adhere to any part other than the cap Replenishing spittoon absorber liquid 1 Open the front cover and then open the cap cover 2 Check the spittoon absorber liquid level in the spittoon unit visu...

Страница 61: ...s the warning beeps 4 Open the front cover and then open the cap cover O P E N C O V E R C L E A N C A P 5 Remove the knob screw of the spittoon unit and remove the spittoon unit Spittoon unit Knob screw Note The spittoon unit contains cleaning liquid Be careful not to spill it 6 Soak the cleaning stick in the cap cleaning liquid Note Do not soak the cleaning stick that you used for cleaning in th...

Страница 62: ...cleaning swab in the cap cleaning liquid Checking visually scrub stains on the media edge guard 3 Clean the stains with a soft and clean cloth 4 Close the front cover Performing normal cleaning Select PH REC MENU from the operation panel and select NORMAL ALL for cleaning Performing nozzle print Select ADJUST MENU from the operation panel and select TEST PRINTS to perform the nozzle print Check fo...

Страница 63: ... E R X X X m m S E L E C T M E D I A 0 1 T Y P E 0 1 M E D I A A D V P R I N T R O U G H N O R M A L 1 R E W I N D I N G M E D I A P H R E C O V E R Y N O R M A L F E E D I N G M E D I A C A P C L E A N I N G C O N F I G P R I N T T E S T P R I N T S N O Z Z L E P R I N T L A N G U A G E J A P A N E S E H E A T E R S T A N D B Y T I M E 3 0 m i n P R I N T E R R E A D Y R O L L 1 6 2 5 P A P E R I...

Страница 64: ...ter temperature However when is set the print heater does not work PREHEATER T XX 40 C Set the preheater temperature However when is set the preheater does not work COLOR STRIPE XX ON Select whether to print color stripes or not PH HEIGHT VAL XX 0 0 Adjust the print head height IMAGE IMPROVE XX ON Select whether to automatically correct the print quality or not PH CLEANING XX START END To keep the...

Страница 65: ...a back correction pattern print result REWIND MENU Menu Outline of functions REWINDING MEDIA While you keep pressing the key the printer rewinds media PH REC MENU Menu Outline of functions PH RECOVERY NORMAL This menu is used to clean the print head of the printer Press the key to enter PH REC MENU for the print head FORM FEED MENU Menu Outline of functions FEEDING MEDIA While you keep pressing th...

Страница 66: ...ect a length unit TEMPERATURE UNITS CENTIGRADE Select a temperature unit BEEP UNCAP CARRI ON Set whether to emit a warning beep in the state below The print head is dislocated from the cap in the daily maintenance or head height adjustment The print head cannot be capped due to a media jam error during printing BEEP TUR TIMEOUT ON Set whether to emit a warning beep when a take up TUR timeout has o...

Страница 67: ...el Room temperature Raise the room temperature Recommended temperature 20 to 25ºC Affect of air flow If the air from the air conditioner or fan is blowing against the paper guide avoid the air flow by changing air flow direction orientation of the printer or the location of the printer The transmitted data is not printed ONLINE LED blinking Check the host computer communication conditions Blank sh...

Страница 68: ... C A R T R I D G E C H E C K K I N D X X X S U B C A R T R I D G E C L O S E S U B C A R T C O V E R Waste ink bottle errors B O T T L E O U T I N S T A L L B O T T L E B O T T L E F U L L R E P L A C E B O T T L E Media jam errors W A R N I N G 0 C L E A R M E D I A J A M W A R N I N G 1 C L E A R M E D I A J A M W A R N I N G 2 C L E A R M E D I A J A M Media errors N O M E D I A L O A D E D L O...

Страница 69: ...nducted Action Perform the daily maintenance S E R V I C E N E E D E D C A L L S E R V I C E Meaning The life of the cap SUS belt and supply tube pump assembly is coming close Action Ask the service depot to replace them L O A D I N K P A C K C H A R G E I N K Meaning Ink filling from the ink tray is not yet completed Action Prepare an ink pack and perform cleaning menu When you select cleaning th...

Страница 70: ...lation des axes d enrouleur dans le rouleau de support 83 Installation et remplacement des packs d encre 84 Procédure d installation et de remplacement des packs d encre 84 Installation et remplacement de la bouteille de résidus d encre 85 Procédure si la bouteille de résidus d encre est pleine 85 Procédure si aucune bouteille de résidus d encre n est installée 85 Remplacement de l essuie glace 86...

Страница 71: ...nt Doit être fermé pendant l impression Unité de bouteille de résidus d encre Unité contenant une bouteille de résidus d encre Capot de protection Ouvert pour le nettoyage de l unité de protection ou le remplacement de l essuie glace Capot de nettoyage Ouvert lors de la maintenance de la tête d impression remplacement réglage de la hauteur Commutateur de direction d entrée Commutateur permettant d...

Страница 72: ...e Interrupteur d alimentation de l unité de chauffage Connecteur USB Connecté au serveur d impression Cartouche secondaire Une encre de dépannage permettant d imprimer même pendant le remplacement de l encre Commutateur de bobine d entrée P 77 Commutateur de chargement du support P 77 Bouton de contrôle de la pression P 90 Collerette de l enrouleur P 74 Rouleau de retrait P 77 ...

Страница 73: ...ortie arrière Côté entrée avant Voyants DEL Indiquent l état de l imprimante ON OFF clignotement Touches Servent pour l utilisation du menu et autres usages de l imprimante Alerte sonore Unité de post chauffage arrière Effectue un pré chauffage du support Unité de chauffage de l imprimante avant Fait pénétrer l encre dans le support en vue de la fusion de l encre Unité de post chauffage finition S...

Страница 74: ...s ligne ON En ligne Clignote Mode de pause en ligne OFF Hors ligne Touche Touche ONLINE Utilisée pour sélectionner l état en ligne ou hors ligne de l imprimante Touche MENU Utilisée pour la saisie de paramètres secondaires passer à l affichage de couche de menu Touche CANCEL Utilisée pour annuler les paramètres saisis Touche OK Utilisée pour valider le menu et les paramètres sélectionnés Touche HE...

Страница 75: ...ment du support Pour une bonne installation de ces colerettes reportez vous aux tableaux ci après Cette section décrit le processus d installation sans recours à un axe d enrouleur Pour l utilisation d un axe d enrouleur voir en P 83 Avec un support commun quelconque Poids du support Moins de 35 kg 35 à 50 kg Surface d impression du support Enroulement interne du support Enroulement externe du sup...

Страница 76: ...rotection et ouvrez le capot avant Capot avant Barre de protection 6 Déplacez les protections des bords du support vers chaque côté afin qu ils ne se trouvent pas sous le support Protections des bords du support 7 Tournez le bouton de contrôle de la pression dans le sens des aiguilles d une montre pour lever le rouleau de pression Côté entrée Côté sortie ou Boutons de contrôle de la pression 8 Ins...

Страница 77: ...sont correctement placées appuyez sur la touche 13 Sélectionnez le support en rouleau ou en feuille R O U L F E U I L F E U I L S E L E C T S U P P O R T R O U L F E U I L R O U L Vous pouvez sélectionner rouleau ou feuille à l aide de la touche ou Dans ce cas sélectionnez rouleau et appuyez sur la touche Pour revenir à la sélection du support appuyez sur la touche CANCEL 14 Sélectionnez le type d...

Страница 78: ...e utilisée Longueur de la barre de tension L 123 cm L S 164 cm L S S 204 cm Support général en mode d enroulement TENSION En règle générale sauf rares exceptions placez une barre de tension adaptée à la largeur du support Support général sans bobine d entrée Placez une barre de tension de la moitié de la largeur du sup port Support au chlorure de vinyle Placez une barre de tension de taille S sans...

Страница 79: ...à ce que la colerette soit fixée au tube de papier Collerettedel enrouleur Poignée 4 Remove the flange spacers 2 Réglez le commutateur de direction d entrée sur OFF Remarque Si l imprimante poursuit le traitement vers l étape suivante alors que le commutateur de direction d entrée est réglé sur ON votre main risque d être prise puisque l enrouleur n est pas sécurisé Commutateur de direction d entr...

Страница 80: ...e direction d entrée sur OFF Remarque Si la barre de tension est fixée sans enrouler le support en un tour la bande se décolle 8 Avancez le support à l aide de MENU AVA PAP sur le panneau de commande jusqu au point où il peut se détendre Veillez à créer un jeu suffisant de manière à ce que la barre de tension soit placée en bas du guide de la barre de tension Avant de l imprimante côté entrée 9 Ou...

Страница 81: ...imante hors ligne en appuyant sur la touche O N L I N E E N C R E S U P P O R T E N R S U P P O R T S A V A 6 Appuyez sur la touche The TUR s take up switch is activated by selecting media and setting the take up direction switch to ON 7 Faites tourner le commutateur d enroulement noir du côté entrée pour faire entrer le support Commutateur de la bobine réceptrice noir 8 Détachez la barre de prote...

Страница 82: ...que vous sélectionnez le support 3 Soulevez la partie desserrée et retirez la barre de tension côté sortie Rouleau de retrait Enrouleur Support en général Barre de tension Support au chlorure de vinyle Arrière de l imprimante côté sortie Rouleau de retrait Barre de tension Barre de tension de taille S Commutateur Précaution Ne faites pas tourner le rouleau de retrait sinon vous risquez d endommage...

Страница 83: ...une valeur approximative de correction d avance de support à partir du résultat d impression Neuf modèles sont imprimés avec incréments de 0 5 dans une plage comprise entre 99 et 101 Sélectionnez une valeur ap proximative de correction d avance de support parmi ces valeurs 7 Appuyez sur la touche puis pour afficher la valeur de correction de l avance du support V A L E U R A V A S U P P O R 0 1 0 ...

Страница 84: ... enrouleur à chaque extrémité du rouleau de support 1 Insérez une collerette de l enrouleur à chaque bout du tube de papier Collerette de l enrouleur 2 Insérez la pièce d écartement de la colerette entre la collerette de l enrouleur et le rouleau de support Pièce d écartement de colerette 3 Poussez la collerette de l enrouleur jusqu à butée et tournez la poignée dans le sens horloger jusqu à ce qu...

Страница 85: ...té du pack d encre aux deux parties saillantes du conteneur d encre In sérez ensuite la plaque dans le conteneur d encre jusqu à ce que vous entendiez un clic 2 1 Pack d encre neuf Plaque Partie saillante Conteneur d encre 5 Insérez le conteneur d encre dans le logement de l imprimante Remarque Insérez le conteneur d encre au maximum L emplacement du conteneur d encre est déterminé par couleur Vei...

Страница 86: ... d encre Remarque Ne heurtez pas la partie supérieure du capot externe Les résidus d encre risquent sinon de se renverser 7 Un message indiquant de sélectionner la réini tialisation effacement du compteur de résidus d encre apparaît B O U T E I L L E V I D E N O N B O U T E I L L E V I D E O U I 8 Sélectionnez BOUTEILLE VIDE OUI et ap puyez sur la touche Procédure si la bouteille de résidus d encr...

Страница 87: ... de l essuie glace avec les pinces et libérez le crochet du bord saillant en plastique 3 Retirez l essuie glace vers le haut 4 Saisissez le caoutchouc du nouvel essuie glace avec les pinces et insérez le tout droit puis installez le en fixant l orifice du caoutchouc à la projection en plastique Partie en caoutchouc Remarque Lorsque vous manipulez l essuie glace veillez à ne pas toucher la partie s...

Страница 88: ...tre la marge mesurée et la valeur 15 mm indiquée dans les spécifications Si la différence est de 15 mm terminez cette procédure Sinon suivez la procédure ci dessous pour corriger la valeur 508 buses blanc par le nombre égal de têtes 508 buses Toutes les buses 15mm 8 Appuyez sur la touche pour accéder au menu REGL V A L R E G C A P T E B O R D Y Y m m 9 Appuyez sur la touche pour afficher le menu V...

Страница 89: ...touche O N L I N E E N C R E S U P P O R T E N R S U P P O R T S A V A 2 Appuyez sur la touche M E N U pour afficher le MENU TI REC E N C R E S U P P O R T E N R S U P P O R T S A V A M E N U R E M B O B I N E R A V A P A P T I R E C T I M A I N 3 Appuyez sur la touche pour accéder au menu de nettoyage de tête R E C U P E R A T I O N T I N O R M A L Remarque Si le remplissage de l encre du contene...

Страница 90: ...Appuyez sur la touche pour revenir à l état hors ligne mode menu R E M B O B I N E R A V A P A P T I R E C T I M A I N Chargementdusupport Chargement Cette fonction permet de charger le support 1 Mettez l imprimante hors ligne Appuyez sur la touche O N L I N E E N C R E S U P P O R T E N R S U P P O R T S A V A 2 Appuyez sur la touche M E N U pour ac céder au groupe de menus incluant le MENU AVA P...

Страница 91: ...on de rembobinage Ne rembobinez pas le support à l aide de l unité de bobine réceptrice Commentutiliserleboutondecontrôledelapression Comment utiliser le bouton de contrôle de la pression Le bouton de contrôle de la pression est utilisé pour régler la force de pression du support pour le rouleau de grille de chargement en fonction du support utilisé Réglez le bouton de contrôle de la pression corr...

Страница 92: ...0 1 0 1 m m La plage de valeur d ajustement est comprise entre 0 3 et 1 mm 5 Appuyez sur la touche pour déterminer la valeur de réglage Commentutiliserl utilitairedeprotectiondesbordsdusupport Pour protéger la tête d écriture des déformations et des bavures aux deux extrémités du support utilisez l utilitaire de protection des bords du support dans le chemin de chargement du support et faites le g...

Страница 93: ...érieur de l unité de nettoy age Niveau du liquide Port du liquide de nettoyage Si le niveau du liquide se situe en dessous du sommet du repère à l intérieur du port du liquide de net toyage réapprovisionnez le liquide de nettoyage à un niveau en dessous du sommet du repère Liquide de nettoyage 3 Fermez le capot de nettoyage et le capot avant Nettoyage de l unité de protection 1 Fixez le rouleau de...

Страница 94: ...ticules et taches d encre qui se trouvent sur la protection à l aide d un chiffon propre imbibé de liquide de nettoyage des protections tout en effectuant une vérification visuelle Veillez à ce que le liquide de nettoyage des protections n adhère pas à une autre partie que la protection Réapprovisionnerleliquided absorptiondeséclaboussures 1 Ouvrez le capot avant puis ouvrez le capot de protection...

Страница 95: ...e capot avant puis ouvrez le capot de protection O U V R I R C A P O T N E T T O Y E R P R O T E C T I O N 5 Desserrez la vis du bouton de l unité de collecte d éclaboussures et retirez l unité Unité de collecte d éclaboussures Vis de bouton Remarque L unité de collecte d éclaboussures contient du liquide de nettoyage Veillez à ne pas le renverser 6 Imbibez la tige de nettoyage avec le liquide de ...

Страница 96: ...llement frottez les taches qui se trouvent sur la protection de bord de support 3 Eliminez les taches à l aide d un chiffon doux et propre 4 Refermez le capot avant Effectuer un nettoyage standard Sélectionnez MENU TI RECsur le panneau de commande et sélectionnez NORMAL TOUT pour nettoyer Effectuer une impression avec les buses Sélectionnez MENU REGL dans le panneau de commande et sélectionnez PAG...

Страница 97: ...P A P E R X X X m m S E L E C T S U P P O R T 0 1 T Y P E 0 1 I M P R A V A S U P P O R T E P R E U V E N O R M A L R E M B O B I N E R S U P P O R T R E C U P E R A T I O N T I N O R M A L C H A R G E R S U P P O R T N E T T O Y E R P R O T E C T I O N I M P R E S S I O N C O N F I G P A G E S D E T E S T I M P R B U S E L A N G U E J A P O N A I S V E I L L E R A D I A T E U R 3 0 m i n I M P R ...

Страница 98: ... si est activé l unité de chauffage d impression ne fonctionne pas TEMP PRE CHAUFFAGE 01 40ºC Réglez la température de l unité de pré chauffage Toutefois si est activé l unité de pré chauffage ne fonctionne pas BANDE DE COULEUR XX OUI Sélectionnez si vous souhaitez ou non imprimer des bandes de couleur VAL HAUTEUR TI XX 0 0 Réglez la hauteur de la tête d impression IMAGE IMPROVE XX OUI Sélectionne...

Страница 99: ...de correction de support arrière MENU REMBOBINAGE Menu Présentation des fonctions REMBOBINER SUPPORT L imprimante rembobine le support pendant que vous appuyez sur la touche MENU TI REC Menu Présentation des fonctions RECUPERATION TI NORMAL Ce menu permet de nettoyer la tête d impression de l imprimante Appuyez sur la touche pour accéder au MENU TI MAIN de la tête d imprimante MENU AVA PAP Menu Pr...

Страница 100: ...EMPERATURE CENTIGRADE Sélectionnez une unité de température BIP CHA NON PROT OUI Indiquez si un signal sonore d avertissement doit être émis dans le cas ci dessous La tête d impression est désolidarisée de la protection lors de la maintenance quotidienne ou du réglage de la hauteur de la tête La tête d impression ne peut pas être protégée en raison d une erreur de bourrage de support lors de l imp...

Страница 101: ... Voyant DEL d erreur allumé ou message d erreur sur le LCD Prenez les mesures appropriées en fonction du message d erreur Voyant DEL d erreur éteint Imprimez la page de test Vérifiez que la Page de test du logiciel de RIP est imprimée Nettoyage de tête d impression Nettoyez la tête d impression Bien que l imprimante soit en mode impression l impression ne démarre pas et PRECHAUFFAGE est affiché su...

Страница 102: ... Y S T E M E n n n n M A R C H E A R R E T nnnn Code d erreur Erreurs nécessitant l intervention d un technicien interne Erreurs que l opérateur le client peut traiter Prendre les mesures en fonction du message Erreurs d encre F E R M E R C A P O T E N C R E O U V R I R C A P O T E N C R E C C C C H A R C A R T E N C R E V E R I F I E R n n C C C C A R T E N C R E O U V R I R C A P O T E N C R E X...

Страница 103: ... erreur Le message d avertissement suivant apparaît après une impression en ligne Prenez les mesures appropriées en fonction du message affiché E F F E C T M A I N T E N A N C E Q U O T I D M A I N T E N A N T Signification Cette erreur indique que la maintenance quotidienne nettoyage des protections n a pas été effectuée Action Effectuez la maintenance quotidienne M A I N T E N A N C E R E Q U I ...

Страница 104: ...rto 116 Come usare gli alberi dello scroller 117 Procedura per l installazione di alberi dello scroller nel supporto in rotolo 117 Installazione e sostituzione dell inchiostro 118 Procedura di installazione sostituzione del pacco d inchiostro 118 Installazione e sostituzione della bottiglia di scarico dell inchiostro 119 Procedura da seguire quando la bottiglia di scarico dell inchiostro è piena 1...

Страница 105: ...rimanere chiuso durante la stampa Unità bottiglia scarico inchiostro Unità contenente la bottiglia di scarico dell inchiostro Coperchio capsule Aprire per pulire l unità capsule o per sostituire la lama di pulizia Coperchio lama pulizia Aprire per effettuare la manutenzione della testina di stampa sostituzione regolazione altezza Interruttore direzione avvolgimento Interruttore per l impostazione ...

Страница 106: ...atori Interruttore di alimentazione dei riscaldatori Connettore USB Collegato al server di stampa Cartucce di riserva Inchiostro di riserva che consente di continuare a stampare anche durante la sostituzione dell inchiostro Interruttore bobina avvolgimento P 111 Interruttore alimentazione supporti P 111 Manopola controllo pressione P 124 Flangia scroller P 108 Rullo pellicola P 111 ...

Страница 107: ...osteriore Lato avvolgimento anteriore LED Indicano lo stato della stampante e possono essere accesi spenti o lampeggianti Tasti Consentono di selezionare le voci dei menu e impostare altre funzioni della stampante Segnalatore acustico Pre riscaldatore posteriore Preriscalda il supporto Riscaldatore stampa anteriore Permette la penetrazione dell inchiostro nel supporto e fonde l inchiostro Riscalda...

Страница 108: ...E LED Green Indica se la stampante è in linea o non in linea Acceso in linea Lampeggiante modalità pausa in linea Spento non in linea Tasto Tasto ONLINE Consente di mettere la stampante in modalità in linea o non in linea Tasto MENU Consente di utilizzare ulteriori parametri selezionando i menu sul display Tasto CANCEL Consente di annullare i parametri specificati Tasto OK Consente di confermare i...

Страница 109: ...angia dello scroller Questa sezione descrive la procedura di installazione senza l utilizzo dell albero dello scroller Per la modalità d uso dell albero dello scroller vedere a P 117 Quando si usa un qualsiasi supporto comune Peso del supporto Inferiore a 35 kg Da 35 a 50 kg Superficie di stampa del supporto Supporto con avvolgimento verso l interno Supporto con avvolgimento verso l esterno Suppor...

Страница 110: ...ra di protezione e aprire il coperchio anteriore Coperchio anteriore Barra di protezione 6 Spostare le protezioni laterali del supporto verso l esterno per fare in modo che non si trovino sotto il supporto Protezioni laterali supporto 7 Ruotare la manopola di controllo pressione in senso orario per sollevare il rullo di pressione Lato avvolgimento Lato alimentazione o Manopole controllo pressione ...

Страница 111: ... protezioni laterali del supporto siano impostate correttamente premere il tasto 13 Selezionare se verranno utilizzati supporti in rotolo o in fogli R O T O L O F O G L I O F O G L I O S E L E Z I O N A R E S U P P O R T O R O T O L O F O G L I O R O T Premere il tasto o per selezionare rot oppure foglio Selezionare rot e premere il tasto Per tornare alla selezione supporto premere il tasto CANCEL...

Страница 112: ...ombinazioni della barra di tensionamento Dimensione utilizzata Lunghezza barra tensionamento L 48 pollici 123 cm L S 64 pollici 164 cm L S S 80 pollici 204 cm Supporti generici in modalità di avvolgimento con TENSIONAMENTO Generalmente si utilizza una barra di tensionamento adatta alla larghezza del supporto salvo poche eccezioni Supporti generici senza unità bobina di avvolgimento Utilizzare una ...

Страница 113: ... è fissata al tubo di carta Flangia scroller Maniglia 4 Rimuovere i distanziatori delle flange 2 Spostare l interruttore della direzione di avvol gimento su OFF Nota Se la stampante avanza alla fase successiva con l interruttore della direzione di avvolgimento impostato su ON la mano dell operatore potrebbe rimanere intrappolata in quanto lo scroller non è protetto Interruttore direzione avvolgime...

Страница 114: ...di tensionamento viene collegata senza avvolgere il supporto di un giro il nastro si staccherà 8 Alimentare il supporto con il MENU ALIM CARTA sul pannello operatore fino al punto in cui è possibile creare un allentamento Creare un allentamento sufficiente da consentire di po sizionare la barra di tensionamento in fondo alla guida della barra di tensionamento Lato anteriore della stampante lato av...

Страница 115: ...dura di rimozione dei supporti scroller dalla stampante 5 Mettere la stampante in modalità non in linea premendo il tasto O N L I N E I N C H R E G S U P P S U P P A V A N Z S 6 Premere il tasto L interruttore della bobina di avvolgimento si attiva selezionando il supporto e spostando l interruttore della direzione di avvolgimento su ON 7 Far ruotare lo scroller tramite l interruttore di avvolgime...

Страница 116: ...3 Sollevare la parte allentata e rimuovere la barra di tensionamento sul lato di alimentazione Rullo pellicola Scroller Supporti in genere Barra di tensionamento Supporti al cloruro di vinile Lato posteriore della stampante lato alimentazione Rullo pellicola Barra di tensionamento Barra di tensionamento di dimensione S Interruttore Attenzione Per evitare di danneggiare la stampante non ruotare il ...

Страница 117: ...i correzione avanza mento supporto approssimativo dal risultato di stampa Vengono stampati nove motivi con incrementi dello 0 5 in un intervallo compreso tra 99 00 e 101 00 Selezionare un valore di correzione avanzamento sup porto approssimativo tra questi motivi 7 Premere il tasto e quindi il tasto per visualizzare il valore di correzione avanzamento supporto V A L O R E A V A N Z S U P P 0 1 0 9...

Страница 118: ...Installare la flangia dello scroller in ognuna delle estremità del supporto in rotolo 1 Inserire la flangia dello scroller in ognuna delle es tremità del tubo di carta Flangia scroller 2 Inserire il distanziatore della flangia tra la flangia dello scroller e il supporto in rotolo Distanziatore della flangia 3 Spingere la flangia dello scroller fino in fondo e ruotare la maniglia in senso orario fi...

Страница 119: ...o al pacco d inchiostro alle due sporgenze sul vassoio per l inchiostro Quindi inserire la piastra dentro il vassoio per l inchiostro finché non scatta in posizione 2 1 Nuovo pacco d inchiostro Piastra Sporgenza Vassoio inchiostro 5 Insert the ink tray into the slot of the printer Nota Spingere il vassoio fino in fondo La posizione del vassoio per l inchiostro dipende dal colore Assicurarsi di ins...

Страница 120: ... di scarico inchiostro Nota Non colpire la parte superiore del coperchio esterno per evitare che l inchiostro di scarico fuoriesca 7 Comparirà il messaggio che richiede di azzerare il contatore della bottiglia di scarico dell inchiostro B O T T I G L I A V U O T A N O B O T T I G L I A V U O T A S Ì 8 Selezionare BOTTIGLIA VUOTA SÌ e premere il tasto Procedura da seguire quando la bottiglia di sca...

Страница 121: ...inferiore della lama di pulizia con le pinzette e rilasciare il fermo della sporgen za in plastica 3 Rimuovere la lama di pulizia verso l alto 4 Afferrare la gomma della nuova lama di pulizia con le pinzette e inserirla con un movimento in linea retta verso il basso quindi installarla ag ganciando il foro nella gomma alla sporgenza in plastica Parte in gomma Nota Quando si maneggia la lama di puli...

Страница 122: ...l valore 15 mm mostrato nelle specifiche Se la differenza è pari a 15 mm completare questa procedura In caso contrario seguire la procedura descritta di seguito per correggere il valore 508 ugelli le testine di numero pari non emettono inchiostro 508 ugelli tutti gli ugelli 15 mm 8 Premere il tasto per accedere al menu REGOLAZ V A L R E G S E N S B O R D O Y Y m m 9 Premere il tasto per visualizza...

Страница 123: ...LE TUTTI 1 Mettere la stampante in modalità non in linea Premere il tasto O N L I N E I N C H R E G S U P P S U P P A V A N Z S 2 Premere il tasto M E N U per accedere al MENU RIPR T I N C H R E G S U P P S U P P A V A N Z S M E N U R I A V V A L I M C A R T A R I P R T M A N U T T 3 Premere il tasto per accedere al menu di pulizia della testina di stampa R I P R I S T I N O T E S T I N A N O R M ...

Страница 124: ...la modalità non in linea modalità menu R I A V V A L I M C A R T A R I P R T M A N U T T Alimentazionedeisupporti Alimentazione Questa funzione consente di alimentare i supporti 1 Mettere la stampante in modalità non in linea Premere il tasto O N L I N E I N C H R E G S U P P S U P P A V A N Z S 2 Premere il tasto M E N U per accedere al gruppo di menu comprendente il MENU ALIM CARTA R I A V V A L...

Страница 125: ...ntamento del supporto tocchi il pavimento Tenere inoltre presente che l unità bobina di avvolgimento non esegue l operazione di riavvolgimento Non riavvolgere i supporti se l unità bobina di avvolgimento è in funzione Comeusarelamanopoladicontrollopressione Come usare la manopola di controllo pressione Regolare la manopola di controllo pressione in base al supporto La pressione può essere impostat...

Страница 126: ...ina con il tasto o A L T E Z Z A T E S T I N A 0 1 0 1 m m The adjustment value range is 0 3 to 1 0 mm 5 Premere il tasto per confermare il valore im messo Comeusareleprotezionilateralidelsupporto Per proteggere la testina di stampa da deformazioni e sfrangiature su entrambe le estremità del supporto utilizzare le protezioni laterali del supporto nel percorso di alimentazione supporti facendole sc...

Страница 127: ...teriore dell unità di pulizia Livello del liquido Porta liquido detergente Se la levetta del liquido è sotto la parte alta dell indicatore X visibile all interno della porta del liquido detergente aggiungere altro liquido detergente fino a un livello inferiore alla parte alta dell indicatore O Liquido detergente 3 Chiudere il coperchio della lama di pulizia e il coperchio anteriore Pulizia dell un...

Страница 128: ...pulizia sopra descritta continuano a verificarsi malfunzionamenti degli ugelli rimuovere eventuali sostanze estranee e macchie d inchiostro dalle capsule con un tampone di pulizia immerso nel liquido detergente mentre si esegue il controllo visivo Evitare che il liquido detergente aderisca a parti diverse dalla capsula stessa Rifornimento di liquido di assorbimento spruzzi 1 Aprire il coperchio an...

Страница 129: ... viene emesso un segnale acustico 4 Aprire il coperchio anteriore quindi aprire il coperchio capsule O P E N C O V E R C L E A N C A P 5 Rimuovere la rotella dell unità spruzzo e rimuo vere l unità Unità spruzzo Rotella Nota L unità spruzzo contiene liquido detergente Fare attenzione a non far uscire il liquido 6 Immergere il bastoncino di pulizia nel liquido detergente per le capsule Nota Non imm...

Страница 130: ... visi vamente e pulire le macchie sulle protezioni laterali del supporto 3 Rimuovere le macchie con un panno morbido e pulito 4 Chiudere il coperchio anteriore Pulizia normale Selezionare il MENU RIPR T dal pannello operatore e selezionare NORMALE TUTTI per la pulizia Esecuzione di una prova di stampa Selezionare il MENU REGOLAZ dal pannello operatore quindi selezionare STAMPE DI PROVA per eseguir...

Страница 131: ...S E L E Z I O N A S U P P O R T O 0 1 T Y P E 0 1 S T A M P A A V A N Z S U P P S C H I Z Z O N O R M A L E 1 R I A V V O L G I M E N T O S U P P R I P R I S T I N O T E S T I N A N O R M A L E A L I M E N T A Z I O N E S U P P P U L I Z I A C A P S U L A S T A M P A C O N F I G U R A Z S T A M P E D I P R O V A S T A M P A U G E L L I L A N G U A G E E N G L I S H S T A N D B Y U N I T À R I S C ...

Страница 132: ...di stampa Tuttavia quando si seleziona il riscaldatore di stampa non funziona TEMP U RISC POST 01 30ºC Consente di impostare la temperatura del pre riscaldatore posteriore Tuttavia quando si seleziona il pre riscaldatore posteriore non funziona STRISCIA A COLORI 01 OFF Consente di selezionare se stampare o meno le strisce a colori ALTEZZA TESTINA 01 X Xmm Consente di regolare l altezza della testi...

Страница 133: ... Immettere un valore di regolazione posteriore sulla base del motivo di regolazione posteriore stampato MENU RIAVV Menu Descrizione delle funzioni RIAVVOLGIMENTO SUPP Mentre si tiene premuto il tasto la stampante riavvolge i supporti MENU RIPR T Menu Descrizione delle funzioni RIPRISTINO TESTINA NORMALE Questo menu consente di pulire la testina di stampa della stampante Premere il tasto per accede...

Страница 134: ...tà di lunghezza UNITÀ TEMPERATURA CENTIGRADI Consente di selezionare l unità di temperatura BEEP CAPSU APERTA ON Consente di impostare se negli stati indicati sotto verrà emesso un segnale acustico La testina di stampa è stata allontanata dalla capsula durante la manutenzione giornaliera o la regolazione dell altezza della testina Non è possibile inserire la capsula sulla testina di stampa perché ...

Страница 135: ...e messaggio LCD Intraprendere le azioni appropriate a seconda del messaggio di errore visualizzato LED di errore spento Stampare il motivo di prova Verificare che il Motivo di prova del software RIP venga stampato Pulizia della testina di stampa Pulire la testina di stampa Anche se la stampante è in modalità stampa la stampa non viene avviata e sul pannello operatore compare PRERISCALDAMENTO Tempe...

Страница 136: ...n n n S P E G N E R E E A C C E N D E R E nnnn Codice errore Errori di richiesta intervento dell utente Errori risolvibili dall operatore il cliente Intraprendere le azioni segnalate dai messaggi Errori inchiostro C H I U D E R E C O P E R C H I O I N C H I O S T R O A P R I R E C O P E R I N C H C C C C A R P A C C O I N C H C O N T R O L L A R E n n C C C P A C C O I N C H A P R I R E C O P E R ...

Страница 137: ...possono comparire i messaggi di errore seguenti Intraprendere le azioni appropriate a seconda del messaggio di errore visualizzato E S E G U I R E O R A M A N U T E N Z G I O R N A L I E R A Significato Questo errore segnala che non è stata effettuata la manutenzione giornaliera pulizia capsula Azione Effettuare la manutenzione giornaliera R I C H I E S T O I N T E R V E N T O C H I A M A R E S E ...

Страница 138: ...stlegen von Korrekturwerten für den Medienvorschub 150 Verwendung der Papierspindeln 151 Vorgehensweise beim Installierien der Papierspindeln in die Mediumrolle 151 Installieren und Ersetzen der Tintenpatronen 152 Vorgehensweise zum Installieren Ersetzen der Tintenpatronen 152 Installieren und Wechseln des Resttintenbehälters 153 Vorgehensweise bei vollem Resttintenbehälter 153 Vorgehensweise bei ...

Страница 139: ...andrucks Vorderabdeckung Muss beim Drucken geschlossen sein Resttintenbehältereinheit Einheit die einen Resttintenbehälter enthält Kappenabdeckung Wird beim Reinigen der Kappen oder Austauschen der Abstreifleiste geöffnet Abstreifleistenabdeckung Wird bei der Wartung des Druckkopfes geöffnet Austausch Höheneinstellung Schalter für Aufrollrichtung Schalter zum Auswählen der Medienaufrollrichtung Sc...

Страница 140: ... des Heizers Netzschalter des Heizers USB Anschluss Mit Druckerserver verbunden Hilfspatrone Zusatztinte zum Drucken während des Patronenwechsels Schalter für Aufrolleinheit S 145 Schalter für Medienvorschub S 145 Knopf zur Andrucksteuerung S 158 Papierspindelflansch S 142 Etikettenabwickler S 145 ...

Страница 141: ...g der Druckqualität Medium Kopf 1 2 3 Abrollseite hinten Aufrollseite vorne LEDs Zeigen Druckerstatus an EIN AUS Blinken Tasten Für Menübedienung und andere Druckerfunktionen Summer Vorheizer hinten Zum Vorheizen des Mediums Druckheizer vorne Sorgt dafür dass die Tinte das Medium durchdringt und fixiert wird Nachheizer Endbearbeitung Trocknet die Tinte um die Druckqualität zu fixieren Diese drei H...

Страница 142: ...nzelblattmedium geladen E ONLINE LED grün Zeigt den Online bzw Offline Status des Druckers an EIN Online Blinken Online Pausenmodus AUS Offline Taste ONLINE Taste Zum Wählen des Online bzw Offline Status des Druckers MENU Taste Für Hilfsparametereingaben Wechsel zwischen Menüebenen CANCEL Taste Zum Abbrechen eingegebener Parameter OK Taste Zum Fixieren der ausgewählten Menüs und Parameter HEATER T...

Страница 143: ...h auf S 2 44 beziehen Bei Verwendung eines gebräuchlichen Mediums Mediumgewicht Weniger als 35 kg 35 bis 50 kg Medium Aufdruckseite Inneres Aufwickelmedium Äußeres Aufwickelmedium Inneres Aufwickelmedium Äußeres Aufwickelmedium Flansch Abstandsstück Erforderlich Erforderlich Erforderlich Erforderlich Papierspindel Nicht erforderlich Not required Erforderlich S 151 Erforderlich S 151 Bei Verwendung...

Страница 144: ...rnen Sie die Schutzleiste und öffnen Sie die Vorderabdeckung Vorderabdeckung Schutzleiste 6 Schieben Sie die Kantenkontrollen auf jede Seite so dass sie nicht unter dem Medium liegen Kantenkontrollen 7 Drehen Sie den Knopf zur Andrucksteuerung im Uhrzeigersinn um die Andruckrolle anzuheben Aufrollseite Abrollseite oder Knöpfe zur Andrucksteuerung 8 Legen Sie das Medienende in die Papierzufüh rung ...

Страница 145: ...t haben dass die Kantenkontrollen richtig eingestellt sind drücken Sie die Taste 13 Wählen Sie Rollenmedium oder Einzelblatt medium aus R O L L E B L A T T B L A T T M E D I U M A U S W Ä H L E N R O L L E B L A T T R O L L E Mit den Tasten bzw wählen Sie Rolle bzw Blatt aus Wählen Sie hier Rolle und drücken Sie die Taste Um zur Medienauswahl zurückzukehren dräcken Sie die Taste CANCEL 14 Wählen S...

Страница 146: ...onen Verwendete Größe Länge der Spannleiste L 48 Zoll 123 cm L S 64 Zoll 164 cm L S S 80 Zoll 204 cm Normales Medium im Aufrollmodus mit Spannleiste Abgesehen von einigen Ausnahmen sollte eine Spannleiste für die entsprechende Medienbreite eingesetzt werden Normales Medium ohne Aufrolleinheit Setzen Sie eine Spannleiste ein die der halben Medienbreite entspricht Vinylchlorid Medium Setzen Sie eine...

Страница 147: ...inn drehen bis der Flansch fest gegen die Papierröhre gedrückt wird Papierspindelflansch Handrad 4 Die Flansch Abstandsstücke entfernen 2 Setzen Sie den Schalter für die Aufrollrichtung auf AUS Hinweis Wenn die Druckerverarbeitung mit dem nächsten Schritt fortfährt wenn der Schalter für die Aufrollrichtung auf EIN gesetzt ist kann Ihre Hand eingeklemmt werden da die Papierspindel nicht gesichert i...

Страница 148: ...ng auf AUS Hinweis Wenn die Spannleiste eingesetzt wird ohne dass das Medium um eine Umdrehung aufgewickelt wurde löst sich das Klebeband ab 8 Schieben Sie das Medium über das Menü SEITENVORSCH auf dem Bedienfeld so weit vor dass ein Schlupf erzeugt werden kann Stellen Sie sicher dass der Schlupf ausreicht um die Spannleiste unten an der Spannleistenführung einset zen zu können Vorderseite des Dru...

Страница 149: ...ert wird Vorgehensweise zum Entfernen des Mediums Papierspindel aus dem Drucker 5 Setzen Sie den Drucker durch Drücken der Taste O N L I N E in den Offline Status T I N T E M E D I E N R E G M E D I E N M E D I E N V O R 6 Drücken Sie die Taste Wenn Sie das Medium auswählen und den Schalter für die Aufrollrichtung auf EIN setzen wird der Aufrollschal ter der Aufrolleinheit aktiviert 7 Drehen Sie d...

Страница 150: ...rd der Aufrollschalter der Aufrolleinheit aktiviert 3 Heben Sie den gelockerten Teil an und ent fernen Sie die Spannleiste auf der Abrollseite Etikettenabwickler Papierspindel Medien im Allgemeinen Spannleiste Vinylchlorid Medium Rückseite des Druckers Abrollseite Etikettenabwickler Spannleiste Spannleiste Größe S Schalter Vorsicht Drehen Sie den Etikettenabwickler nicht manuell da dies den Drucke...

Страница 151: ... einen groben Korrekturwert für den Medienvorschub aus Es werden neun Muster in Schritten von 0 5 inner halb eines Bereichs von 99 00 bis 101 00 gedruckt Wählen Sie daraus einen groben Korrekturwert für den Medienvorschub aus 7 Drücken Sie dieTaste und anschließend die Taste um den Korrekturwert für den Medienvorschub anzuzeigen W E R T M E D I E N V O R S C H U B 0 1 0 9 9 8 0 8 Geben Sie den Kor...

Страница 152: ...pierspindelflansch an jedem Ende der Mediumrolle einschieben 1 Den apierspindelflansch an jedem Ende der Papier röhre einschieben Papierspindelflansch 2 Die Flansch Abstandsstücke zwischen Papierspin delflansch und Mediumrolle einsetzen Flansch Abstandsstück 3 Den apierspindelflansch bis zum Anschlag hinein schieben dann das Handrad im Uhrzeigersinn drehen bis der Flansch fest gegen die Papierröhr...

Страница 153: ...ängen Sie die Tintenpatrone mit den beiden Löchern in die beiden Ausbuchtungen des Tintenfachs ein Schieben Sie die Platte in das Tintenfach bis sie einrastet 2 1 Neue Tintenpatrone Platte Ausbuchtung Tintenfach 5 Schieben Sie das Tintenfach in den Einschub des Druckers Hinweis Schieben Sie das Tintenfach bis zum Anschlag hinein Die Position des Tintenfachs ist durch Farben markiert Stellen Sie si...

Страница 154: ...in 6 Drücken Sie den Hebel nach unten Schlauch Hebel Resttintenbehälter Hinweis Achten Sie darauf dass Sie nicht an den oberen Teil der Außenabdeckung stoßen damit keine Resttinte verschüttet wird 7 Es wird die Meldung angezeigt dass der Rest tintenzähler zurückgesetzt werden muss F L A S C H E L E E R N E I N F L A S C H E L E E R J A 8 Wählen Sie FLASCHE LEER JA und drücken Sie die Taste Vorgehe...

Страница 155: ...leisten abdeckung 2 Fassen Sie den unteren Rand der Abstreifleiste mit der Pinzette an und lösen Sie den Haken des Plastikschutzes 3 Ziehen Sie die Abstreifleiste nach oben heraus 4 Fassen Sie das Gummi der neuen Abstreifleiste mit der Pinzette an setzen Sie sie gerade ein und befestigen Sie sie indem Sie das Gummi mit dem Loch in den Haken des Plastikschutzes einhängen Gummiteil Hinweis Fassen Si...

Страница 156: ...hen dem gemessenen Rand und dem in den Spezifikationen an gezeigten Wert 15 mm Wenn die Differenz 15 mm beträgt schließen Sie diesen Vorgang ab Befolgen Sie anderenfalls die unten stehenden Schritte um den Wert zu korrigieren 508 Düsen gerade Anzahl Köpfe leer 508 Düsen alle Düsen 15mm 8 Drücken Sie die Taste um das Menü JUSTIEREN einzugeben W E R T L S A U S R S E I T E Y Y m m 9 Drücken Sie die ...

Страница 157: ...Modus Drücken Sie die Taste O N L I N E T I N T E M E D I E N R E G M E D I E N M E D I E N V O R 2 Drücken Sie die Taste M E N U um das Menü DK REGEN anzuzeigen T I N T E M E D I E N R E G M E D I E N M E D I E N V O R M E N U A U F W S E I T E N V O R S C H D K R E G E N D K W A R T 3 Drücken Sie die Taste um das Druckkopfreinigungsmenü einzugeben D K R E G E N E R A T I O N N O R M A L Hinweis ...

Страница 158: ...us Menümodus zurückzukehren A U F W S E I T E N V O R S C H D K R E G E N D K W A R T Medienzufuhr Vorschub Diese Funktion ist für den Medienvorschub verantwortlich 1 Setzen Sie den Drucker in den Offline Modus Drücken Sie die Taste O N L I N E T I N T E M E D I E N R E G M E D I E N M E D I E N V O R 2 Drücken Sie die Taste M E N U um die Menügruppe mit dem Menü SEITENVORSCH anzuzeigen A U F W S ...

Страница 159: ...auf den Boden hängt Beachten Sie dass die Aufrolleinheit den Backfeed Vorgang nicht ausführen kann Ziehen Sie das Medium nicht mit der Aufrolleinheit zurück VerwendendesKnopfeszurAndrucksteuerung Verwenden des Knopfes zur Andrucksteuerung Mit dem Knopf zur Andrucksteuerung wird der Andruck der Medienvorschubrolle für das verwendete Medium eingestellt Stimmen Sie den Knopf zur Andrucksteuerung auf ...

Страница 160: ...E 0 1 0 0 m m 4 Drücken Sie die Taste und geben Sie den Einstellwert für die Druckkopfhöhe mit der Taste oder ein D R U C K K O P F H Ö H E 0 1 0 1 m m Der Einstellwert liegt zwischen 0 3 und 1 0 mm 5 Drücken Sie die Taste um den Einstellwert festzulegen VerwendenderKantenkontrollen Passen Sie die Medien Kantenkontrollen im Vorschubpfad an die Medienbreite an um den Druckkopf vor Gratbildung und F...

Страница 161: ...s sigkeit über die entsprechende Öffnung die sich unten rechts an der Oberseite der Abstreif ereinheit befindet Flüssigkeitsstand Öffnung für Reinigungsflüssigkeit Wenn der Flüssigkeitsstand unter dem oberen Rand der Marke X in der Öffnung liegt füllen Sie Abstrei fer Reinigungsflüssigkeit bis über den oberen Rand der Marke O nach Abstreifer Reinigungsflüssigkeit 3 Schließen Sie die Abstreifleiste...

Страница 162: ...rweise nicht mehr einwandfrei Wenn das Düsenproblem nach dem oben beschriebenen Reinigungsvorgang weiterhin besteht entfernen Sie Fremdkörper und Tintenflecken auf der Kappe mit einem mit Kappenreiniger angefeuchteten Läppchen und überprüfen Sie die Kappe per Sichtkontrolle Achten Sie darauf dass der Kappenreiniger nur mit der Kappe in Berührung kommt Auffüllen der Tropfschalen Absorberflüssigkeit...

Страница 163: ...rd ertönt ein Warnton 4 Öffnen Sie die Vorderabdeckung und dann die Kappenabdeckung Ö F F N E A B D E C K U N G R E I N I G E K A P P E 5 Lösen Sie die Knopfschraube der Tropfschalenein heit und nehmen Sie diese heraus Tropfschaleneinheit Knopfschraube Hinweis Die Tropfschale enthält Reinigungsflüssigkeit Achten Sie darauf dass nichts verschüttet wird 6 Halten Sie das Reinigungsstäbchen in die Rei...

Страница 164: ...ungstupfer in die Kappen Reinigungsflüssigkeit ein Entfernen Sie Flecken auf der Kantenkontrolle 3 Reiben Sie mit einem weichen sauberen Tuch nach 4 Schließen Sie die Vorderabdeckung Normale Reinigung Wählen Sie das Menü DK REGEN im Bedienfeld und wählen Sie für die Reinigung NORMAL ALLE Düsentestdruck Wählen Sie das Menü JUSTIEREN im Bedienfeld und dann TESTDRUCKE um den Düsentestdruck durchzufüh...

Страница 165: ... X m m M E D I U M A U S W Ä H L E N 0 1 T Y P 0 1 M E D I E N V O R S C H U B D R C K G R O B N O R M A L M E D I U M A U F W I C K E L N D K R E G E N E R A T I O N N O R M A L A L L E M E D I U M V O R S C H I E B E N K A P P E R E I N I G E N K O N F I G U R A T I O N S D R U C K T E S T D R U C K E D Ü S E N D R U C K S P R A C H E J A P A N I S C H S T A N D B Y Z E I T H E I Z E R 3 0 m i n...

Страница 166: ...wird funktioniert der Druckheizer nicht HEIZTEMP HINTEN 01 40 C Legen Sie die Heiztemperatur hinten fest Wenn jedoch festgelegt wird funktioniert der Heizer hinten nicht FARBSTREIFEN XX ON Legen Sie fest ob Farbstreifen gedruckt werden sollen DRUCKKOPF HÖHE XX 0 0 Stellen Sie die Druckkopfhöhe ein IMAGE IMPROVE XX EIN Legen Sie fest ob die Druckqualität automatisch korrigiert werden soll DK REINIG...

Страница 167: ...s Medium fest Geben Sie anhand des Druckergebnisses des Korrekturmusters einen Wert für die Medienausrichtung hinten ein Menü AUFW Menü Funktionsbeschreibung MEDIUM AUFWICKELN Wenn Sie die Taste gedrückt halten wird das Medium aufgewickelt Menü DK REGEN Menü Funktionsbeschreibung DK REGENERATION NORMAL ALLE Dieses Menü dient der Reinigung des Druckkopfes des Druckers Drücken Sie die Taste um DK RE...

Страница 168: ...en Sie eine Längeneinheit TEMPERATUREINHEIT GRAD CELSIUS Wählen Sie eine Temperatureinheit WARNTON PATR OFF EIN Legen Sie fest ob in folgenden Situationen ein Warnton ausgegeben werden soll Der Druckkopf befindet sich nicht an der Kappe tägliche Wartung oder Einstellung der Kopfhöhe Der Druckkopf kann aufgrund eines Medienstaus beim Drucken nicht abgedeckt werden WARNTON TINTEFEHL ON BEEP INK ERRO...

Страница 169: ...B Kabelanschluss Schließen Sie das USB Kabel korrekt an Fehler LED EIN und LCD Meldung Führen Sie der Fehlermeldung entsprechende Maßnahmen durch Fehler LED AUS Drucken Sie das Testmuster Stellen Sie sicher dass das RIP Software Testmuster gedruckt wird Reinigen des Druckkopfes Reinigen Sie den Druckkopf Obwohl sich der Drucker im Druckmodus befindet wird der Druckvorgang nicht gestartet wenn im B...

Страница 170: ...oftwarefehler Setzen Sie sich mit dem Kundendienst in Verbindung S Y S T E M F E H L E R n n n n A U S U N D E I N S C H A L T E N nnnn Fehlercode Fehler die einen Bedienereingriff erfordern Fehler die vom Bediener Kunden gelöst werden können Führen Sie der Meldung entsprechende Maßnahmen durch Tintenfehler T I N T E A B D E C K U N G S C H L I E S S E T I N T E A B D E C K U N G Ö F F N C C C T I...

Страница 171: ...m Online Drucken wird folgende Warnmeldung angezeigt Führen Sie der angezeigten Fehlermeldung entsprechende Maßnahmen durch J E T Z T T Ä G L I C H E W A R T U N G D U R C H F Ü H R E N Bedeutung Dieser Fehler zeigt an dass die tägliche Wartung Kappenreinigung nicht durchgeführt wurde Maßnahme Führen Sie die tägliche Wartung durch S E R V I C E E R F O R D E R L I C H S E R V I C E A N R U F E N B...

Страница 172: ...Cómo utilizar los ejes del enrollador 185 Procedimiento para instalación de los ejes del enrollador en el rollo de medio 185 Instalación y sustitución del cartucho de tinta 186 Procedimiento de instalación sustitución del cartucho de tinta 186 Instalación y sustitución de la botella de tinta residual 187 Procedimiento a seguir cuando se llena la botella de tinta residual187 Procedimiento a seguir ...

Страница 173: ...de la botella de tinta residual Unidad que contiene una botella de tinta residual Cubierta de tapas Debe estar abierta cuando se limpia la unidad de tapado o se sustituye la escobilla de limpieza Cubierta de limpieza Debe estar abierta cuando se realiza el mantenimiento del cabezal de la impresora sustitución o ajuste de la altura Interruptor de dirección de recepción Interruptor que sirve para se...

Страница 174: ...or de encendido del calentador Conector USB Conectado al servidor de la impresora Cartucho secundario Cartucho de tinta auxiliar para imprimir durante la sustitución del cartucho primario de tinta Interruptor de la bobina receptora pág 179 Interruptor de alimentación del papel pág 179 Botón de control de la presión pág 192 Base del enrollador pág 176 Rodillo de arrastre pág 179 ...

Страница 175: ...estabilizar la calidad de la imagen Papel Cabezal 1 2 3 Lado de suministro parte trasera Lado de recepción parte delantera Luces LED Indican el estado de la impresora cuando están encendidas apagadas o parpadeando Teclas Se utilizan para controlar los menús y otras funciones de la impresora Alarma Precalentador trasera Precalienta el papel Calentador de impresión delantera Introduce la tinta en el...

Страница 176: ...xión o desconexión de la impresora Encendida Conectada Intermitente Modo de pausa de la conexión Apagada Desconectada Key Tecla ONLINE Utilizada para seleccionar el modo de conexión o desconexión de la impresora Tecla MENU Utilizada para introducir parámetros auxiliares Tecla CANCEL Utilizada para cancelar los parámetros introducidos Tecla OK Utilizada para verificar el menú y los parámetros selec...

Страница 177: ... se utilice cualquier medio popular Peso del medio Inferior a 35 kg 35 kg a 50 kg Superficie de impresión del medio Medio de recepción interior Medio de recepción exterior Medio de recepción interior Medio de recepción exterior Espaciador de base Requerido Requerido Requerido Requerido Eje del enrollador No requerido No requerido Requerido P 185 Requerido P 185 Cuando se utilice cualquier medio de...

Страница 178: ...bierta del antera Cubierta delantera Barra protectora 6 Desplace los protectores de bordes del papel hacia los lados de forma que no queden debajo del papel Protectores de bordes del papel 7 Gire el botón de control de la presión en el sentido de las agujas del reloj para levantar el rodillo de presión Lado de recepción Lado de suministro o Botones de control de la presión 8 Inserte el extremo del...

Страница 179: ... visualmente que los protectores de bordes del papel están correctamente colocados pulse la tecla 13 Seleccione un rollo de papel u hojas sueltas R O L L O H O J A H O J A S E L E C C I O N A R P A P E L R O L L O H O J A R O L L O Tanto el rollo como las hojas pueden seleccionarse con la tecla o con la tecla Aquí seleccione rollo y pulse la tecla Para volver a la selección de papel pulse la tecla...

Страница 180: ... utilizado Longitud de la barra tensora L 48 pulgadas 123 cm L S 64 pulgadas 164 cm L S S 80 pulgadas 204 cm Papel general en modo de bobinado con TENSIÓN Como norma general coloque una barra tensora adecuada a la anchura del papel aunque se aplican algunas excepciones Papel general sin unidad de bobina receptora Coloque una barra tensora que mida la mitad de la anchura del papel Papel de cloruro ...

Страница 181: ...ijada al tubo de papel Base del enrollador Asa 4 Retire los espaciadores de base 2 Coloque el interruptor de dirección de recep ción en posición OFF Nota Si la impresora pasa al siguiente paso con el interruptor de dirección de recepción posición ON su mano puede verse atrapada ya que el enrollador no está bloqueado Interruptor de dirección de recepción Recepción exterior OFF Recepción interior 3 ...

Страница 182: ...n en posición OFF Nota Si la barra tensora se acopla sin bobinar el papel una vuelta la cinta se soltará 8 Haga avanzar el papel con el MENÚ ALIMENT ACIÓN PAPEL en el panel de control de manera que pueda formarse algo de holgura Cree holgura suficiente como para colocar la barra tensora en la parte inferior de la guía de la barra tensora Parte delantera de la impresora lado de recepción 9 Abra la ...

Страница 183: ...impresora 5 Seleccione el estado de desconexión de la im presora pulsando la tecla O N L I N E T I N T A R E G P A P E L P A P E L A V P A P E L 6 Pulse la tecla El interruptor de recepción de la bobina receptora se activa seleccionando el papel y colocando el interruptor de la dirección de recepción en posición ON 7 Gire la bobina receptora negra del lado de recepción para recibir el papel Interr...

Страница 184: ... by selecting media 3 Levante la parte floja y retire la barra tensora del lado de suministro Rodillo de arrastre Enrollador Papel en general Barra tensora Papel de cloruro de vinilo Parte trasera de la impresora lado de suministro Rodillo de arrastre Barra tensora Barra tensora de tamaño S Interruptor Precaución No gire el rodillo de arrastre ya que puede dañar la impresora 4 Gire el botón de con...

Страница 185: ...n valor de corrección del avance del papel borrador a partir del resultado de la impresión Se imprimen nueve patrones con incrementos del 0 5 dentro de un intervalo del 99 al 101 Seleccione un valor de corrección del avance del papel entre ellos 7 Pulse la tecla y la tecla para visualizar el patrón de corrección del avance del papel V A L O R A V A N C E P A P E L 0 1 0 9 9 8 0 8 Introduzca el val...

Страница 186: ...o del rollo de medio 3 Instale la base del enrollador en cada extremo del rollo de medio 1 Inserte la base del enrollador en cada borde del tubo de papel Base del enrollador 2 Inserte el espaciador de base entre la base del enrol lador y el rollo de medio Espaciador de base 3 Empuje la base del enrollador hasta que se pare y gire la asa hacia la derecha hasta que la base quede fijada al tubo de pa...

Страница 187: ...tes situados en la bandeja de tinta en los dos orificios practicados en el extremo del cartucho de tinta A continuación inserte la placa en la bandeja de tinta hasta oír un chasquido 2 1 Cartucho de tinta nuevo Placa Gancho Bandeja de tinta 5 Inserte la bandeja de tinta en la ranura de la impresora Nota Inserte la bandeja de tinta hasta que haga tope La ubicación de la bandeja de tinta viene deter...

Страница 188: ...de tinta residual Nota No golpee la parte superior de la cubierta exterior ya que podría derramarse la tinta residual 7 Aparece el mensaje para restaurar poner a cero el contador de tinta residual B O T E L L A V A C I A N O B O T E L L A V A C I A S I 8 Seleccione BOTELLA VACÍA SÍ y pulse la tecla Procedimiento a seguir cuando se llena la botella de tinta residual Procedimiento a seguir cuando no...

Страница 189: ...mpieza 2 Pellizque el borde inferior de la escobilla de limp ieza con las pinzas y suelte el gancho del saliente de plástico 3 Saque hacia arriba la escobilla de limpieza 4 Pellizque la goma de la nueva escobilla de limp ieza con las pinzas insértela recta hacia abajo y enganche el saliente de plástico en el orificio practicado en la goma Nota Al manipular la escobilla de limpieza no toque la part...

Страница 190: ... escuadra y determine una diferencia entre el margen medido y el valor 15 mm mostrado en las especificaciones Si la diferencia es de 15 mm complete este proced imiento De lo contrario siga el siguiente procedimiento para corregir el valor 508 inyectores en blanco por el número par de cabezales 508 inyectores todos los inyectores 15mm 8 Pulse la tecla para acceder al menú AJU STAR V A L A J S E N S...

Страница 191: ...onexión Pulse la tecla O N L I N E T I N T A R E G P A P E L P A P E L A V P A P E L 2 Pulse la tecla M E N U para visualizar el MENÚ REC CABEZ T I N T A R E G P A P E L P A P E L A V P A P E L M E N U R E T R O C I N T R O D R E C C A B M A N T C A B 3 Pulse la tecla para acceder al menú de limp ieza del cabezal R E C U P E R A C I O N C A B E Z N O R M A L Nota Si la recarga de tinta de la bande...

Страница 192: ... al estado de desconexión de la impresora modo menú R E T R O C I N T R O D R E C C A B M A N T C A B Introduccióndelpapel Alimentación Con esta función se introduce el papel 1 Coloque la impresora en estado de desconexión Pulse la tecla O N L I N E T I N T A R E G P A P E L P A P E L A V P A P E L 2 Pulse la tecla M E N U para visualizar el grupo de menús entre los que se incluye el MENÚ ALIMENTA...

Страница 193: ...ceso No haga retroceder el papel utilizando la unidad de la bobina receptora Cómousarelbotóndecontroldelapresión Cómo usar el botón de control de la presión El botón de control de la presión se utiliza para ajustar la fuerza de presión que ejerce sobre el papel el rodillo de rejilla con arreglo al papel que va a utilizarse Ajuste el botón de control de la presión adecuadamente con arreglo al papel...

Страница 194: ... ajuste de la altura del cabezal con la tecla o V A L O R A L T U R A C A B E Z 0 1 0 0 m m El intervalo del valor de ajuste es de 0 3 a 1 0 mm 5 Pulse la tecla para determinar el valor de ajuste Cómousarlosprotectoresdebordesdelpapel Para proteger el cabezal de impresión del pandeo y el volteo en ambos extremos del papel utilice protectores de bordes del papel en la ruta de alimentación del papel...

Страница 195: ... de la unidad de limpieza Nivel del líquido Puerto del líquido de limpieza Si el nivel del líquido está por debajo de la parte supe rior de la marca que puede verse dentro del puerto del líquido de limpieza recargue el líquido de limpieza hasta alcanzar un nivel por debajo de la parte superior de la marca Líquido de limpieza de la escobilla 3 Cierre la cubierta de limpieza y la cubierta del antera...

Страница 196: ...vería Si los inyectores se siguen saliendo incluso después de haber realizado la limpieza elimine las sustancias extrañas y las manchas de tinta de la tapa con un algodón humedecido con líquido de limpieza de tapas Tenga cuidado de que el líquido de limpieza de tapas no se pegue a ninguna otra parte Recarga del líquido absorbente de la caja salivera 1 Abra la cubierta delantera y a continuación ab...

Страница 197: ...y a continuación abra la cubierta de la tapa A B R I R C U B I E R T A L I M P I E Z A D E T A P A 5 Extraiga el tornillo del tirador de la unidad de la caja salivera y extraiga la unidad de la caja sali vera Unidad de la caja salivera Tornillo del tirador Nota La unidad de la caja salivera contiene líquido de limpieza Tenga cuidado de no derramarlo 6 Impregne la varilla limpiadora en el líquido d...

Страница 198: ...l 3 Limpie las manchas con un paño limpio y suave 4 Cierre la cubierta delantera Realización de una limpieza normal Seleccione MENÚ REC CABEZ del panel de control y seleccione NORMAL TODOS para limpiar Realizacióndeunaimpresióndecomprobacióndeinyectores Seleccione el MENÚ AJUSTAR del panel de control y seleccione IMPRESIONES PRUEBA para realizar una impresión de comprobación de inyectores Comprueb...

Страница 199: ...L E C C I O N A R P A P E L 0 1 T I P O 0 1 I M P R A V A N C E P A P E L E S B O Z O B O R R A D O R 1 R E T R O C E D I E N D O P A P E L R E C U P E R A C I O N C A B E Z N O R M A L I N T R O D U C I E N D O P A P E L L I M P I E Z A D E T A P A I M P R E S I O N C O N F I G I M P R E S I O N E S P R U E B A I M P R E S I O N I N Y E C T I D I O M A I N G L E S T I E M P O E S P C A L E N T 3 ...

Страница 200: ...RE CALENT 01 40 C Ajuste la temperatura del precalentador Cuando se selecciona el precalentador no funciona FRANJA DE COLOR XX DESACTIVADO Seleccione si imprimir franjas de color o no VALOR ALTURA CABEZ XX 0 0 Ajuste la altura del cabezal de impresión MEJORA IMAGEN XX ACTIVADO Seleccione si corregir automáticamente o no la calidad del color LIMPIEZA CABEZALES XX INICIO Y FIN Para mantener el cabez...

Страница 201: ...EDER Menú Resumen de funciones RETROCEDIENDO PAPEL Mientras mantiene pulsada la tecla la impresora rebobina el papel MENÚ REC CABEZ Menú Resumen de funciones RECUPERACION CABEZ NORMAL Este menú se utiliza para limpiar el cabezal de impresión de la impresora Pulse la tecla para acceder al MENÚ REC CABEZ del cabezal de impresión MENÚ ALIMENTACIÓN PAPEL Menú Resumen de funciones INTRODUCIENDO PAPEL M...

Страница 202: ...ria UNIDADES LONGITUD MILIMETRO Seleccione una unidad de longitud UNIDADES TEMPERAT CENTIGRADOS Seleccione una unidad de temperatura PITIDO TAPA ABIE ACTIVADO Elija si emitir un pitido de advertencia en las siguientes situaciones El cabezal de impresión se ha salido de la tapa en el mantenimiento diario o durante el ajuste de la altura del cabezal El cabezal de impresión no puede taparse debido a ...

Страница 203: ...ecte correctamente el cable USB Luz LED de error encendida y mensaje en pantalla LCD Tome las medidas adecuadas en función del mensaje de error Luz LED de error apagada Imprima el patrón de prueba Compruebe que se imprime el Patrón de prueba del software RIP Limpieza del cabezal de impresión Limpie el cabezal de impresión Aunque la impresora esté en el modo de impresión la impresión no empieza con...

Страница 204: ...co E R R O R S I S T E M A n n n n A P A G A R E N C E N D E R nnnn Código de error Errores a notificar al operador Errores que el operador cliente puede arreglar Tome medidas con arreglo al mensaje Errores de tinta C E R R A R C U B I E R T A T I N T A A B R I R C U B I E R T A T I N T A C A R G A C A R T T I N T A C C C C O M P R O B A R n n C A R T U C H O T I N T A C C C A B R I R C U B I E R ...

Страница 205: ...ica mediante el parpadeo de una luz LED de error El siguiente mensaje de advertencia aparece tras la impresión en línea Tome las medidas adecuadas en función del mensaje mostrado R E A L I Z A R M A N T E N I M D I A R I O A H O R A Significado Este error indica que no se ha realizado el mantenimiento diario limpieza de tapas Acción Realice el mantenimiento diario M A N T E N I M R E P A R A C I ó...

Страница 206: ...ilizar os eixos do deslizador 219 Procedimento para instalar os eixos do deslizador no rolo de papel 219 Instalação e substituição do conjunto de tinteiros 220 Procedimento de instalação substituição do conjunto de tinteiros 220 Instalação e substituição do recipiente de tinta residual 221 Procedimento a executar quando o recipiente de tinta residual está cheio221 Procedimento a executar quando o ...

Страница 207: ...a impressão Unidade de recipiente de tinta residual Uma unidade contém um recipiente de tinta residual Tampa da cápsula Aberta para limpeza da unidade de encapsulamento ou para substituição da palheta de limpeza Tampa de limpeza Aberta para operações de manutenção da cabeça de impressão substituição ajuste da altura Interruptor de direcção de admissão Um interruptor para seleccionar a direcção de ...

Страница 208: ...gerador de calor Interruptor de funcionamento do gerador de calor Conector USB Ligado ao servidor de impressão Subtanque Recipiente de tinta auxiliar que permite imprimir mesmo durante a substituição de tinta Interruptor de enrolamento P 213 Interruptor de alimentação do papel P 214 Botão de controlo de pressão P 226 Friso do deslizador P 210 Desenrolador P 213 ...

Страница 209: ...1 2 3 Lado de alimentação traseira Lado de recepção frente LEDs Acendem apagam ou ficam intermitentes para indicar o estado da impressora Teclas Utilizam se para trabalhar com os menus e outras funções da impressora Sinal sonoro Pré aquecedor traseira Aquece previamente o papel Gerador de calor de impressão frente Faz a tinta penetrar no papel para a fusão da tinta Pós aquecedor acabamento Seca a ...

Страница 210: ...ermitente Activada em modo de pausa Apagado Desactivada Tecla Tecla ONLINE Utilizada para seleccionar o estado activado ou desactivado da impressora Tecla MENU Utilizada para a introdução de parâmetros auxiliares alternar entre a apresentação de camadas de menus Tecla CANCEL Utilizada para cancelar parâmetros introduzidos Tecla OK Utilizada para fixar os menus e parâmetros seleccionados Tecla HEAT...

Страница 211: ...iso do deslizador correctamente Esta secção descreve o procedimento de instalação sem utilizar o eixo do deslizador Para saber como utilizar o eixo do deslizador consulte a P 219 Quando se utiliza papel de uso geral Peso do papel Menos de 35 kg 35 kg a 50 kg Superfície de impressão do papel Entrada de papel pelo interior Entrada de papel pelo exterior Entrada de papel pelo interior Entrada de pape...

Страница 212: ...fícil inserir a extremidade do papel no alimen tador devido ao enrolamento do papel coloque uma folha intermédia e insira a extremidade do papel por baixo da folha intermédia conforme indica a figura Curvatura para cima Curvatura para baixo 3 Empurre o friso do deslizador até que o mesmo pare e rode a pega no sentido dos ponteiros do relógio até que o friso se fixe no tubo de papel Friso do desliz...

Страница 213: ... ao tentar inseri lo à força Depois de confirmar visualmente que as guias de margem estão devidamente colocadas prima a tecla 13 Seleccione papel em rolo ou folhas soltas R O L O F O L H A F O L H A S E L E C I O N A R M í D I A R O L O F O L H A R O L O Pode seleccionar rolo ou folha com a tecla ou Aqui seleccione rolo e prima a tecla Para regressar à selecção de papel prima a tecla CANCEL 14 Sel...

Страница 214: ...barra de tensão Tamanho utilizado Comprimento da barra de tensão L 123 cm 48 polegadas L S 164 cm 64 polegadas L S S 204 cm 80 polegadas Suporte geral no modo de TENSÃO de enrolamento Normalmente utiliza se uma barra de tensão adequada à largura do papel salvo raras excepções Suporte geral sem a unidade de enrolamento Utilize uma barra de tensão com metade da largura do papel Suporte em cloreto de...

Страница 215: ...té que o friso se fixe no tubo de papel Friso do deslizador Pega 4 Retire os espaçadores do friso 2 Coloque o interruptor de direcção de admissão em OFF Nota Se o processamento da impressora continuar para o passo seguinte com o interruptor de direcção de admissão em ON corre o risco de ficar com a mão entalada pois o deslizador não está fixo Interruptor de direcção de admissão Entrada pelo exteri...

Страница 216: ...dmissão em OFF Nota Se a barra de tensão estiver instalada sem o papel ter sido enrolado uma volta a fita descola se 8 Faça avançar o papel com o MENU ALIM FORM do painel de controlo até um ponto em que seja deixada alguma folga Certifique se de que deixa folga suficiente de forma a que a barra de tensão seja colocada no fundo do guia da barra de tensão Parte frontal da impressora lado de recepção...

Страница 217: ...rrumar o chão Procedimento para retirar o papel deslizador da impressora 5 Prima a tecla O N L I N E para desactivar a im pressora T I N T A R E G M í D I A M í D I A A V A N Ç O 6 Prima a tecla O interruptor TUR é activado ao seleccionar o papel e configurar o interruptor de direcção de admissão para ON 7 Rode o interruptor de enrolamento preto do lado de recepção para admitir o papel Interruptor...

Страница 218: ...ionar o papel 3 Levante a parte solta e remova a barra de ten são do lado de alimentação Desenrolador Deslizador Papel em geral Barra de tensão Suporte em cloreto de vinilo Parte posterior da impressora lado de alimentação Desenrolador Barra de tensão Barra de tensão de tamanho S Interruptor Precaução Não rode o desenrolador se o fizer pode danificar a impressora 4 Rode o botão de controlo de pres...

Страница 219: ...el de esboço a partir do resultado de impressão São impressos nove padrões em incrementos de 0 5 num intervalo de 99 a 101 Seleccione um valor de correcção do avanço de papel de esboço para os mesmos 7 Prima a tecla e em seguida a tecla para visualizar o valor de correcção do avanço de papel V A L O R A V A N Ç O M í D I A 0 1 0 9 9 8 0 8 Introduza o valor de correcção do avanço de papel e prima a...

Страница 220: ...nstale o friso do deslizador em cada extremidade do rolo de papel 1 Insira o friso do deslizador em cada uma das extremi dades do tubo de papel Friso do deslizador 2 Insira o espaçador do friso entre o friso do deslizador e o rolo de papel Espaçador do friso 3 Empurre o friso do deslizador até que o mesmo pare e rode a pega no sentido dos ponteiros do relógio até que o friso se fixe no tubo de pap...

Страница 221: ...s orifícios existentes na extremidade do pacote de tinta nas duas protuberâncias do tabuleiro de tinta Em seguida insira a placa no tabuleiro de tinta até ouvir um clique 2 1 Novo pacote de tinta Placa Protuberância Tabuleiro de tinta 5 Insira o tabuleiro de tinta na respectiva ranhura da impressora Nota Insira o tabuleiro de tinta até ao máximo possível A localização do tabuleiro de tinta é deter...

Страница 222: ...a Não bata na parte superior da tampa externa pois pode derramar a tinta residual 7 É apresentada a mensagem para seleccionar o reinício do contador de tinta residual limpar R E C I P I E N T E V A Z I O N ã O R E C I P I E N T E V A Z I O S I M 8 Seleccione RECIPIENTE VAZIO SIM e prima a tecla Procedimento a executar quando o recipiente de tinta residual está cheio Procedimento a executar quando ...

Страница 223: ...mpa de limpeza 2 Utilizando as pinças agarre a palheta de limpeza pela margem inferior e solte o grampo da pro jecção de plástico 3 Retire a palheta de limpeza para cima 4 Utilizando as pinças agarre a nova palheta de limpeza pela borracha e insira a na vertical engatando o orifício existente na borracha na projecção de plástico Nota Ao manusear a palheta de limpeza não toque na parte superior com...

Страница 224: ...ine a diferença entre a margem medida e o valor 15 mm indicado nas especificações Se a diferença for de 15 mm conclua este procedi mento Caso contrário siga o procedimento descrito abaixo para corrigir o valor 508 jactos ocultado pelo número par de cabeças 508 jactos todos os jactos 15mm 8 Prima a tecla para entrar no menu AJU STAR E D G E S E N S O R A D J V A L Y Y m m 9 Prima a tecla para visua...

Страница 225: ...o offline Prima a tecla O N L I N E T I N T A R E G M í D I A M í D I A A V A N Ç O 2 Prima a tecla M E N U para visualizar o MENU REC CABEÇ T I N T A R E G M í D I A M í D I A A V A N Ç O M E N U R E B O B I N A L I M F O R M L I M P A R C A B E Ç M A N U T 3 Prima a tecla para entrar no menu de lim peza da cabeça R E C U P E R A Ç ã O C A B E Ç N O R M A L Nota Se o enchimento de tinta a partir ...

Страница 226: ... R M A L 11 Prima a tecla para regressar ao estado of fline modo de menus R E B O B I N A L I M F O R M L I M P A R C A B E Ç M A N U T Alimentaçãodepapel Alimentação Esta função alimenta o papel 1 Coloque a impressora no estado offline Prima a tecla O N L I N E T I N T A R E G M í D I A M í D I A A V A N Ç O 2 Prima a tecla M E N U para visualizar o gru po de menus que inclui o MENU ALIM FORM R E...

Страница 227: ...etroceder papel quando a unidade de enrolamento estiver em funcionamento Comoutilizarobotãodecontrolodepressão Como utilizar o botão de controlo de pressão O botão de controlo de pressão é utilizado para ajustar a força de pressão do rolo da grelha de alimentação de papel em função do papel a ser utilizado Ajuste o botão de controlo de pressão correctamente em função do papel A força de pressão po...

Страница 228: ... Prima a tecla e insira o valor de ajuste da altura da cabeça com a tecla ou V L R A L T U R A C A B E Ç O T E 0 1 0 1 m m O intervalo do valor de ajuste é de 0 3 a 1 0 mm 5 Prima a tecla para determinar o valor de ajuste Comoutilizarasguiasdemargemdopapel Para evitar o encravamento ou a variação de passo da cabeça de impressão nas extremidades do papel utilize guias de margem do papel na trajectó...

Страница 229: ...a na parte inferior direita da face superior da unidade de limpeza Nível de líquido Porta do líquido de limpeza Se o nível de líquido estiver abaixo do topo da marca existente no interior da porta do líquido de lim peza reabasteça o líquido de limpeza até ficar num nível abaixo do topo da marca Líquido de limpeza 3 Feche a tampa de limpeza e a tampa frontal Limpar a unidade de encapsulamento 1 Lig...

Страница 230: ... de ter efectuado a limpeza descrita anteriormente retire quaisquer objectos estranhos e manchas de tinta que se encontrem na cápsula com cotonete de limpeza humedecido em líquido de limpeza enquanto inspecciona visualmente Tenha cuidado para o líquido de limpeza da cápsula não aderir a qualquer outra peça para além da cápsula Reabastecimento do líquido absorvente de descarga 1 Abra a tampa fronta...

Страница 231: ... frontal e em seguida abra a tampa da cápsula A B R I R T A M P A L I M P A R C á P S U L A S 5 Retire o parafuso saliente da unidade de descarga e retire a unidade de descarga Unidade de descarga Parafuso saliente Nota A unidade de descarga contém líquido de limpeza Tenha cuidado para não o derramar 6 Impregne o cotonete no líquido de limpeza da cápsula Nota Depois de utilizar o cotonete de limpe...

Страница 232: ... na guia de margem do papel 3 Limpe as manchas com um pano limpo e macio 4 Feche a tampa frontal Executar a limpeza normal Seleccione MENU REC CABEÇ no painel de controlo e seleccione NORMAL TODOS para limpeza Executar uma impressão de bicos injectores Seleccione MENU AJUSTAR no painel de controlo e seleccione IMPRESSÃO TESTE para executar uma impressão de bicos injectores Verifique se existem jac...

Страница 233: ... Y m m S E L E C I O N A R M í D I A 0 1 T Y P E 0 1 I M P R A V A N Ç O M í D I A E S B O Ç O N O R M A L 1 R E B O B I N A N D O A M í D I A R E C U P E R A Ç ã O C A B E Ç N O R M A L A L I M E N T A Ç ã O D E M í D I A L I M P E Z A D E C á P S U L A S I M P R E S S ã O C O N F I G I M P R E S S ã O T E S T E I M P R E S S ã O B I C O S I N J I D I O M A I N G L ê S T E M P E S P E R A A Q U E...

Страница 234: ...tem estiver seleccionado o aquecedor de impressão não funciona TEMP PRé AQUEC 01 30ºC Defina a temperatura do pré aquecedor No entanto quando o item estiver seleccionado o pré aquecedor não funciona FAIXA DE COR 01 DESATIVADO Seleccione se pretende imprimir tiras a cores ou não VLR ALTURA CABEÇOTE 01 0 0 Ajuste a altura da cabeça de impressão QUALIDADE IMAGEM 01 ATIVADO Seleccione se pretende ou n...

Страница 235: ...NU REBOBIN Menu Descrição geral de funções REBOBINANDO A MíDIA Enquanto prime a tecla a impressora rebobina o papel MENU REC CABEÇ Menu Descrição geral de funções RECUPERAÇãO CABEÇ NORMAL Este menu é utilizado para limpar a cabeça de impressão da impressora Prima a tecla para entrar no MENU REC CABEÇ para a cabeça de impressão MENU ALIM FORM Menu Descrição geral de funções ALIMENTAÇãO DE MíDIA Enq...

Страница 236: ...ccione uma unidade de comprimento UNIDADE TEMPERATURA CENTíGRADO Seleccione uma unidade de temperatura BIPE CáP ABERTA ATIVADO Seleccione se pretende ou não emitir um aviso sonoro no estado abaixo indicado A cabeça de impressão é deslocada da cápsula na manutenção diária ou ajuste da altura da cabeça A cabeça de impressão não pode ser encapsulada devido a um erro de congestionamento de papel CONGE...

Страница 237: ...igue o cabo USB correctamente Indicador luminoso de erro aceso e mensagem LCD Execute as acções adequadas de acordo com a mensagem de erro Indicador luminoso de erro aceso apagado Imprima um padrão de teste Confirme se o Padrão de teste do software RIP é impresso Limpeza da cabeça de impressão Limpe a cabeça de impressão Embora a impressora esteja no modo de impressão a impressão não é iniciada e ...

Страница 238: ...acte o nosso serviço de assistência E R R O N O S I S T E M A n n n n D E S L I G A R L I G A R nnnn Código de erro Erros que requerem assistência do operador Erros que o operador cliente pode resolver Execute as acções de acordo com a mensagem Erros de tinta F E C H A R T A M P A T I N T A A B R I R T A M P A T I N T A C A R R E G A R T I N T A C C C V E R I F I C A R n n T I N T A C C C A B R I ...

Страница 239: ...e aviso É apresentada a seguinte mensagem de aviso após impressão online Execute as acções adequadas de acordo com a mensagem apresentada F A Z E R M A N U T E N ç ã O D I á R I A A G O R A Significado Este erro indica que a manutenção diária limpeza da cápsula não foi realizada Acção Efectue a manutenção diária M A N U T N E C E S S á R I A S O L I C I T E M A N U T E N Ç ã O Significado A duraçã...

Отзывы: