PT
RC 14.11
www.sigmasport.com
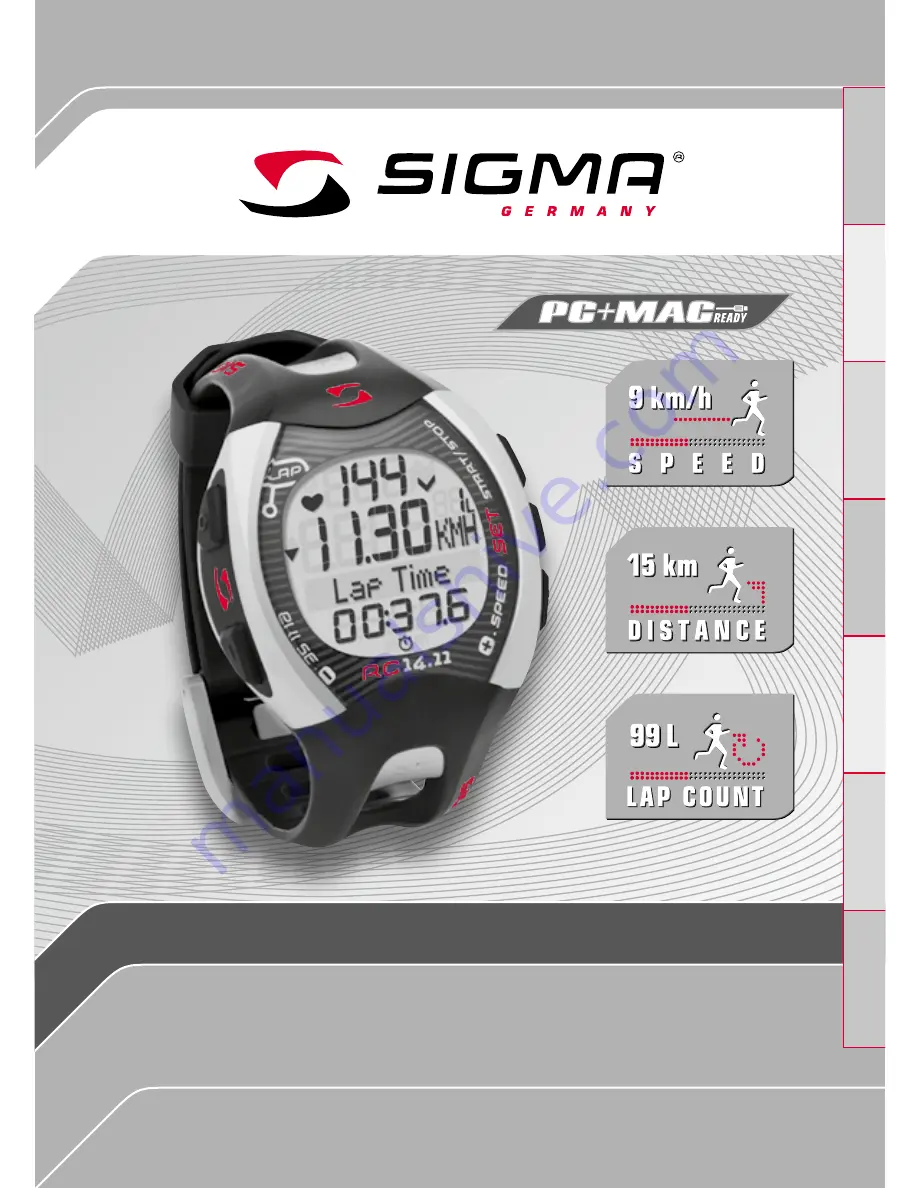
RUNNING COMPUTER
SPEED – DISTANCE – LAP CouNT
ruNNINg CoMPuTEr
DE
US/GB
FR
IT
ES
NL
Страница 1: ...PT RC 14 11 www sigmasport com RUNNING COMPUTER SPEED DISTANCE Lap Count running COMPUTER DE US GB FR IT PT ES NL...
Страница 2: ...ignment in the setting mode 62 5 4 Brief guide to device settings 63 5 5 Establishing device settings 63 5 5 1 Setting the language 63 5 5 2 Setting the measuring unit 63 5 5 3 Calibration 63 5 5 4 Co...
Страница 3: ...ransmitter 82 7 6 Starting a training session 83 7 7 Interrupting a training session 84 7 8 Ending a training session 84 7 9 Training values after training 85 7 10 Resetting and saving the training va...
Страница 4: ...strument that measures not only your heart rate but also your distance and speed Please read these instructions carefully to familiarize yourself with the many functions of your new running computer a...
Страница 5: ...connection For reading the RC 14 11 training data in the Data Center 2 software on the computer Please install the Data Center 2 software before connecting the docking station 3 SAFETY GUIDELINES k k...
Страница 6: ...ed to activate it To do this use the appropriate tool to set the battery compartment to ON Your RC 14 11 will automatically change to setting mode Use the PULSE and SPEED buttons to scroll through the...
Страница 7: ...e HipClip to the center of your pants Important Speed and distance are only measured correctly if you wear the HipClip on the front center 4 2 1 Attaching the chest belt 4 2 2 Attaching the HipClip Sn...
Страница 8: ...our heart rate is displayed before you start training 1 Put on the chest belt or HipClip and the RC 14 11 4 Start training Press the START STOP button to start training Before you can start training y...
Страница 9: ...buttons on the running computer perform different actions depending on how long you press them k k Press button briefly Activate or scroll through functions k k Press and hold Switch to another mode...
Страница 10: ...monitor has three main modes training mode setting mode and sleep mode You can switch between these modes by pressing and holding a button Sleep mode Lap view Setting mode Training mode The sleep mod...
Страница 11: ...k k Remaining log time k k Total Kcal SET k k Distance in km k k Speed in km h or min km k k Running time START STOP k k Stopwatch LAP k k Laps intervals SPEED k k Lap time k k Lap distance k k Avera...
Страница 12: ...ng mode To do this hold down the LAP button In lap view mode Use the LAP and START STOP buttons to navigate and scroll through the previous laps Press the PULSE and SPEED buttons to view the heart rat...
Страница 13: ...running time Enter Time Enter 12h 24h Total distance Enter Gender Male Female Training zone Fat Burn Fit Zone Individual Year of birth Enter Max heart rate Calculated from gender age and weight Correc...
Страница 14: ...play setup 5 3 Button assignment in the setting mode 1st line SET indicates that the setting mode is active 3rd line Submenu or the setting to be 4th line changed START STOP Press In calibration mode...
Страница 15: ...ing value flashes 3 Press the PULSE or SPEED button repeatedly until the desired value is displayed 4 Press the SET button The new device setting is saved You can now scroll to a different device sett...
Страница 16: ...the preset year flashes Press the PULSE or SPEED button repeatedly to set the year Press the SET button Month is displayed Press the PULSE or SPEED button repeatedly to set the month Press the SET bu...
Страница 17: ...s displayed The hours entry flashes Press the SPEED button The hour increases by one Press the PULSE button to decrease the displayed hour by one Press the SET button The minute entry flashes Press th...
Страница 18: ...he maximum heart rate and calories You should therefore ensure that you set this value correctly Follow the steps described in section 5 4 Brief guide to device settings This device setting is taken i...
Страница 19: ...lect the Fat Burn Prerequisite Your running computer must be in setting mode 5 SETTING MODE Press the SPEED button repeatedly until Train Zone appears on the display Press the SET button The set train...
Страница 20: ...et training zones Fat Burn and Fit Zone are calculated from the maximum heart rate Each training zone has an upper and a lower heart rate limit k k Fat Burn This training is for the aerobic energy met...
Страница 21: ...alue is set to 160 Press the SET button The upper and lower limits are set Press the SET button The set training zone is displayed 5 SETTING MODE Use the SPEED button to scroll to Individual Press the...
Страница 22: ...equisite Your running computer must be in setting mode Press the SPEED button repeatedly to scroll until Total Dist appears on the display Press the SET button You will see zeros below the total dista...
Страница 23: ...total distance 5 SETTING MODE 5 5 15 Setting the total running time 5 5 16 Setting the total calories 5 5 17 Setting the contrast Follow the steps described in section 5 5 14 Setting the total distanc...
Страница 24: ...can be set 5 sec 10 sec 20 sec and 30 sec Depending on the memory log interval the maximum memory times are as follows k k 5 seconds approx 15 hours k k 10 seconds approx 30 hours k k 20 seconds appr...
Страница 25: ...ually deleted To delete the logbook select the entry logbook in setting mode and then press the SET button Cancel flashes Press SET again to cancel the process Press SPEED to select Delete Confirm the...
Страница 26: ...bration function To calibrate put on the R3 transmitter and the running computer and run a known distance You can measure a distance in advance with a bike computer or run on a 400 meter track After y...
Страница 27: ...g computer 6 3 Activating calibration Hold down the SET button until the setting mode is activated Press the SPEED button repeatedly until the Calibration function appears Press the SET button The RC...
Страница 28: ...owest training k k Fast running or fast walking Run at the fastest pace that you would run in an endurance run or a long tempo run over 3000 m The two speeds should ideally differ by 30 Tip If you onl...
Страница 29: ...is 400 meters 3 Select Calibration in the setting mode 4 Press the SET button The running computer detects whether you are wearing the HipClip or the chest belt The function Running is displayed Tip...
Страница 30: ...displayed value to the actual distance run by pressing the PULSE or SPEED button 5 Press the SET button The slow calibration run is saved 6 The alternating prompt Run walk fast press Start now appears...
Страница 31: ...lways shows a little more e g 2037 m The factory setting for the correction factor is 1 000 and does not effect a change Please calculate the correction factor as follows k k New correction factor 1 0...
Страница 32: ...example the heart rate is below the selected training zone and should be increased If the heart rate is too high the arrow points down k k Arrow next to the speed In the example the speed is below the...
Страница 33: ...mode exit training mode SPEED Press Display the time and speed values Press and hold Reconnect the R3 transmitter with the RC 14 11 synchronize k k Stopwatch stopped correct synchronization The stopwa...
Страница 34: ...e speed and distance from the R3 transmitter by means of a coded digital transmission The coding ensures that other signals from other transmitters are ignored and only the signals from your chest bel...
Страница 35: ...terference such as other heart rate monitors power lines and antennas 2 Press any button to remove the message 3 Press and hold the SPEED button until Radio link reset appears on the display The R3 tr...
Страница 36: ...rted Hold down the PULSE button You switch to sleep mode Only the time and date are displayed so as to save the battery The current training values remain saved Note If you have stopped training your...
Страница 37: ...e k k Total calories Note Total values are available only when the stopwatch is stopped 7 10 Resetting and saving the training values Before you begin a new training session you should set the trainin...
Страница 38: ...Tip You can also use lap training when competing If you start a new lap at the end of each kilometer you can compare the values for each kilometer after your run 3 Start next lap Press the LAP button...
Страница 39: ...conds 8 3 Lap view The training values for the individual laps can be seen in the lap view Summary of the last lap Average heart rate Lap distance km lap speed km h min km running time Scroll using th...
Страница 40: ...8 3 1 Activating the lap view mode Prerequisite Your running computer must be in training mode Hold down the LAP button The display will flash twice to indicate that the lap view mode is now active 8...
Страница 41: ...iew HEART RATE VALUES k k Average heart rate k k Maximum heart rate k k Calories SPEED VALUES k k Lap time k k Lap distance k k Average speed k k Maximum speed k k Time since start k k Distance since...
Страница 42: ...croll through the laps 3 View several heart rate values for the selected lap Press the PULSE button 4 View several speed values for the selected lap Press the SPEED button 5 Exit lap view Hold down th...
Страница 43: ...situations Solid red docking station watch is connected to your computer Solid green you have correctly connected your RC 14 11 to the docking station watch Flashing green the data is being transferr...
Страница 44: ...n the cover anti clockwise until the arrow points to OPEN Alternatively you can also use a ballpoint pen 2 Remove the cover 3 Remove the battery 4 Insert the new battery The plus sign points upward Im...
Страница 45: ...sh Standard detergents may be used but please do not use bleaching agents or detergents with bleach additives k k Do not use soap or fabric softener k k Do not dry clean the Comfortex k k Do not tumbl...
Страница 46: ...ignated delivery station for their disposal 11 TECHNICAL DATA RC 14 11 k k Battery type CR2032 k k Battery life Average of 1 year k k Accuracy of the clock Higher than 1 second day at an ambient tempe...
Страница 47: ...nterference to radio communications However there is no guarantee that interference will not occur in a particular installation If this equipment does cause harmful interference to radio or television...
Страница 48: ...state The result can also be further optimized by the correction factor The accuracy specifications assume constant conditions k k Watertightness the R3 transmitter is watertight up to 1 ATM correspon...
Страница 49: ...g computer or send your running computer together with receipt of purchase and all accessory parts with sufficient postage paid to SIGMA Elektro GmbH Dr Julius Leber Stra e 15 D 67433 Neustadt Weinstr...
Страница 50: ...21 9120 34 E mail info sigmasport com SIGMA SPORT ASIA Asia Australia South America Africa 10F No 192 Zhonggong 2nd Rd Xitun Dist Taichung City 407 Taiwan Tel 886 4 2358 3070 Fax 886 4 2358 7830 SIGMA...