


❑
1) For maximum strength, we recommend using SIG Epoxy
Glue for joining the wing panels in this step.
a) Trial fit both wing panels together, without glue, on the ply-
wood wing joiner to familiarize yourself with the assembly. Then,
take back apart.
b) Mix up a small amount of epoxy glue. Use a wire or stick
to quickly coat the inside of the wing joiner slot in the end of the
right wing panel. Also, coat the right half of the plywood wing
joiner with glue. Push the plywood wing joiner all the way into the
slot in the right wing panel. Hold the wing joiner in place until the
glue dries, wiping off any excess glue that oozes out of the joint.
c) Mix up a batch of epoxy glue. Use a wire or stick to coat
the inside of the slot in the end of the left wing panel with glue.
Also, coat the stub of the plywood wing joiner, that is sticking out
of the right wing panel, and the bare wood end ribs of both wing
panels. Then, put the wing panels together. Squeeze the panels
tightly together, aligning the leading and trailing edges of the wing
panels with each other. Wipe off any excess glue that oozes out
of the joint with a paper towel soaked in rubbing alcohol. Hold or
tape the wing panels in proper position until dry.
NOTE: If possible, get someone to help you with this step. An
extra set of hands makes the job much easier. While one person
holds the two wing panels together in correct alignment, the other
person can clean off the excess glue and tape the wing panels
tightly together.
❑
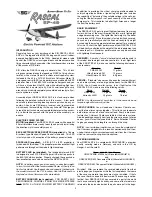
2) Test fit the wing on the fuselage. Make sure the wing slides
all the way forward, snug against the back of the fuselage former.
At the rear, align the wing carefully on the fuselage, and then use
the metal M3 x 18mm PWA Bolt to secure the wing in place on
the fuselage. After checking the fit, remove the wing.
AILERON HOOKUP
For this section you will need the assembled Wing, (2) Aileron
Servos and appropriate Chords (see radio notes at beginning of
this book), (2) Short Formed Wire Pushrods, (2) Nylon Control
Horns, and (2) Nylon Pushrod Keepers.
❑
3) Note that the ailerons are permanently hinged in place.
Give each aileron a gentle pull to the rear to double check that
they are securely glued.
❑
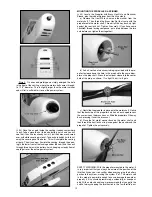
4) The aileron servos will be mounted on the back (uncov-
ered) side of the plywood Servo Hatches.
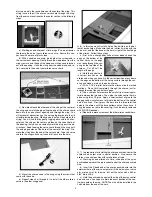
a) Center the servo control arm, and then hold the servo in po-
sition on the back of one of the hatches. Make sure that you have
the servos control arm centered in the pre-cut slot in the hatch -
centered both horizontally and vertically. It needs to be right in
the middle of the slot when at neutral!
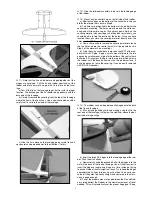
b) Mark the bottom of the servo mounting lugs onto the hatch.
Also mark the sides of the servo case.
c) Use Medium CA or epoxy to glue two Hardwood Servo
Mounting Blocks in position on the hatch, right up against the lines
you drew on the hatch, as shown. Let dry.
d) Mount your servo to the hatch, using the screws that were
provided with the radio system. Be sure to drill pilot holes in the
mounting blocks before screwing the servo in place.
e) Set up and turn on your radio system to center the servo
and check servo travel. Check to see that the servo control arm
does not bind on the slot in the hatch at extremes of travel.
f) Repeat steps 4a) through e) to mount the other aileron servo
to the other hatch.
NOTE: If you have a double-sided servo arm, cut off the side of
the arm that you won’t be using so that it cannot bind on the top
of covering when the servo and hatch are installed in wing.
❑
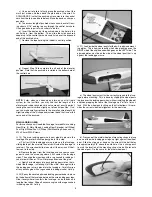
5) Looking inside the aileron servo mount opening in the bot-
tom of the wing, you will find a short length of scrap wood with a
string tied to it. The other end of this string is tied to another piece
4