background image

en

Customer service

36

4

Customer service

C

us

t

o

m

er


s

er

v

ic

e

If you are unable to rectify the fault, 
please contact your customer service. 
We always find a suitable solution, even 
to avoid unnecessary visits 
by technicians. Contact information 
for your nearest customer service can 
be found on the back of these 
instructions for use or on the enclosed 
customer service list. When calling, 
please state the appliance number (E-
Nr. = 1) and the production number 
(FD = 2) which can be found on the 
rating plate

92

 on the appliance door.

Rely on the competence of the manufa
cturer.

 Contact us. You can therefore be 

sure that the repair is carried out 
by trained service technicians who carry 
original spare parts for your domestic 
appliances. 

5

Installation and 

connection

I

n

s

t

al

l

at

i

o

n


a

n

d


co

n

n

e

ct

i

o

n

The dishwasher must be connected 
correctly, otherwise it will not function 
properly. The specifications for the inlet 
and outlet as well as the electrical 
connected loads must correspond with 
the required criteria as 
specified in the following paragraphs 
or in the installation instructions.
Install the appliance in the correct 
sequence:

1.

Checking appliance on delivery

2.

Installing the appliance

3.

Waste water connection

4.

Fresh water connection

5.

Electrical connection

Product package

If you have any complaints, contact 
the dealer where you purchased 
the appliance or our customer service.

Dishwasher

Instructions for use

Installation instructions

Warranty*

Installation materials

Steam guard plate*

Rubber apron*

Power cord

* depending on model

)'

(1U

Downloaded from DishWasher-Manual.com Manuals

Содержание SN 56T595

Страница 1: ...6 HQ 2SHUDWLQJ LQVWUXFWLRQV LVKZDVKHU Downloaded from DishWasher Manual com Manuals ...

Страница 2: ... 5HVHW VHF Downloaded from DishWasher Manual com Manuals ...

Страница 3: ...Switching off rinse aid refill indicator 13 Utensils 13 Not suitable 13 Glass and utensil damage 13 Loading the dishwasher 13 Unloading the dishwasher 14 Cups and glasses 14 Pans 14 Cutlery drawer 15 Folding spikes 15 Small accessories holder 15 Adjusting the height of the basket 16 Detergent 16 Adding detergent 17 Combination detergent 17 Overview of programmes 19 Programme selection 19 Informati...

Страница 4: ...rtation 40 Protection against frost Emptying the appliance 40 8 Intended use I n t e n d e d u s e This appliance is intended for use in the home and the home environment Use the dishwasher only in the household and only for its designed purpose for washing domestic dishes Safety instructions S a f e t y i n s t r u c t i o n s Children from 8 years of age or people whose physical sensory or menta...

Страница 5: ...stic supply has been correctly installed The electrical connection conditions must correspond with the specifications on the dishwasher rating plate 92 If the power cord of this appliance is damaged it must be replaced with a particular power cord To prevent injury the power cord may be replaced by customer service only If the dishwasher is installed in a high sided unit the unit must be secured p...

Страница 6: ... buttons do not operate the appliance Pull out the mains plug or switch off the fuse Turn off the tap call customer service Disposal 1 Make redundant appliances unusable to prevent subsequent accidents 2 Dispose of the appliance in a n environmentally friendly manner ã Warning Risk of injury To prevent injuries e g caused by stumbling open the dishwasher only briefly in order to load and unload th...

Страница 7: ...at and eyes or asphyxiation Keep children away from open dishwasher The water in the rinsing compartment is not drinking water and could contain detergent residue Ensure that children do not place fingers in the tablet collecting tray 1B Small fingers could become caught in the slots When opening and closing the door on an eye level appliance ensure that children do not become jammed or crushed be...

Страница 8: ...d appliances Please follow the safety instructions under Disposal of your appliance Getting to know your appliance G e t t i n g t o k n o w y o u r a p p l i a n c e Diagrams of the control panel and the interior of the appliance can be found in the envelope at the front Individual positions are referred to in the text Control panel Number depending on model This appliance is identified according...

Страница 9: ...or special salt 1Z Filters 1b Bottom basket 1j Dispenser for rinse aid 9 Detergent dispenser 9 Lock for detergent dispenser 92 Rating plate Water Hardness ˆ š Intensive drying š š Rinse aid Hot water End of programme buzzing sound p Language p p ƒ Automatic disconnection ƒ Onboard computer Language Setting Deutsch p English p ƒ Français p Nederlands p Italiano p E p Español p ˆ Português p Svenska...

Страница 10: ...r Tap water above 1 2 mmol l must be softened The water is softened with special salt regeneration salt in the water softening system of the dishwasher The setting and therefore the required amount of salt depends on the degree of hardness of your tap water see table Setting The amount of salt dispensed can be set from to ˆ Salt is not required at the set value 1 Find out about the hardness value ...

Страница 11: ...ned detergents with a salt component are used salt can usually be omitted up to a water hardness of 21 dH 37 fH 26 Clarke 3 7 mmol l If the water hardness is over 21 dH special salt must be used Switching off salt refill indicator water softening systemSw itchingoffw atersofteningsystem If the salt refill indicator H is impaired e g when using combined detergents containing salt component it can b...

Страница 12: ...e aid which has run over with a cloth Setting amount of rinse aid The amount of rinse aid can be set from to Please set rinse aid on to obtain very good drying results is already set in factory Change this setting only if streaks select lower setting or water stains select higher setting are left on the utensils 1 Open the door 2 Switch on ON OFF switch 3 Hold down programme button and press START...

Страница 13: ...al glass objects may turn cloudy after many wash cycles Glass and utensil damage Causes Glass type and glass production process Chemical composition of the detergent Water temperature of the wash programme Recommendation Use only glasses and porcelain which the manufacturer designates as dishwasher proof Use a detergent which protects utensils Take glass and cutlery out of the dishwasher as soon a...

Страница 14: ...amme ends water droplets can still be seen inside the appliance This does not affect the drying of the utensils Cups and glasses Top basket 12 Pans Bottom basket 1b Tip Heavily soiled utensils pans should be placed in the bottom basket The more powerful spray jet provides a better dishwashing result Tip Other examples such as the best way of loading your dishwasher can be found on our homepage as ...

Страница 15: ... room for taller items of cutlery The front rows of prongs can be folded down to provide room for wider handles FoldingspikesFolding spikes depending on model The spikes can be folded down to improve arrangement of pans bowls and glasses Small accessories holder Sm allaccessoriesholder depending on model Light weight plastic accessories e g cups lids etc can be held securely in the small accessori...

Страница 16: ...or a liquid detergent according to the degree of soiling Tablets contain an adequately large amount of active ingredients for all cleaning tasks Modern powerful detergents predominantly use a low alkaline formulation with phosphate and enzymes Phosphates bond the lime in the water Enzymes break down starch and remove protein Phosphate free detergents are less frequent These have a slightly weaker ...

Страница 17: ...e detergents and care products can be purchased online via our website or via customer service see back page Combination detergent Apart from conventional detergents Solo a number of products are offered with additional functions These products contain not only the detergent but also rinse aid and salt replacement substances 3in1 and depending on the combination 4in1 5in1 etc additional components...

Страница 18: ...using washing powder you can apply some of this cleaning agent to the inside of the appliance s door Even if the rinse aid and or salt refill indicator is lit the rinse programme will run correctly with combined detergents If using detergents in a water soluble protective cover Take hold of the cover with dry hands only and put the detergent into an absolutely dry detergent dispenser only otherwis...

Страница 19: ... Auto 65 75 all Is optimised according to the soiling with the aid of sensors Á Auto 45 65 all mixed utensils and cutlery part dried common household food remnants Á Auto 45 65 all Is optimised according to the soiling with the aid of sensors â à Eco 50 all Prerinse Clean 50 Intermediate rinse Final rinse 65 Drying sensitive utensils cutlery temperature sensitive plastic and glasses slightly adhes...

Страница 20: ...can switch to half load This will save water energy and time It is recommended to put a little less detergent in the detergent dispenser than for a full load Hygiene Hygiene The temperature is increased during the cleaning process This increases the hygiene status This additional option is ideal for cleaning e g chopping boards and baby bottles Ï Intensive zone Intensivezone Perfect for a mixed lo...

Страница 21: ...es on the digital display 8 4 Press the START button 5 Close the door The programme starts running Note for environmentally friendly operation of the dishwasher For ecological reasons the Eco 50 programme is preset whenever the appliance starts This conserves environmental resources and not least saves you money The Eco 50 programme is a particularly environmentally friendly programme According to...

Страница 22: ...nds with your requirements 5 Press START button timer programming is activated 6 To delete timer programming press the or button until is indicated on the digital display X You can change your programme selection at any time until the programme starts 7 Close the door End of programme The programme ends when the value appears on the digital display 8 and Finished appears in the display window 2 Th...

Страница 23: ...een reached the display jumps back to 2 Press START button The set value is saved 3 Close the door Switching off the appliance Short time after the end of the programme 1 Open the door 2 Switch off ON OFF switch 3 Turn off the tap not applicable if Aqua Stop fitted 4 Remove the utensils when they have cooled down Note When the programme ends leave the appliance to cool down a while before opening ...

Страница 24: ... 8 shows the display window 2 indicates Finished 4 Open the door 5 Switch off ON OFF switch 6 Close the door Changing the programme When the START button has been pressed the programme cannot be changed The only way a programme can be changed is by Cancel programme Reset Intensive drying The final rinse uses a higher temperature which improves the drying result The running time may increase slight...

Страница 25: ...oth and a little washing up liquid If the appliance is switched off for a prolonged period leave the door ajar to prevent the formation of an unpleasant odour Never use a steam cleaner to clean your dishwasher The manufacturer is not liable for any consequential damage Regularly wipe the front of the appliance and fascia with a damp cloth water and a little washing up liquid are adequate Do not us...

Страница 26: ... filter system 3 Remove any residue and clean filters under running water 4 Re install filter system in reverse sequence and ensure that the arrow marks are opposite each other after closing the filter system Spray arms Limescale and contaminants in the rinsing water may block nozzles and bearings on the spray arms 1 and 1J 1 Check outlet nozzles on the spray arms for blockages 2 Unscrew the upper...

Страница 27: ...s are used Improper repairs or use of non original spare parts may cause considerable damage and put the user at considerable risk Waste water pump Large food remnants or foreign objects which were not captured by the filters may block the waste water pump The rinsing water will then be above the filter In this case 1 First always disconnect the appliance from the power supply 2 Take out top baske...

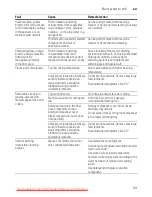
Страница 28: ... Switch on the appliance Error code ƒƒ is lit Filters 1Z are soiled or blocked Clean filters See Cleaning and maintenance Error code ƒ is lit Waste water hose is blocked or kinked Install hose without kinks remove any residue Siphon connection still sealed Check connection to siphon and open if required Cover on the waste water pump loose Lock cover correctly See Waste water pump Error code ƒ is l...

Страница 29: ...nse aid P is lit No rinse aid Refill rinse aid No salt Refill with special salt Sensor does not detect salt tablets Use different special salt Refill indicatorfor salt H and or rinse aid P is not lit Refill indicator switched off Activation deactivation see chapter Water softening system Special salt or Rinse aid There is still enough special salt rinse aid available Check refill indicator levels ...

Страница 30: ...d yet Wait until program ends or wait until 30 min after program ends before removing utensils The eco rinse aid used has a poor drying performance Usea proprietary rinseaid Eco products are much less effective Plastic utensils not dry Special properties of plastic Plastic has a lower heat storage capacity and therefore dries less well Cutlery not dry Cutlery not arranged properly in the cutlery b...

Страница 31: ...ogramme Eco 50 or Intensive Tall narrow receptacles in corner areas are not rinsed adequately Do not place hollow receptacles too obliquely and do not place in the corner area Top basket 12 on right and left not set to same height Set top basket to same height using side levers Detergent residue Detergent dispenser cover blocked by utensils and therefore does not open fully Detergent dispenser cov...

Страница 32: ...oor Detergent substances are deposited Thesecoatingscannot usually be removed with chemicals appliance cleaner Change detergent brand Clean appliance mechanically Hardness range incorrectly set or water hardness greater than 8 9 mmol l Set water softening system according to instructions for use or top up salt 3 in 1 detergent or bio eco detergent not effective enough Set water softening system ac...

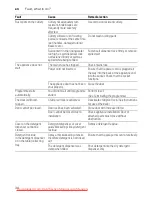
Страница 33: ...ence Stubborn soiling cannot be completely removed Do not prerinse utensils Remove only large food remnants Recommended programme Eco 50 Removable streaks on glasses glasses with metallic appearance and cutlery Too much rinse aid Set rinse aid amount to lower setting No rinse aid added or setting too low Add rinse aid and check dosage recommended setting 4 5 Detergent residue in the final rinse pr...

Страница 34: ...lose the door Programme starts automatically You did not wait until programme ended Perform reset See Terminating the programme The door is difficult to open Child proof lock is activated Deactivate childproof lock See instructions for use at the back Door cannot be closed Door lock has been activated Close door with increased force Door cannot be closed due to installation Check appliance install...

Страница 35: ... appliance is not defective No effect on appliance function No remedial action possible Knocking or rattling noise Spray arm strikes the utensils utensils not positioned correctly Position utensils so that the spray arms do not strike the utensils If there is a low load the water jets strike the washing tank directly Load the appliance with more utensils or distribute the utensils more evenly in t...

Страница 36: ...rts for your domestic appliances 5 Installation and connection I n s t a l l a t i o n a n d c o n n e c t i o n The dishwasher must be connected correctly otherwise it will not function properly The specifications for the inlet and outlet as well as the electrical connected loads must correspond with the required criteria as specified in the following paragraphs or in the installation instruction...

Страница 37: ...d in the installation instructions Level the appliance with the aid of the height adjustable feet Ensure that the appliance is situated securely on the floor A built under or integrated appliance which is installed subsequently as a free standing appliance must be secured to prevent it from overturning e g by screwing it to the wall or by installing it under a continuous worktop which is screwed t...

Страница 38: ...ed if the hot water can be supplied by energetically favourable means and from a suitable installation e g solar heating system with circulation line This will save energy and time The hot water setting allows you to adjust your appliance optimally to operation with hot water It is recommended to have a water temperature temperature of the incoming water of at least 40 C and no more than 60 C It i...

Страница 39: ...to satisfy the relevant safety instructions The connection may be modified by technicians only A power cord extension may be purchased from customer service only Use only a residual current operated circuit breaker which features the symbol Only this extension guarantees compliance with the currently valid regulations The appliance features a water damage protection system Please note the system w...

Страница 40: ...Press START button until is indicated on the digital display 9 Close the door 10 Open door after approx 1 minute The numerical display indicates 11 Switch off ON OFF switch 12 Turn off the tap disconnect supply hose and drain water Transport appliance upright only This prevents residual water from running into the machine control and damaging the programme sequence Protection against frostProtecti...

Страница 41: ... VKHHWV RU JULOOHV DQG SODWHV ZKLFK KDYH D GLDPHWHU JUHDWHU WKDQ FP JRXUPHW SODWHV SDVWD SODWHV GLQQHU SODWHV FDQ EH FOHDQHG ZLWK WKH DLG RI WKH VSUD KHDG 7R GR WKLV UHPRYH WKH WRS EDVNHW DQG LQVHUW WKH VSUD KHDG DV LOOXVWUDWHG LQ WKH GLDJUDP VRPH PRGHOV 1HYHU RSHUDWH WKH GLVKZDVKHU ZLWKRXW WKH WRS EDVNHW RU EDNLQJ VKHHW VSUD KHDG 7R HQVXUH WKDW WKH VSUD MHW FDQ UHDFK DOO SDUWV DUUDQJH WKH EDNLQJ ...

Страница 42: ...RS H WHQVLRQ RULJLQDO DFFHVVRU 2XU ZDUUDQW GRHV QRW H WHQG WR GHIHFWLYH IHHG OLQHV RU ILWWLQJV XS WR WKH TXD 6WRS FRQQHFWLRQ RQ WKH WDS I RXU DSSOLDQFH LV ILWWHG ZLWK TXD 6WRS RX FDQ OHDYH RXU DSSOLDQFH XQDWWHQGHG GXULQJ RSHUDWLRQ DQG OHDYH WKH WDS WXUQHG RQ DIWHUZDUGV 7KH WDS VKRXOG RQO EH WXUQHG RII LI RX DUH DEVHQW IURP KRPH IRU D SURORQJHG SHULRG H J VHYHUDO ZHHNV KROLGD 48 6723 JXDUDQWHH GRHV...

Отзывы: