Technical Instructions
RDX42.22U Room Temperature Controller with LCD
Document Number 155-747
March 13, 2008
Page 8
Siemens Industry, Inc.
Mounting,
Installation and
Commissioning
Notes
•
Check the position of the DIP switches and change them, if necessary.
•
After applying power, the controller makes a reset, which takes approximately three
seconds; it is then ready to operate.
•
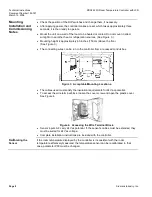
Mount the unit on a wall of the room to be heated or cooled. Do not mount in direct
sunlight or near other heat or refrigeration sources. (See Figure 3.)
•
Mounting height is approximately 60 inches (150 cm) above the floor.
(See Figure 3.)
•
The connecting wires can be run to the controller from a recessed conduit box.
Figure 3. Acceptable Mounting Locations.
•
The cables used must satisfy the insulation requirements for 24 Vac potential.
•
To access the wire terminal block, loosen the cover screw and open the plastic cover.
See Figure 4.
Figure 4. Accessing the Wire Terminal Block.
•
Sensor inputs 9-8 carry 24 Vac potential. If the sensor's cables must be extended, they
must be suited for 24 Vac voltage.
•
Complete installation instructions are included with the controller.
Cali
brating the
Sensor
If the room temperature displayed by the controller is inconsistent with the room
temperature effectively measured, the temperature sensor can be recalibrated. In that
case, parameter P09 must be changed.


