background image

1.4: Installation

1.  Open the door by unscrewing the door knob.
2.  Fix the starter enclosure vertically on a rigid surface free from vibration. 
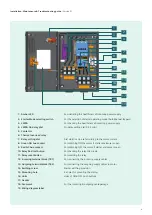
3.  Remove the rubber grommets for incoming and outgoing cable connections. (Fig: 2)
4.  Connect incoming and outgoing cables as follows (Fig: 2)
 

-Select correct size of cable from Table 1. 


-Remove approx. 10mm of insulation. 


-Pass the cable through proper cable gland to avoid ingress of material. 


-Connect the incoming supply cables to terminal block TB1 and tighten the screws firmly


(ref.tightening torque from Table 3).

5.  NOTE: LMRA is set in Manual mode (Factory setting).
6.  Set the overload relay scale (Fig: 2) using proper screw driver as per the procedure given below. 
7.  Set the overload relay to rated current mentioned on motor name plate. 
8.  Press green button of the Aux.contact block (Fig: 2) to start the motor and wait till it reaches to normal speed. 
 9.  Reduce the overload relay settings till it trips. 
10.  Set the overload relay at slightly higher value. 
11.  Allow a reset time approx 4min. and reset the overload relay manually (Fig: 2)
12.  Restart the motor. If the relay does not trip, consider the overload relay as properly set. If it trips,


set it at little higher value and recheck. 

13.  Press the red knob (Fig: 2) on the overload relay to stop the motor 
14.  Fix the door by screwing the knob


9

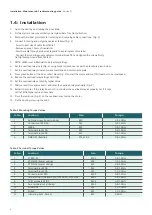
Table: 2 Mounting Torque Values

Sr. No 

Location 

Size 

Torque

1  

Earthing screw (cover to body) 

M5 

2.5-3.0Nm

2  

Contactor 3TS30..36 

M4 

0.8-1.4Nm

3  

LMR-A  

M4 

0.8-1.4Nm

4  

Terminal block 30A 

M4 

0.8-1.4Nm

5  

Terminal block 60A 

M4 

0.8-1.4Nm

6  

ON& OFF /Rest link 

ST4.2x9.5 

0.8-1.2Nm


Table: 3 Terminal Torque Values

Sr. No 

Location 

Size 

Torque

1  

3TS30..32  

M3.5 

0.8-1.4Nm

2  

3TS33/34 (Power wiring) 

M4 

1.0-1.5Nm

3  

3TS35/36 (Power wiring) 

M5 

2.5-3.0Nm

4  

Terminal block 30A 

M4 

0.8-1.4Nm

5  

Terminal block 60A 

M5 

1.5-2.1Nm

6  

Contact block 3SB5 

M3.5 

0.8-1.2Nm

7  

Aux terminal (side add on) of 3TS35/36, 3TS33/34 

M3.5 

0.8-1.4Nm

8  

Coil Terminals A1/A2 

M3.5 

0.8-1.2Nm

9  

Aux. terminals of all Relays 

M3.5 

0.8-1.2Nm

10 3UW51/52 

M4 

1.0-1.5Nm

11 3US56 

M5 

2.5-3.0Nm

12 

Indicating light - Amber 

M3 

0.8Nm

Installation, Maintenance & Troubleshooting guide

 | Version 01

Содержание RAJA+ 3TE7111-2BC21-1A Series

Страница 1: ...Installation Maintenance Troubleshooting Guide For RAJA Agriculture Starters Controllers ...

Страница 2: ...llation 1 5 Operating procedure in normal condition 1 6 Troubleshooting guidelines in case any incoming fault is present before switching ON the motor 1 7 Troubleshooting guidelines in fault condition when motor stops while it is in running condition 1 8 Troubleshooting guidelines in case any fault is at the load side ...

Страница 3: ...ter 4 ON Push button Green For switching ON the motor 5 OFF RESET push button Red For switching OFF the motor Reset the overload relay 6 Mechanical Latch OFF push button For preventing undesired ON operation of motor 7 Door Door of ADOL starter 8 Earthing screw Earthing screw of ADOL starter for Customer 9 Name Plate Name plate with technical details of ADOL 1 2 3 4 5 6 7 8 9 3 Installation Mainte...

Страница 4: ... 9 Red NC Aux contact For switching OFF the motor if starter enclosure is open 10 Relay Red test button For checking the relay trip circuit 11 Relay reset button For resetting the relay 12 Incoming terminal block TB1 For connecting the incoming supply cables 13 Outgoing terminal block TB2 For connecting the outgoing supply cables to motor 14 Earthing screw Starter earthing provision 15 Mounting ho...

Страница 5: ...1 2 Wiring Diagram Installation Maintenance Troubleshooting guide Version 01 5 ...

Страница 6: ...6 Control logic diagram Installation Maintenance Troubleshooting guide Version 01 ...

Страница 7: ...7 Power circuit diagram Installation Maintenance Troubleshooting guide Version 01 ...

Страница 8: ...1AZ8 3TE7111 2RC25 1AZ8 7 5 5 5 11 4 3TS3210 0Ax x 08K 3UW5102 2A 10 16 7UG0613 0yy20 32A 2 5 7 5 5 5 14 5 3TS3210 0Axx 08K 3UW5102 2A 10 16 7UG0613 0yy20 32A 2 5 10 7 5 15 4 3TS3311 0Axx 08K 3UW5102 2B 10 16 7UG0613 0yy20 32A 2 5 10 7 5 19 5 3TS3311 0Axx 08K 3UW5202 2C 12 5 20 7UG0613 0yy20 32A 2 5 12 5 9 3 19 5 3TS3311 0Axx 08K 3UW5202 2C 16 25 7UG0613 0yy20 32A 4 0 12 5 9 3 25 3TS3511 0AZ8 08K ...

Страница 9: ...ly higher value 11 Allow a reset time approx 4min and reset the overload relay manually Fig 2 12 Restart the motor If the relay does not trip consider the overload relay as properly set If it trips set it at little higher value and recheck 13 Press the red knob Fig 2 on the overload relay to stop the motor 14 Fix the door by screwing the knob 9 Table 2 Mounting Torque Values Sr No Location Size To...

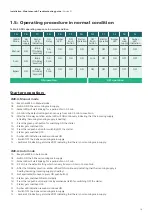
Страница 10: ...n 1E After the ON delay duration amber LED will ON continously indicating that the incoming supply is healthy Assuming incoming supply is healthy 1F Not applicable No need to press ON push button 1G Starter gets switched ON automatically 1H Press the red push button and lock by mechanical latch for switching OFF the starter 1I Starter gets switched OFF 1J Amber LED indication remains continous ON ...

Страница 11: ...which can vary from min 0 5 min to max 5min 1E After the ON delay duration amber LED will ON continously indicating that the incoming supply is healthy Assuming incoming supply is healthy 1F Press the green push putton for switching ON the starter 1G Starter gets switched ON 1H Press the red push button for switching OFF the starter 1I Starter gets switched OFF 1J Amber LED indication remains cont...

Страница 12: ...f phase connected in any of the incoming terminal 2 2G Connect the phase sequence of all the phases correctly R phase to L1 Y phase to L2 B phase to L3 to the incoming main supply terminals of Terminal block TB1 Repeat the steps from 2A to 2D and then go to step no 2H If fault still exists then 3 2F Check the rated operational voltage of the starter in incoming terminal block TB1 between L1 L2 L2 ...

Страница 13: ...n min required voltage Max voltage allowed Refer table no 6 Repeat the steps from 2A to 2D and then go to step no 2H If fault still exists then 5 2F Check the rated operational voltage of the starter in incoming terminal block TB1 between L1 L2 L2 L3 L1 L3 Check whether the operational line voltage difference between any 2 phase in the incoming terminals of terminal block TB1 is 50V 5 2G Starter wi...

Страница 14: ...s from 2F to 2G of Auto mode Refer Table no 5 Corrective action 2 3F to 3K Follow steps from 1B to 1G of Auto mode Refer Table no 4 3L Motor starts running again Starter Fault conditon Table 7 ADOL operating sequence in fault condition 3A 3B 3C 3D 3E 3F 3G 3H 3J 3K 3L 3I LMR A Bypass mode As in Bypass mode there is no protection from the inconing supply faults however there may some conditions exa...

Страница 15: ...otor current rating and adjust the overload relay setting dial as per the requirement b Single phasing at load side Overload relay tripped as inbuilt feature to protect from single phase faults Check the single phasing condition at Motor side terminal TB2 TB3 to Motor For both conditions restart the Starter after proper reset time of approx 4 min Steps to be followed Installation Maintenance Troub...

Страница 16: ...ir business goals It helps our customers to thrive communities to progress and supports sustainable development to protect our planet for the next generation Creating environments that care siemens com smart infrastructure Subject to changes and errors The information given in this document only contains Article no SI EP CC RajaSM1 042021 general descriptions and or performance features which may ...

Отзывы: