background image

Service and maintenance 


8.2 Checking and changing lubricants 


BA 2515 

44


Operating Instructions, 10/2016, A5E38123453A/RS-AB 

8.2.2


Checking the oil level 


NOTICE 
The volume of gearbox oil changes with temperature 
If the temperature rises, the volume increases. Where temperature differences and filling 

quantities are significant, the volume difference can amount to several liters. 
The oil level must therefore be checked while still slightly warm, approximately 30 minutes 

after switching off the drive unit. 


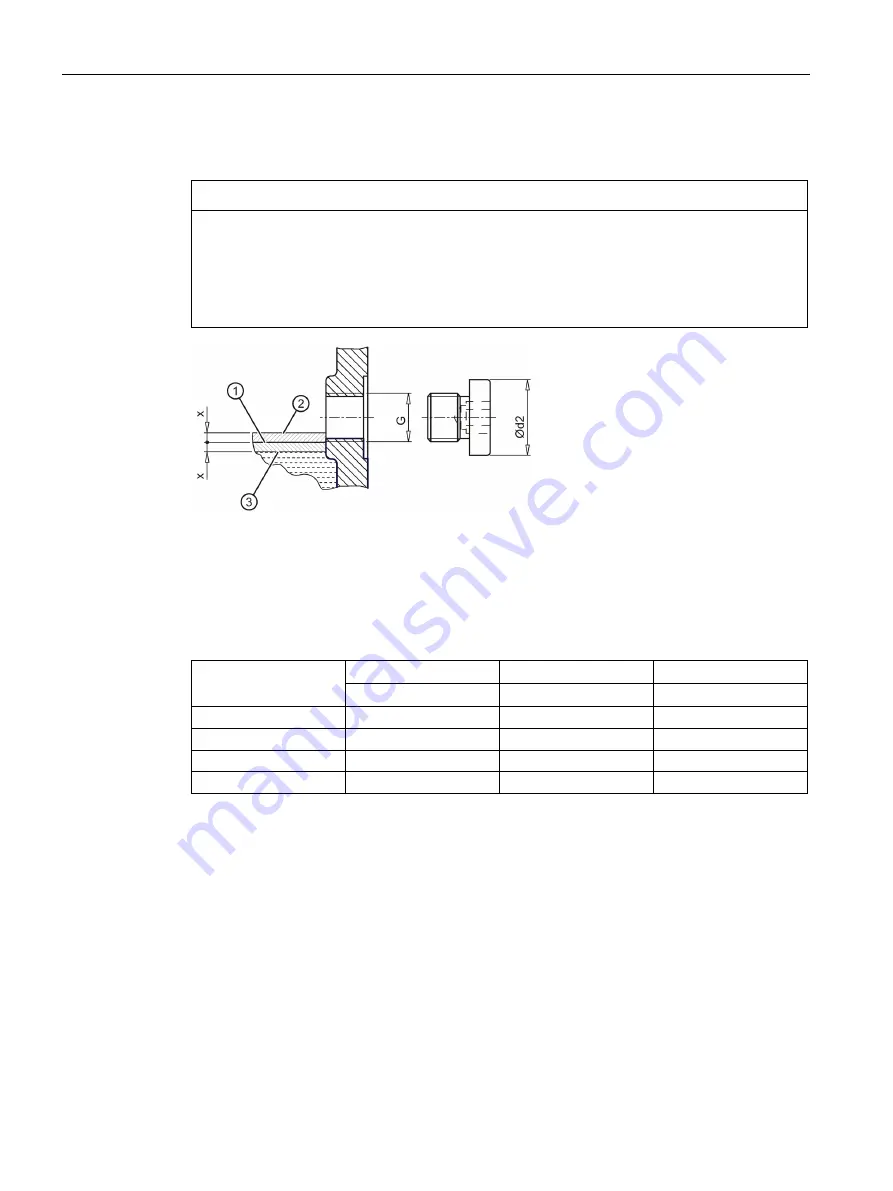
Specified oil level 


Maximum oil level 


Minimum oil level 

Figure 8-1 

Oil level in the gearbox housing 

Table 8- 2 

Minimum and maximum fill levels x 

Oil level hole 

d2 

Fill level x 

Tightening torque 

[mm] 

[mm] 

[Nm] 

G 1/8" 

14 

2.5 

10 

G 1/4" 

18 

10 

G 3/8" 

22 

25 

G 3/4" 

32 

50 

Procedure 

1.


Switch off the power supply to the drive unit. 

2.


Unscrew the oil level screw, see Mounting positions (Page 63). Oil escapes if the 

maximum fill level is above the plug hole. 

3.


Check the oil level. Observe the fill level x. 

4.


Top up the oil level if necessary and check it again. 

5.


Check the state of the sealing ring on the sealing element. If the sealing ring is damaged, 

replace the sealing element with a new one. 

6.


After checking, seal the gearbox immediately using the sealing element. 

You have now checked the oil level in the gearbox housing. 

Содержание MOTOX BA 2515

Страница 1: ......

Страница 2: ......

Страница 3: ...________ MOTOX Gearboxes for overhead conveyors BA 2515 Operating Instructions Translation of the original instructions 10 2016 A5E38123453A RS AB General information and safety notes 1 Technical description 2 Incoming goods transport and storage 3 Installation 4 Commissioning 5 Operation 6 Faults causes and remedies 7 Service and maintenance 8 Disposal 9 Technical specifications 10 Spare parts 11...

Страница 4: ...ed only by personnel qualified for the specific task in accordance with the relevant documentation in particular its warning notices and safety instructions Qualified personnel are those who based on their training and experience are capable of identifying risks and avoiding potential hazards when working with these products systems Proper use of Siemens products Note the following WARNING Siemens...

Страница 5: ...uspended transport 23 3 3 Bearings 25 3 3 1 General information for storage 25 3 3 2 Storage up to 36 months with long term preservation optional 25 3 3 2 1 General notes for storage up to 36 months 25 3 3 2 2 Gearbox filled with operating oil and anti corrosive agent 26 3 3 2 3 Gearbox completely filled with oil 26 4 Installation 27 4 1 Unpacking 27 4 2 General information concerning the installa...

Страница 6: ...patible oils 48 8 2 6 4 Filling in oil 49 8 2 7 Topping up with oil 50 8 2 8 Regreasing the roller bearing 50 8 2 9 Change the roller bearing grease 51 8 2 10 Service life of the lubricants 51 8 2 11 Recommended lubricants 52 8 3 Replace bearings 54 8 4 Checking the gearbox for leaks 54 8 5 Cleaning the vent filter 55 8 6 Cleaning the gearbox 55 8 7 Checking the tightness of fastening bolts 55 8 8...

Страница 7: ...rating Instructions 10 2016 A5E38123453A RS AB 7 11 2 Spare parts lists 70 11 2 1 Bevel helical gearboxes BHF38 BHB38 KHF48 KHF46 KHZ48 70 11 2 2 Helical worm gearboxes CHF28 CHF48 CHF68 CHZ48 73 12 Declaration of Incorporation 77 ...

Страница 8: ...Table of contents BA 2515 8 Operating Instructions 10 2016 A5E38123453A RS AB ...

Страница 9: ... 1 2 3 4 5 14 Bevel Helical Gearbox B and K 2 K J 1 5 Helical Worm Gearbox C 2 K J 1 6 Overhead conveyor H G00 Flange F F Foot flange mounted design B B Centering flange Z Z Note In addition to these operating instructions special contractual agreements and technical documentation apply to special gearbox designs and the associated supplementary equipment Please refer to the other operating instru...

Страница 10: ...s please contact Technical Support https support industry siemens com cs ww en sc 2090 Europe and Africa Telephone 49 911 895 7222 support automation siemens com America Telephone 1 800 333 7421 support america automation siemens com Asia Australia Pacific Telephone 86 400 810 4288 support asia automation siemens com Valid operating instructions for MOTOX BA 2010 operating instructions for MOTOX g...

Страница 11: ...ct this operational reliability and are forbidden Note The performance data assumes an ambient temperature of 20 C to 40 C and an installation altitude of up to 2000 m above sea level In the case of other ambient temperatures and installation altitudes please contact Technical Support The gearboxes are designed only for the area of application described in Section Technical specifications Page 59 ...

Страница 12: ... such as couplings gear wheels or belt drives Take appropriate protective measures to prevent accidental contact with parts and equipment that heat up to over 70 C during operation When removing protective equipment keep fasteners in a safe place Re attach removed protective equipment before commissioning Collect and dispose of used oil in accordance with regulations Remove oil spillages immediate...

Страница 13: ... Hot escaping oil Before starting any work wait until the oil has cooled down to below 30 C WARNING Poisonous vapors when working with solvents Avoid breathing in vapors when working with solvents Ensure adequate ventilation WARNING Risk of explosion when working with solvents Ensure adequate ventilation Do not smoke WARNING Risk of eye injury Rotating parts can throw off small foreign particles s...

Страница 14: ...General information and safety notes 1 5 Particular types of hazards BA 2515 14 Operating Instructions 10 2016 A5E38123453A RS AB ...

Страница 15: ...s Observe the correct oil level Housing The gearbox housing is made of gray cast iron Geared components The geared components are hardened For the helical worm gearbox the worm is hardened and ground The gear is manufactured from high quality bronze The bevel gear stage of the bevel helical gearbox is lapped in pairs Lubrication The geared components are supplied with adequate lubricant by means o...

Страница 16: ...upling or other input or output elements are to be used that give rise to additional radial and or axial forces e g gear wheels belt pulleys this must be contractually agreed Please refer to the relevant operating instructions for details of how to use the coupling Clutch for overhead conveyors Actuation of the operating lever interrupts the force flow in the positive claw coupling on the output s...

Страница 17: ...bility 2 2 2 Painted version The corrosion protection system is classified according to the corrosiveness categories in DIN EN ISO 12944 2 Table 2 1 Paint according to corrosiveness categories Paint system Description Corrosiveness category C1 unpainted for gearbox and motor housings made of aluminum Indoor installation Heated buildings with neutral atmospheres Resistance to greases and some resis...

Страница 18: ...ent polyurethane base coat 2 component polyurethane top coat Indoor and outdoor installation Production areas with high humidity and some air contamination e g food production areas dairies breweries and laundries Urban and industrial atmospheres moderate contamination from sulfur dioxide coastal areas with low salt levels Resistance to greases mineral oils aliphatic solvents sulfuric acid 10 caus...

Страница 19: ...hane paint 2 component epoxide paint and 2 component acrylic paint after prior rubbing down is possible 2 2 3 Primed version Table 2 2 Primer according to corrosiveness category Paint system Can be overpainted with Unpainted corrosiveness category C1 Cast iron parts immersion primed steel parts primed or zinc plated aluminum and plastic parts untreated Synthetic paint synthetic resin paint oil pai...

Страница 20: ...lm is peeled off be at least touch proof Company logo Masking film Rating plate Paint protective film Peeling tab Figure 2 1 Rating plate with paint protective film Procedure 1 Pull the peeling tab up 2 Carefully peel the paint protective film off diagonally from one corner not parallel to the plate 3 Blow any paint fragments away or wipe them off with a clean cloth You have now removed the paint ...

Страница 21: ...ce with the purchase order Inspect the delivery immediately on arrival for completeness and any transport damage Notify the freight company of any damage caused during transport immediately this is the only way to have damage rectified free of charge Siemens AG will not accept any claims relating to items missing from the delivery and which are submitted at a later date The gearbox or geared motor...

Страница 22: ...u can then use them again for transporting further items or you can apply them again Different forms of packaging may be used depending on the size of the gearbox or geared motor and the method of transport Unless contractually agreed otherwise the seaworthy packaging complies with HPE Packaging Guidelines Bundesverband Holzpackmittel Paletten Exportverpackungen e V the German Federal Association ...

Страница 23: ...e the eyebolt on the motor to transport the motor prior to mounting or following removal If necessary use additional suitable lifting accessories for transport or during installation When attaching by a number of chains and ropes just two strands must be sufficient to bear the entire load Secure lifting accessories against slipping NOTICE Do not rig eyebolts to the front threads at the shaft ends ...

Страница 24: ...aximum load of the transport eye on the bevel helical gearbox Size m d2 Size m d2 kg mm kg mm KH 48 250 22 KH 68 350 26 Table 3 2 Maximum load of the eyebolt axis on helical worm gearbox CH68 Thread size m d2 kg mm M10 230 45 Procedure 1 Mount the geared motor on the transport device by the heaviest permissible weight to be attached This will normally be on the main gearbox 2 Check that the eyebol...

Страница 25: ... be made for preservation Please contact Technical Support Store the gearbox or geared motor in dry dust free rooms that are maintained at a constant temperature The storage location must be vibration and shock free The free shaft ends sealing elements and flange surfaces must have a protective coating 3 3 2 Storage up to 36 months with long term preservation optional 3 3 2 1 General notes for sto...

Страница 26: ...ressure breather valve with transport fixture For storage up to 36 months a VCI anti corrosion agent Volatile Corrosion Inhibitor is added 3 3 2 3 Gearbox completely filled with oil NOTICE Damage to the gearbox caused by incorrect oil quantities Prior to commissioning remove excessive oil until it has the correct oil level Observe the information and procedures for Correcting the oil level Page 43...

Страница 27: ...ormation concerning the installation WARNING Assembly work with the system under load Under load the system can start or reverse in an uncontrolled fashion The entire system must be load free so that there is no danger during this work NOTICE Destruction caused by welding Welding destroys the geared parts and bearings Do not weld on the gearbox The gearbox must not be used as a grounding point for...

Страница 28: ... permissible temperature is exceeded If the geared motor is shut down then this can cause the machine to come to a stop Exercise particular care during mounting and installation The manufacturer cannot be held liable for damage caused by incorrect mounting and installation Make sure that there is sufficient space around the gearbox or geared motor for mounting maintenance and repair On geared moto...

Страница 29: ...8 10 9 12 9 Nm Nm Nm M4 3 4 5 M5 6 9 10 M6 10 15 18 M8 25 35 41 M10 50 70 85 M12 90 120 145 M16 210 295 355 M20 450 580 690 M24 750 1 000 1 200 M30 1 500 2 000 2 400 M36 2 500 3 600 4 200 4 4 Fastening in the case of high shock loads In the case of high shock loads provide additional suitable positive fastenings such as cylindrical taper pins or spring pins NOTICE Do not use spring washers serrate...

Страница 30: ...asured at a standstill If the gearbox is fastened to a concrete foundation use foundation blocks for the appropriate recesses Align and grout the slide rails into the foundation Align the gearbox carefully with the units on the input and output side Take into account the elastic deformation due to operating forces Prevent displacement from external forces due to lateral impacts Use stud bolts or h...

Страница 31: ...Premature wear or material damage due to misalignment Misalignment caused by excessive angular or axis displacement to the connecting shaft ends Ensure precise alignment of the individual components NOTICE Damage caused by improper handling Bearings housing shaft and locking rings are damaged due to improper handling Do not use impacts or knocks to force the input and output elements to be mounted...

Страница 32: ...angement to minimize stress on shafts and bearings due to lateral forces Correct Incorrect a Hub F Force Figure 4 2 Mounting arrangement for low stress on shafts and bearings Procedure 1 Use either benzine or solvent to remove the anti corrosion protection from the shaft ends and flanges or remove the applied protective skin 2 Fit the drive input and output elements to the shafts Fasten the elemen...

Страница 33: ...um radial force can damage the bearings On cylindrical roller bearings in the input unit undershooting the minimum radial force can damage the bearings Prolonged test runs when off load must be kept to a minimum 5 2 Checking the oil level prior to commissioning Check the oil level before commissioning Correct the oil quantity when required Note Checking and changing lubricants Page 43 Siemens AG r...

Страница 34: ...he type of construction diagrams see Mounting positions Page 63 Ventilation Procedure 1 Unscrew the vent plug 2 Seal the gearbox with the vent filter or the pressure breather valve without securing clip You have now replaced the vent filter or pressure breather valve with the vent plug without the securing clip Pressure breather valve with securing clip The pressure breather valve with securing cl...

Страница 35: ...n the event of changes during operation the drive unit must be switched off immediately Determine the cause of the fault using the fault table Page 37 Remedy faults or have faults remedied Check the gearbox during operation for Excessive operating temperature Changes in gear noise Possible oil leakage at the housing and shaft seals ...

Страница 36: ...d weights are low Low speed differentials before and after shifting e g when extending and retracting at low speed into a chain pulled conveyor or similar material handling systems when the clutch is shifted via the shifting guides Figure 6 1 Clutch lever Engaging Move clutch lever towards until stop is reached Disengaging Move clutch lever towards until stop is reached Shift force needed on clutc...

Страница 37: ...e Table 7 1 Faults causes and remedies Faults Causes Remedy Unusual noise on the gearbox Oil level too low Check the oil level Page 43 Foreign objects in the oil irregular noise Checking the oil quality Page 45 Cleaning the gearbox Page 55 Change the oil Page 43 Excessive bearing play and or bearing defective Check the bearing and replace if necessary Defective gearing Check the gearing and replac...

Страница 38: ... air gap and adjust if necessary Inverter parameterization Correct the parameterization Oil escapes Incorrect oil level for the mounting position being used Check the mounting position Page 63 and the oil level Page 43 Gearbox leaks Checking the gearbox for leaks Page 54 Overpressure due to lack of venting Mount the venting as appropriate for the mounting position Page 63 Overpressure due to soile...

Страница 39: ...earbox very dirty Clean the fan cover and surface of the geared motor Page 55 Incorrect oil level for the mounting position being used Check the mounting position Page 63 and the oil level Page 43 Incorrect oil being used e g incorrect viscosity Checking the oil quality Page 45 Oil is too old Check the date of last oil change If required change the oil Page 43 Excessive bearing play and or bearing...

Страница 40: ...eased Check circuit connection of brake Check brake for wear and readjust if necessary Geared motor runs against backstop Change the direction of motor or backstop rotation Gearbox is disengaged Engage the coupling Excessive play at drive input and output Flexible elements worn e g on couplings Replace flexible elements Positive connection disrupted by overload Call Technical Support Increased pla...

Страница 41: ...by Siemens AG may be installed Only qualified personnel may perform the inspection maintenance and servicing work Note the General information and safety instructions Page 9 Table 8 1 Maintenance measures Measure Interval Description of work Monitor and check the gearbox for unusual noises vibrations and changes Daily if possible more frequently during operation Operation Page 35 Check the housing...

Страница 42: ...Page 55 Check the coupling For the first time after 3 months Please refer to the separate operating instructions Complete inspection of the geared motor Every 12 months Inspecting the gearbox Page 56 Check that fastening bolts on gearboxes and add on elements are securely tightened Check that covers and plugs are securely fastened After 3 hours regularly thereafter Checking the tightness of fasten...

Страница 43: ...the position of the sealing elements are determined by the mounting position After removing the oil level screw up to and including gearbox size 128 the oil level may not be more than 3 mm and from gearbox size 148 not more than 5 mm below the recommended filling level NOTICE Damage to the gearbox due to open oil holes Dirt and damaging atmosphere can penetrate through open oil holes Close the gea...

Страница 44: ...vel Figure 8 1 Oil level in the gearbox housing Table 8 2 Minimum and maximum fill levels x Oil level hole d2 Fill level x Tightening torque mm mm Nm G 1 8 14 2 5 10 G 1 4 18 3 10 G 3 8 22 4 25 G 3 4 32 7 50 Procedure 1 Switch off the power supply to the drive unit 2 Unscrew the oil level screw see Mounting positions Page 63 Oil escapes if the maximum fill level is above the plug hole 3 Check the ...

Страница 45: ...ptional To measure the oil level push the oil dipstick into the hole but do not screw it in The oil level must be between the lower and upper min max marks on the oil dipstick If you are using the electric oil level monitoring system the oil must be level with the upper max mark on the oil dipstick Rectify the oil level if necessary and check it again 8 2 5 Checking the oil quality Signs of change...

Страница 46: ...ck it again You have now checked the oil quality 8 2 6 Changing the oil 8 2 6 1 General safety notes for changing the oil NOTICE Impermissible mixing of oils leads to damage Impermissible mixing of oils leads to Darkening Sediment Foam formation Change of the viscosity or reduced corrosion protection Wear protection When changing oil of the same type the residual volume of oil in the gearbox shoul...

Страница 47: ... the gearbox for 15 to 30 minutes to become warm 8 2 6 2 Draining the oil Observe the symbols in the type of construction diagrams see Mounting positions Page 63 Ventilation Oil filling Oil level Oil drain Procedure 1 Switch off the power supply to the drive unit 2 Unscrew the vent plug 3 Unscrew the oil level screw 4 Place a suitable and sufficiently large receptacle underneath the oil drain plug...

Страница 48: ...al oil floats on top This makes the required complete draining of mineral oil from the gearbox extremely difficult Note We recommend that after the second flush the quality of the rinse is checked by an expert analyzer Observe the symbols in the diagrams of the mounting positions Page 63 Ventilation Oil filling Oil drain Procedure 1 After the oil has been drained wipe the gearbox clean of any rema...

Страница 49: ...ity When changing mutually incompatible oils see Flushing the gearbox Page 48 Observe the symbols in the diagrams of the mounting positions Page 63 Ventilation Oil filling Procedure 1 Remove the vent plug or oil filler screw 2 Fill the gearbox with fresh oil Use a filler filter with mesh of max 25 μm 3 Check the oil level 4 Rectify the oil level if necessary and check it again 5 Check the state of...

Страница 50: ...ibol Foodproof Optileb GT 1800 460 If following agreement the gearbox is filled at the factory with special lubricant for the special applications referred to above the lubricant must be shown on the rating plate 8 2 8 Regreasing the roller bearing NOTICE When regreasing do not mix greases with different soap bases Drive units of motor size 160 and above need to be regreased for K2 A and P and dri...

Страница 51: ...b GR UF 1 NSF H1 Biologically degradable for agriculture forestry and water industries 35 C to 40 C BP Biogrease EP 2 8 2 10 Service life of the lubricants Note In case of ambient conditions deviating from normal conditions e g high ambient temperatures high relative humidity aggressive ambient media the intervals between changes should be shorter In such cases contact Technical Support for assist...

Страница 52: ...tions and ambient temperatures no regreasing is required We recommend that the grease in the bearings is also renewed when the oil or shaft sealing rings are replaced 8 2 11 Recommended lubricants The released and recommended lubricants are listed in the table T 7300 http support automation siemens com WW view en 44231658 DANGER Used lubricants only have conditional approval The used lubricants ar...

Страница 53: ...nized and coordinated with one another corresponding to the prevailing operating conditions Contact Technical Support for Change of the operating conditions Change in oil grade Deployment of new shaft seals Note The lubricants used are not at all or only conditionally biodegradable If biologically degradable lubricants are required use only gearbox lubricants with the appropriate classification li...

Страница 54: ...g replacement is necessary 8 4 Checking the gearbox for leaks Note Due to the inherent principle of operation oil mist can escape from a breather valve or labyrinth seal Oil or grease escaping in small quantities from the shaft sealing ring should be regarded as normal during the running in phase of 24 hours operating time If the quantities escaping are significant or leaking continues after the r...

Страница 55: ... the gearbox NOTICE Dust deposits cause higher housing temperatures Dust deposits prevent heat radiation Keep the geared motor free from dirt and dust NOTICE Cleaning with a high pressure cleaning appliance Water can penetrate into the geared motor Seals can become damaged Do not use a high pressure cleaning appliance to clean the geared motor Do not use tools with sharp edges Switch off the power...

Страница 56: ...th class 8 8 10 9 12 9 Nm Nm Nm M4 3 4 5 M5 6 9 10 M6 10 15 18 M8 25 35 41 M10 50 70 85 M12 90 120 145 M16 210 295 355 M20 450 580 690 M24 750 1 000 1 200 M30 1 500 2 000 2 400 M36 2 500 3 600 4 200 8 8 Inspecting the gearbox Carry out a scheduled inspection of the gearbox once a year in accordance with the possible criteria listed in General notes about maintenance work Page 41 Check the gearbox ...

Страница 57: ...ific laws Under German law to allow optimal treatment of the oil 4 VI Used Oil oils with different disposal codes must not be mixed with one another Collect and dispose of used oil in accordance with regulations Remove oil spillages immediately with an oil binding agent in compliance with environmental requirements Dispose of the housing parts gears shafts and roller bearings of the geared motor a...

Страница 58: ...Disposal BA 2515 58 Operating Instructions 10 2016 A5E38123453A RS AB ...

Страница 59: ...F 38 K4 100 Gearbox type B Monorail conveyor H Mounting F Size 38 Input unit K4 for motor size 100 Table 10 2 Type designation code Gearbox type C Helical worm gearbox B Bevel helical gearbox two stage K Bevel helical gearbox three stage Mounting F Flange version A type B Foot flange mounted version Z Housing flange C type Input unit K4 Short lantern with clamp connection for connecting an IEC mot...

Страница 60: ...ndicates the data for the entire drive In certain cases separate rating plates are mounted on the gearbox and the motor Figure 10 1 Rating plate example 1 Data matrix code 2 Applicable standard 3 Factory serial number FDU Siemens AG Bahnhofstr 40 72072 Tübingen Germany 4 CE marking or other marking if required 5 Article number 6 Type designation 7 Mounting position 8 Degree of protection acc to IE...

Страница 61: ...27 Symbols IEC 60617 2 brake 28 Rated braking torque TBr Nm 29 Brake supply voltage U V Frequency 1 30 Rated frequency f Hz 31 Rated voltage range U V 32 Circuit graphical symbols as per DIN EN 60617 Part 6 IEC 60617 6 33 Rated current IN A 34 Power factor cos φ 35 Rated output PN kW 36 Duty type 37 Efficiency class marking according to IEC 60034 30 38 Rated speed nN rpm Frequency 2 39 Rated frequ...

Страница 62: ...o DIN EN ISO 1680 with meters to DIN IEC 60651 The noise depends mainly on speed output and transmission ratio Figure 10 2 Sound energy level MOTOX geared motors The sound pressure levels of MOTOX geared motors fall mainly in the dark colored part of the range Gearboxes with very small transmission ratios high output and high input speed may fall into the cross hatched part If repeat measurements ...

Страница 63: ... the type of construction specified on the rating plate This ensures that the correct quantity of lubricant is provided Note Depending on operating mode e g travel on an incline no ventilation is provided Explanation of symbols in type of design graphics Ventilation Oil level Oil drain A B Position of output shaft V Gearboxes of size 38 are fitted as standard with a screw plug at point V ventilati...

Страница 64: ...Technical specifications 10 5 Mounting positions BA 2515 64 Operating Instructions 10 2016 A5E38123453A RS AB 10 5 1 Helical worm gearbox CHF28 Figure 10 3 Designs for CHF28 ...

Страница 65: ...ecifications 10 5 Mounting positions BA 2515 Operating Instructions 10 2016 A5E38123453A RS AB 65 10 5 2 Bevel helical gearboxes BHF38 BHB38 Figure 10 4 Designs for BHF38 BHB38 Figure 10 5 Position of output shaft ...

Страница 66: ...cations 10 5 Mounting positions BA 2515 66 Operating Instructions 10 2016 A5E38123453A RS AB 10 5 3 Helical worm gearboxes CHZ48 CHF48 CHF68 Figure 10 6 Designs for CHZ48 CHF48 CHF68 Figure 10 7 Position of output shaft ...

Страница 67: ...ations 10 5 Mounting positions BA 2515 Operating Instructions 10 2016 A5E38123453A RS AB 67 10 5 4 Bevel helical gearboxes KHZ48 KHF48 KHF68 Figure 10 8 Designs for KHZ48 KHF48 KHF68 Figure 10 9 Position of output shaft ...

Страница 68: ...r lubricant storage and procurement The precise values depend on the number of stages and transmission ratio of the gearbox Check the oil level before commissioning Table 10 3 Oil quantities l for monorail conveyor gearboxes Type Type of construction B5 01 B5 03 B5 02 B5 00 V1 00 V3 00 CHF28 0 4 0 6 0 8 0 45 0 8 0 6 BHF38 BHB38 0 5 1 2 1 6 1 1 1 3 1 0 CHZ48 CHF48 1 4 2 0 2 1 1 9 1 5 1 8 CHF68 3 0 ...

Страница 69: ...by Siemens AG If you do not use original spare parts and original accessories Siemens AG excludes every liability and warranty Siemens AG accepts the warranty only for original spare parts Note that special manufacturing and delivery specifications often apply to individual components All spare parts offered by Siemens AG are state of the art and conform to the latest legal regulations Please supp...

Страница 70: ...1 2 Spare parts lists BA 2515 70 Operating Instructions 10 2016 A5E38123453A RS AB 11 2 Spare parts lists 11 2 1 Bevel helical gearboxes BHF38 BHB38 KHF48 KHF46 KHZ48 Figure 11 2 Bevel helical gearboxes BHF38 BHB38 ...

Страница 71: ...Spare parts 11 2 Spare parts lists BA 2515 Operating Instructions 10 2016 A5E38123453A RS AB 71 Figure 11 3 Bevel helical gearboxes KHF48 KHF68 KHZ48 ...

Страница 72: ...1 Locking ring 210 Nut 032 Supporting disk shim 220 Seal 050 Housing cover 301 Plug in pinion 051 Screw 305 Helical gear wheel 055 Seal 320 Bevel gear pair 101 Output shaft 331 Parallel key 105 Parallel key 335 Locking ring 118 Plug sealing cap 401 Screw plug 130 Bearing 131 Shim 132 Spacer ring 135 Locking ring 140 Bearing 144 Shim 146 Locking ring 160 Shaft sealing ring 173 Clutch element 174 Co...

Страница 73: ...Spare parts 11 2 Spare parts lists BA 2515 Operating Instructions 10 2016 A5E38123453A RS AB 73 11 2 2 Helical worm gearboxes CHF28 CHF48 CHF68 CHZ48 ...

Страница 74: ...ocking ring 032 Supporting disk shim 308 Locking ring 035 Sealing cap 309 Supporting disk shim 040 Bearing 312 Shaft sealing ring 050 Housing cover 313 Oil splasher 051 Screw 340 Pinion shaft 055 Seal 345 Helical gear wheel 101 Output shaft 351 Shim 105 Parallel key 401 Screw plug 118 Sealing cap 130 Bearing 135 Locking ring 140 Bearing 146 Locking ring 160 Shaft sealing ring 173 Clutch element 17...

Страница 75: ...Spare parts 11 2 Spare parts lists BA 2515 Operating Instructions 10 2016 A5E38123453A RS AB 75 ...

Страница 76: ...1 Supporting disk shim 220 Seal 132 Spacer ring 225 Seal 135 Locking ring 301 Plug in pinion 140 Bearing 305 Helical gear wheel 141 Supporting disk shim for CHF68 331 Parallel key 144 Supporting disk shim 335 Locking ring 145 Locking ring 340 Worm shaft 146 Locking ring 345 Worm wheel 160 Shaft sealing ring 346 Parallel key 170 Clutch hub 430 Eyebolt 171 Supporting disk shim for CH 48 172 Locking ...

Страница 77: ...vant for the product are not listed 1 1 1 1 2 1 1 3 1 1 5 1 2 4 4 1 2 6 1 3 1 1 3 2 1 3 3 1 3 4 1 3 6 1 3 8 1 1 4 1 1 4 2 1 4 2 1 1 5 1 1 5 2 1 5 4 1 5 5 1 5 6 1 5 8 1 5 9 1 5 10 1 5 11 1 5 13 1 5 15 1 6 1 1 6 2 1 7 1 1 7 1 1 1 7 2 1 7 3 1 7 4 1 7 4 1 1 7 4 2 1 7 4 3 When developing and manufacturing the above designated product the following standards and specifications were applied EN ISO 12100 ...

Страница 78: ...Declaration of Incorporation BA 2515 78 Operating Instructions 10 2016 A5E38123453A RS AB ...

Страница 79: ......

Страница 80: ......

Отзывы: