background image

60/61

Building Technologies

Basic Documentation LMO39…

CC1P7154en

15.03.2018

List of figures

Figure 1: Correct wiring of neutral conductors! ............................................................... 7

Figure 2: Connection display and operating unit AZL2... ................................................ 8

Figure 3: Connection BCI OCI410 .................................................................................. 9

Figure 4: Connection interface OCI400... ....................................................................... 9

Figure 5: Example: 1-/2-stage oil burner ....................................................................... 13

Figure 6: Measuring circuit for detector current ............................................................ 22

Figure 7: Diagnostics of cause of fault .......................................................................... 27

Figure 8: Internal diagram ............................................................................................. 28

Figure 9: Control sequence ........................................................................................... 29

Figure 10: Dimensions LMO39... .................................................................................. 31

Figure 11: Dimensions LMO39... with AGK20... ........................................................... 32

Figure 12: Description of the unit/display and buttons .................................................. 33

Figure 13: Meaning of display ....................................................................................... 34

Figure 14: Assignment of levels .................................................................................... 37

Figure 15: Info level ...................................................................................................... 38

Содержание LMO39 Series

Страница 1: ...P7154en 15 03 2018 Building Technologies LMO39 Burner controls Basic Documentation The LMO39 and this Basic Documentation are intended for use by OEMs which integrate the burner controls in their products ...

Страница 2: ...ument type LMO39 Burner control CC1P7154 Data Sheet ACS410 PC software J7352 Software Documentation OCI400 Optical Interface N7614 Data Sheet OCI410 Optical Interface N7616 Data Sheet QRB1 QRB3 Photo Resistive Flame Detectors N7714 Data Sheet QRB4 Yellow flame detector N7720 Data Sheet QRC1 Blue flame Detectors N7716 Data Sheet ...

Страница 3: ...description of functions 12 2 1 Use 12 2 2 Features 12 3 Basic unit 13 3 1 Time parameters 13 3 2 Indication and diagnostics 14 3 2 1 Communication parameterization 14 4 Type summary other types on request 15 5 Accessories 17 5 1 Connection accessories for small burner controls 17 5 2 Flame detectors 17 5 3 Service tools 18 5 4 Display and Operating Units 18 5 5 Others 19 6 Technical data 20 6 1 G...

Страница 4: ...ts and outputs internal connection diagram 28 10 2 Control sequence 29 11 Legend 30 12 Dimensions 31 12 1 LMO39 31 12 2 LMO39 with lockout reset button extension AGK20 32 13 Operation via the AZL2 33 13 1 Description of the unit display and buttons 33 13 2 Meaning of symbols on the display 34 13 3 Special functions 34 13 3 1 Manual lockout 34 14 Operation 35 14 1 Normal display 35 14 1 1 Display i...

Страница 5: ... of service values 44 17 2 1 Error history 44 17 2 2 Mains voltage 44 17 2 3 Intensity of flame 44 17 2 4 End of service level 44 18 Parameter level 45 18 1 Entering the password 46 18 2 Changing the heating engineer s password 48 18 3 Changing the OEM s password 50 19 Operating variants of the parameters 51 19 1 Parameters without index with direct display 51 19 1 1 Example of parameter 266 preig...

Страница 6: ...pointed objects If this is not observed there is a risk of loss of safety functions and a risk of electric shock Fall or shock can adversely affect the safety functions Such units must not be put into operation even if they do not exhibit any damage If this is not observed there is a risk of loss of safety functions and a risk of electric shock Each time work has been carried out mounting installa...

Страница 7: ...fuel valves etc the burner control must not be connected To prevent mixup of different types of burner controls the LMO39 must always be used in connection with grey plug in bases AGK11 6 Make absolutely certain that the live conductor for the control thermostat or pressurestat is tapped after the pressure switch and the safety limit thermostat to be connected to terminal 7 see Connection diagram ...

Страница 8: ...necessarily be met Do not lay the signal cable AGV50 from the LMO39 to the AZL2 together with other cables especially high voltage ignition cable Service operation with a longer signal cable from LMO39 to AZL2 or from LMO39 to OCI410 If a longer signal cable is required for service work for example short time 24 hours note that above usage under the burner hood no longer applies and for this reaso...

Страница 9: ...OCI400 without other extension to the interface at your PC follow the example design below LMO39 OCI400 7154z01e 0212 ACS410 PC software RS232 Figure 4 Connection interface OCI400 1 6 Electrical connection of flame detectors It is important to achieve practically disturbance and loss free signal transmission Never run detector cables together with other cables Line capacitance reduces the magnitud...

Страница 10: ...nt These data can be printed out with the help of the PC software ACS410 for example or must be written down The documentation must be checked by the expert and then kept in a safe place Warning On the OEM access level of the LMO39 it is possible to make parameter settings that differ from application standards When setting the parameters it must be made certain that the application will run safel...

Страница 11: ... control devices for burners and appliances burning gaseous and or liquid fuels General requirements DIN EN 13611 Automatic electrical controls for household and similar use Part 2 5 Particular requirements for automatic electrical burner control systems DIN EN 60730 2 5 The relevant valid edition of the standards can be found in the declaration of conformity Β Note on DIN EN 60335 2 102 Household...

Страница 12: ...ecified in the Terms of Delivery 1 10 Disposal notes The unit contains electrical and electronic components and must not be disposed of together with domestic waste Local and currently valid legislation must be observed 2 Makeup of system description of functions 2 1 Use LMO39 are used for the startup and supervision of 1 or 2 stage oil burners in intermittent operation Yellow burning flames are s...

Страница 13: ...elated digital inputs and outputs of the system are monitored by means of a contact feedback network The display and operating unit AZL2 is designed for direct connection to the LMO39 The LMO39 is operated and parameterized via the AZL2 or with the help of the OCI410 ACS410 Burner capacity unlimited thermal output on startup 120 kW 3 repetitions in the event of loss of flame during operation can b...

Страница 14: ...some manufacturers 3 2 1 Communication parameterization The display and operating unit AZL2 with LCD and menu driven operation facilitates enable a simple operation parameterization and targeted diagnostics via menu driven operation When making diagnostics the display shows operating states the type of error and the startup counter IBZ Passwords protect the different parameter levels of the burner...

Страница 15: ...5 min s t3 P266 min s t3n P295 approx s t4 P270 approx s t8 P274 min s tow P296 approx s BPZ LMO39 100C1 LMO39 100C1 Requirement 2 5 5 0 30 4 5 5 0 600 BPZ LMO39 100C2 LMO39 100C2 Requirement 2 5 5 0 30 4 5 5 0 600 Setting range Min 0 0 0 5 6 0 0 0 0 Max 14 994 1237 1237 5 6 14 994 1237 1237 1237 Increment s 0 147 4 851 4 851 0 147 4 851 4 851 4 851 Factory setting 4 557 0 29 106 5 6 4 410 4 851 0...

Страница 16: ...time shall be set to 30 seconds Special case here The preignition time is made up of parameter 266 and a time of 5 6 seconds that cannot be parameterized Calculation 30 seconds 7 5 6 seconds 32 1 seconds 5 6 seconds 26 5 seconds Value to be parameterized parameter 266 Must be equal to or greater than the calculated value e g 29 106 seconds Example Safety time shall be set to 5 seconds Calculation ...

Страница 17: ...to burner system grey Refer to Data Sheet N7201 Cable holder AGK66 Article no BPZ AGK66 For plug in base AGK11 Refer to Data Sheet N7201 Cable holder AGK65 Article no BPZ AGK65 For plug in base AGK11 Refer to Data Sheet N7201 5 2 Flame detectors Photo resistive detector QRB1 QRB3 See Data Sheet N7714 Yellow flame detector QRB4 See Data Sheet N7720 Blue flame detector QRC See Data Sheet N7716 Front...

Страница 18: ...ng and recording setting parameters on site with the help of the ACS410 software package Refer to Data Sheet N7616 PC software ACS410 Article no BPZ ACS410 For parameterization and visualization to burner controls Refer to software documentation J7352 5 4 Display and Operating Units Display and operating unit AZL21 00A9 Article no BPZ AZL21 00A9 Detached unit choice of mounting methods 8 digit LCD...

Страница 19: ... 5 Others Extension of lockout reset button AGK20 Signal cable AGV50 100 Article no BPZ AGV50 100 For AZL2 with RJ11 connector cable length 1 m pack of 10 PTC resistor AGK25 Article no BPZ AGK25 AC 230 V As a burden for terminal 3 for burners without fan motor such as atmospheric gas burners ...

Страница 20: ...F m laid separately QRB4 Max 3 m at 100 pF m laid separately QRC Max 10 m at 100 pF m laid separately Remote reset Max 20 m at 100 pF m laid separately Detector cable Max 10 m at 100 pF m laid separately Control thermostat pressurestat Max 20 m at 100 pF m laid separately Limit thermostat pressure switch Max 20 m at 100 pF m laid separately Alarm terminal 10 Max 20 m at 100 pF m laid separately Po...

Страница 21: ...60 721 3 2 Climatic conditions Class 2K3 Mechanical conditions Class 2M2 Temperature range 20 70 C Humidity 95 r h Operation DIN EN 60 721 3 3 Climatic conditions Class 3K3 Mechanical conditions Class 3M3 Temperature range 20 60 C Humidity 95 r h Installation altitude Max 2 000 m above sea level Warning Condensation formation of ice and ingress of water are not permitted If this is not observed th...

Страница 22: ...al lamp LED steady on QRB 45 µA 45 µA QRC 45 µA 45 µA Table 4 Detector data signal lamp LED The values given in the table above only apply under the following conditions Mains voltage depending on execution AC 120 V or AC 230 V Ambient temperature 23 C QRB QRC 12 11 LMO bl µA DC QRB 7130v01 0700 sw 12 11 LMO 1 sw bl br µA DC QRC1 7130v02 0700 Legend µA DC DC microammeter with an internal resistanc...

Страница 23: ... 120 V Safety shutdown from the operating position takes place should mains voltage drop below about AC 165 V at UN AC 230 V Restart is initiated when mains voltage exceeds about AC 175 V at UN AC 230 V 7 3 Controlled intermittent operation After no more than 24 hours of continuous operation the burner control initiates automatic controlled shutdown followed by a restart 7 4 Time supervision oil p...

Страница 24: ...n alterable lockout at the end of safety time blink code 2 Loss of flame during operation Factory setting Non alterable lockout blink code 7 Can be parameterized Max 3 repetitions Oil preheaters release contact does not close within 10 minutes Non alterable lockout blink code 8 Release contact of the oil preheater opens 5 times during prepurging Non alterable lockout Table 5 Non alterable lockout ...

Страница 25: ...No repetition in the event of loss of flame during operation Ε Note In the event of repetition due to loss of flame during operation a flame signal must be produced at the end of the safety time if not the unit will initiate a non alterable lockout 8 PC software ACS410 8 1 Duty of PC software The PC software is a component of the LMO39 system and serves primarily as an operator module for the foll...

Страница 26: ...ace OCI400 OCI410 and the PC software ACS410 or flue gas analyzers of different makes 3 On the display of the AZL2 or BCI OCI410 and PC software ACS410 Visual diagnostics In normal operation the different operating states are indicated in the form of color codes according to the color code table given below 9 2 Operational status indication During startup operation indication takes place according...

Страница 27: ...e following sequence activates the diagnostics of the cause of fault EK 3 s EK 3 s Interface diagnostics PC analyzer EK 3 s 7106z04e 1011 Reset On Visual diagnostics Lockout position Lockout position Lockout position Figure 7 Diagnostics of cause of fault Error code table of multicolor signal lamp LED Red blink code of signal lamp LED Alarm at terminal 10 Possible cause 2 blinks ON No establishmen...

Страница 28: ... Fault status signal alarm at terminal 10 according to the error code table The diagnostics of the cause of fault is quit and the burner switched on again by resetting the burner control Press the lockout reset button for about 1 second 3 seconds 10 Inputs and outputs internal connection diagram control sequence of LMO39 100 10 1 Inputs and outputs internal connection diagram SB N M Z V1 AL Si OW ...

Страница 29: ...d01e 0312 R OW V2 Z FS No 1 Function inputs Operation unit parameter number LED permanent LED flashing tw t3 t3n t8 Standby Startup Operation Shutdown Function outputs SB W No 7 No 8 No 3 No 4 No 3 No 5 No 6 No 11 12 Phase number AZL2 21 30 74 10 M V1 OH t1 TSA t4 Terminal Terminal 296 265 266 274 42 AL No 10 40 295 270 267 280 oP P2 38 5 6s oP P1 tfz tow Figure 9 Control sequence ...

Страница 30: ...age alarm BCI Communication interface EK Lockout reset button internal EK2 Remote lockout reset button FS Flame signal FSV Flame signal amplifier K1 4 Internal relay kbr Jumper M Fan motor OH Oil preheater OW Release contact of oil preheater QRB1 Photo resistive detector QRB3 Photo resistive detector QRB4 Yellow flame detector QRC Blue flame detector bl blue br brown sw black R Control thermostat ...

Страница 31: ...ologies Basic Documentation LMO39 CC1P7154en 12 Dimensions 15 03 2018 12 Dimensions 12 1 LMO39 Dimensions in mm 5 2 53 9 88 91 41 6 47 2 62 5 7106m01 0405 22 9 59 1 53 9 37 4 Figure 10 Dimensions LMO39 Plug in base AGK11 6 ...

Страница 32: ...39 CC1P7154en 12 Dimensions 15 03 2018 12 2 LMO39 with lockout reset button extension AGK20 Dimensions in mm 7101m03 1108 Figure 11 Dimensions LMO39 with AGK20 Designation Length L in mm AGK20 19 19 AGK20 43 43 AGK20 55 55 Table 8 Dimensions table AGK20 ...

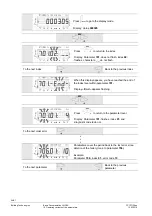
Страница 33: ...arameter setting mode P press F and A simultaneously reset Info and Enter button For navigation in info and service mode For selection symbol flashing press button for 1 second For changing to a lower menu level press button for 1 3 seconds For changing to a higher menu level press button for 3 8 seconds For changing to the normal display press button for 8 seconds Enter in parameter setting mode ...

Страница 34: ...atus message Unit of current display Bild 2e 0807 Figure 13 Meaning of display 13 3 Special functions 13 3 1 Manual lockout reset plus any other button Press reset together with any other button The basic unit switches instantly to the lockout position no matter what the operating position The display shows the fault status message Example Error code 10 See chapter Error code list The reset must b...

Страница 35: ...l h 7106z13 1205 The unit is in Phase 30 The controller calls for heat The bar below the symbol appears The individual program phases and controlled components are displayed in accordance with the program sequence 14 1 2 2 List of phase displays Phase Function Ph1 Undervoltage Ph2 Fault without lockout Ph4 Extraneous light on burner startup Ph10 Home run OFF Standby Ph21 Heating up time oil prehea...

Страница 36: ...he bar under the fault status message appears The unit is in the lockout position The current error code is displayed see Blink code table Example Error code 7 14 1 4 2 Reset reset 1 s When pressing reset for 1 second rESEt appears on the display When the button is released the basic unit will be reset reset 3 s P V h min s Bild 21 0707 P V h min s Bild 22 0707 When pressing reset for 3 seconds th...

Страница 37: ...s The various levels can be accessed via different button combinations The parameter level can only be accessed by entering a password P 7105z10e 0716 Standby VSD A F 1 s P Change to operating mode ESC P Info level P Service level P Parameter level P Operating mode 8 s or or automatic return after 120 s 1 s 3 s 8 s 8 s Figure 14 Assignment of levels ...

Страница 38: ... the previous parameter In place of the button you can also press reset for 1 second Β Note You can press ESC or reset for 8 seconds to return to the normal display Β Note P V h min s Bild 27e 0807 Parameter Parameter value Figure 15 Info level No change of value on the info level If the display shows _ _ together with the parameter the value may consist of more than 5 digits When pressing reset f...

Страница 39: ...ple 102 _ _ reset 1 3 s P V h min s Bild 30 0707 Pressing the reset button 1 3 seconds and releasing it when _ _ flashes displays the identification date creation date of the program sequence DD MM YY Example Identification date 03 11 05 reset or ESC P V h min s Bild 29 0707 Press reset or ESC to return to the display of parameters To the next parameter 16 2 2 Identification number P V h min s Bil...

Страница 40: ...le 113 _ _ reset 1 3 s P V h min s Bild 162 1107 Pressing the reset button 1 3 seconds and releasing it when _ _ flashes displays the burner ID Default setting burnEr Id Β Note The burner ID can only be changed with the help of the PC software ACS410 and only on parameter level reset or ESC P V h min s Bild 32 0707 Press reset or ESC to return to the display of parameters To the next parameter Bac...

Страница 41: ...Pressing the reset button 1 3 seconds and releasing it when _ _ flashes displays the number of startups can be reset Example 000036 reset 3 8 s P V h min s Biod 73 0707 Press reset for 3 8 seconds to go to the range that can be changed Digit 0 flashes reset P V h min s Bild 163 1107 By pressing reset the number of startups is reset to 0 Display 000000 reset or ESC P V h min s Bild 34 0707 Press re...

Страница 42: ... reset or ESC to go back to the display of parameters To the next parameter Back to the previous parameter 16 2 6 End of info level P V h min s Bild 38 0707 When this display appears you have reached the end of the info level The display shows End flashing To the first parameter on the info level To the final parameter on the info level ESC or reset 8 s P V h min s Bild 22 0707 Press ESC or the re...

Страница 43: ... history Β Note When on the service level you can press or to display the next or the previous parameter Instead of pressing you can also press reset for 1 second Β Note Press ESC or reset for 8 seconds to return to the normal display 17 1 Display of the service level reset P V h min s Bild 21 0707 Press reset for 3 seconds until SEr appears When releasing reset you are on the service level ...

Страница 44: ...Back to the previous parameter 17 2 3 Intensity of flame P V h min s Bild 41 0707 The display shows parameter 954 flashing On the right the intensity of the flame is displayed as a microamperes µA Example 954 0 0 End of service level End Back to the previous parameter 17 2 4 End of service level P V h min s Bild 38 0707 When this display appears you have reached the end of the service level The di...

Страница 45: ...fe burner operation will be warranted The OEM which made the settings is always responsible for the parameters their settings and compliance of the respective application with the relevant national and international standards and safety regulations such as EN 676 EN 267 EN 1643 EN 746 2 etc If this is not observed there is a risk of loss of safety functions Siemens its suppliers and other Group Co...

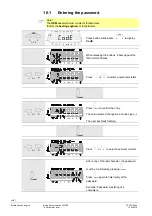
Страница 46: ...ion VSD A F to display CodE When releasing the buttons 6 bars appear the first of which flashes or Press or to select a numeral or letter reset or Press reset to confirm the entry The value entered changes to a minus sign The next bar starts flashing reset or Press or to select a numeral or letter reset After entry of the last character the password must be confirmed by pressing reset Press reset ...

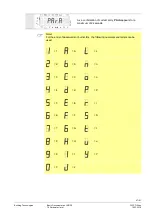
Страница 47: ...eter level 15 03 2018 P V h min s Bild 48 0707 As a confirmation of correct entry PArA appears for a maximum of 2 seconds Β Note For the entry of passwords or burner IDs the following numerals and letters can be used 1 A L 2 b n 3 C o 4 d P 5 E r 6 F S 7 G t 8 H u 9 I Y 0 J ...

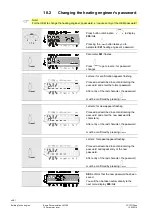
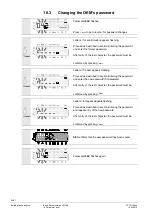
Страница 48: ... described in section Entering the password and enter the former password After entry of the last character the password must be confirmed by pressing reset reset Letter n for new appears flashing Proceed as described in section Entering the password and enter the new password 4 characters After entry of the last character the password must be confirmed by pressing reset reset Letter r for repeat ...

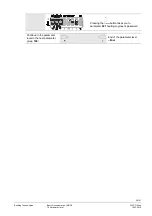
Страница 49: ...Documentation LMO39 CC1P7154en 18 Parameter level 15 03 2018 Pressing the reset button takes you to parameter 041 heating engineer s password Continue in the parameter level to the next parameter group 100 End of the parameter level End ...

Страница 50: ...e password must be confirmed by pressing reset reset Letter n for new appears flashing Proceed as described in section Entering the password and enter the new password 5 characters After entry of the last character the password must be confirmed by pressing reset reset Letter r for repeat appears flashing Proceed as described in section Entering the password and repeat entry of the new password Af...

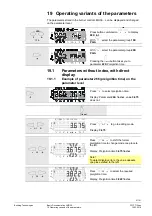
Страница 51: ... 226 Preignition time 19 1 Parameters without index with direct display 19 1 1 Example of parameter 266 preignition time on the parameter level Press to select preignition time Display Parameter 266 flashes value 3 675 does not reset or P V h min s Bild 167 1107 Press or to go to editing mode Display 3 675 or P V h min s Bild 168 1107 Press or to shift the former preignition time to change mode on...

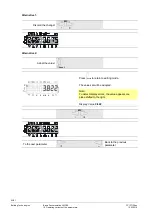
Страница 52: ...ternative 1 Discard the change ESC Alternative 2 Adopt the value reset P V h min s Bild 170 1107 Press reset to return to editing mode The value set will be adopted Note To detect display errors the value appears one place shifted to the right Display Value 3 822 ESC To the next parameter Back to the previous parameter ...

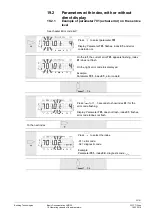
Страница 53: ...and error code 4 do not P V h min s Bild 177 1107 On the left the current error 701 appears flashing index 01 does not flash On the right error code 4 is displayed Example Parameter 701 index 01 error code 4 reset1 3 s P V h min s Bild 178 1107 Press reset for 1 3 seconds to show index 01 for the error code flashing Display Parameter 701 does not flash index 01 flashes error code 4 does not flash ...

Страница 54: ... Back to the previous index P V h min s Bild 180 1107 When this display appears you have reached the end of the index level within parameter 701 Display End appears flashing ESC P V h min s Bild 177 1107 Press ESC to return to the parameter level Display Parameter 701 flashes index 01 and diagnostic code 4 do not To the next older error P V h min s Bild 182 1107 Parameters cover the period back to...

Страница 55: ...on equipment Loc 3 Free Free Loc 4 Extraneous light Extraneous light on burner startup Loc 5 Free Free Loc 7 Loss of flame Loss of flame during operation too frequent limitation of repetitions Defective or soiled fuel valves Defective or soiled flame detector Poor adjustment of burner Loc 8 Oil preheater Time supervision oil preheater Oil preheater failed 5 times during prepurging Loc 9 Free Free ...

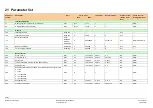
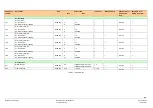
Страница 56: ...Info OEM via ACS410 164 Number of startups Resettable 0 999999 1 0 Info Info 166 Total number of startups Read only 0 999999 1 0 Info Burner control 265 Prepurge time Edit 0 s 1237 005 s 4 851 s 0 s SO OEM 266 Preignition time Edit 0 s 1237 005 s 4 851 s 29 106 s SO OEM 267 Safety time Edit 0 s 14 994 s 0 147 s 4 557 s SO OEM 270 Interval Flame ON until fuel valve 2 BV2 release Edit 0 s 1237 005 s...

Страница 57: ...nly 2 0 15 999999 1 1 Service 703 Error history former 2 01 Error code 02 Startup counter reading Read only 2 0 15 999999 1 1 Service 704 Error history former 3 01 Error code 02 Startup counter reading Read only 2 0 15 999999 1 1 Service 705 Error history former 4 01 Error code 02 Startup counter reading Read only 2 0 15 999999 1 1 Service 706 Error history former 5 01 Error code 02 Startup counte...

Страница 58: ...ins voltage 44 Manual lockout 34 Meaning of symbols on the display 34 Menu drive operation 37 Normal display 35 Number of startups resettable 41 Operating variants of the parameters 51 Operation 35 Operation via the AZL2 33 Parameter level 45 Parameters with index with or without direct display 53 Parameters without index with direct display 51 Reset 36 Service level 43 Special functions 34 Total ...

Страница 59: ...ist 56 S Safety notes 6 Commissioning notes 10 Connection BCI via integrated jack RJ11 8 Disposal notes 12 Electrical connection of flame detectors 9 Engineering notes 6 Installation notes 7 Life cycle 12 Mounting notes 6 Standards and certificates 11 Warning notes 6 Service tools 18 Supplementary documentation 2 T Technical data 20 Environmental conditions 21 Flame supervision with QRB or QRC 22 ...

Страница 60: ...onnection interface OCI400 9 Figure 5 Example 1 2 stage oil burner 13 Figure 6 Measuring circuit for detector current 22 Figure 7 Diagnostics of cause of fault 27 Figure 8 Internal diagram 28 Figure 9 Control sequence 29 Figure 10 Dimensions LMO39 31 Figure 11 Dimensions LMO39 with AGK20 32 Figure 12 Description of the unit display and buttons 33 Figure 13 Meaning of display 34 Figure 14 Assignmen...

Страница 61: ...data signal lamp LED 22 Table 5 Non alterable lockout 24 Table 6 Error code table 26 Table 7 Error code table 27 Table 8 Dimensions table AGK20 32 Table 9 List of phase 35 Table 10 Error code list 55 Table 11 Parameter list 57 Siemens AG Building Technologies Berliner Ring 23 D 76437 Rastatt Tel 49 7222 598 279 Fax 49 7222 598 269 www siemens com 2018 Siemens AG Building Technologies Subject to ch...

Отзывы: