background image

11

Cleaning the self-cleaning surfaces in the 

oven

The rear panel is coated with a self-cleaning ceramic layer. This 

coating absorbs and dispels splashes from baking and 

roasting while the oven is in operation. You will obtain a better 

result, the higher the temperature and the longer the oven is in 

operation. 
If soiling is still visible after several uses, proceed as follows:

1.

First, clean the enamel surfaces in the oven.

2.

Then set 

:

 3D hot air or 

%

 top and bottom heating.

3.

Heat the empty oven for approx. 2 hours at maximum 

temperature.

The ceramic coating is regenerated. Brownish and black 

residues can then be removed with water and  a soft sponge.
Slight colour variations of the coating have no effect on the self-

cleaning function.

Caution!

Never use abrasive cleaners. This could scratch or damage 

the highly porous surface coating.

Do not use oven cleaner on self-cleaning surfaces. If oven 

cleaner is accidentally applied to these surfaces, wipe it away 

immediately with a sponge and plenty of water.

Detaching and attaching the oven door

For cleaning purposes and to remove the door panels, you can 

detach the oven door.
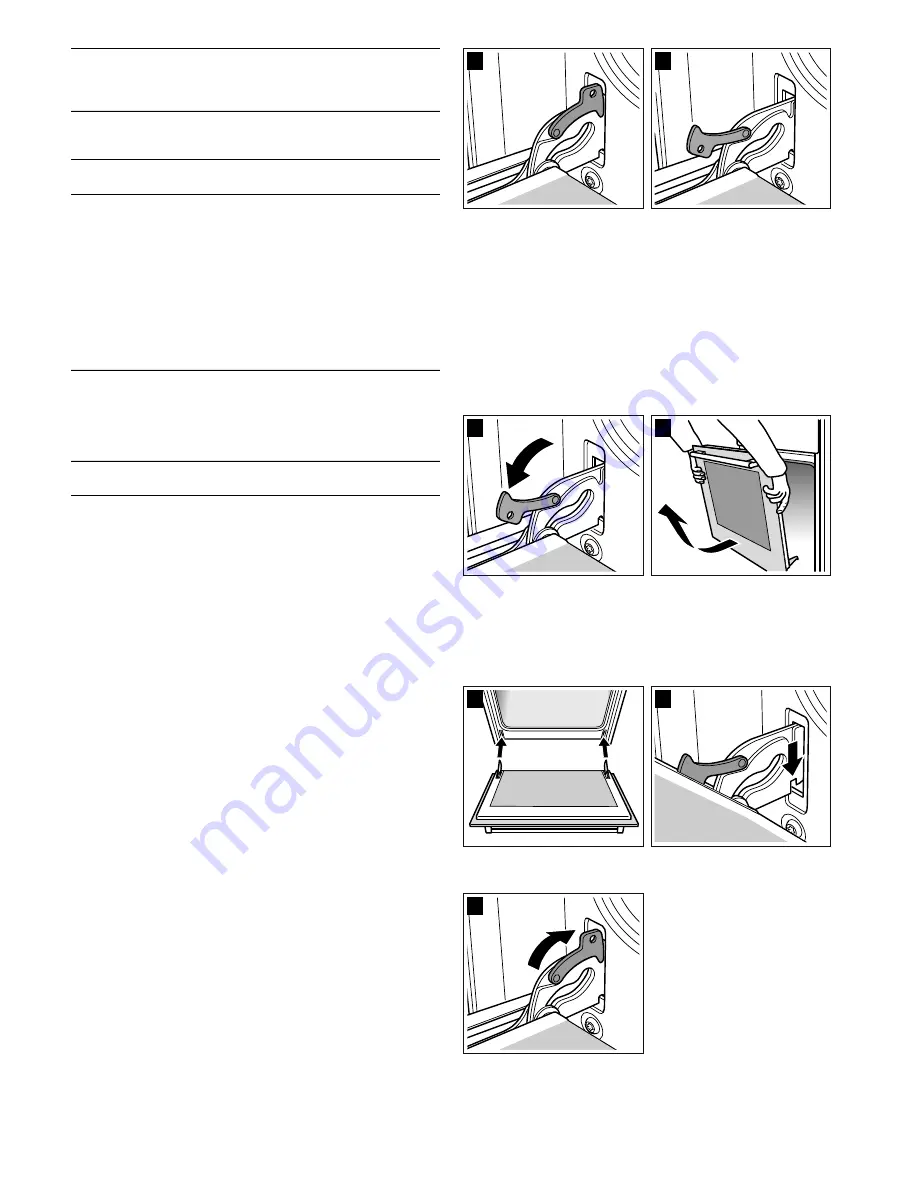
The oven door hinges each have a locking lever. When the 

locking levers are closed (figure A), the oven door is secured in 

place. It cannot be detached. When the locking levers are open 

in order to detach the oven door (Fig. B), the hinges are locked. 

They cannot snap shut.

Risk of injury!

Whenever the hinges are not locked, they snap shut with great 
force. Ensure that the locking levers are always fully closed or, 
when detaching the oven door, fully open.

Detaching the door

1.

Open the oven door fully.

2.

Fold up the two locking levers on the left and right (figure A).

3.

Close the oven door as far as the limit stop. With both hands, 

grip the door on the left and right-hand sides. Close the door 

a little further and pull it out (figure B).

Attaching the door

Reattach the oven door in the reverse sequence to removal.

1.

When attaching the oven door, ensure that both hinges are 

inserted straight into the opening (figure A).

2.

The notch on the hinge must engage on both sides (figure B).

3.

Fold back both locking levers (figure C). Close the oven 

door.

Risk of injury!

If the oven door falls out accidentally or a hinge snaps shut, do 
not reach into the hinge. Call the after

­

sales service.

Oven floor, 

ceiling and 

side panels

Warm soapy water or a vinegar solution. If 

there are heavy deposits of dirt, only use oven 

cleaner on cooled surfaces. Never apply to 

the back panel.

Glass cover 

for the oven 

light

Wipe with warm soapy water and a cloth. Dry 

with a soft cloth.

Equipment

Soak in warm soapy water. Clean with a brush 

or sponge.

Aluminium 

baking tray 

(optional)

Do not clean in the dishwasher. Never use 

oven cleaner. To prevent scratches, never 

touch the metal surfaces with a knife or a sim-

ilar sharp object. Clean horizontally with some 

washing-up liquid and a damp glass cleaning 

cloth or a microfibre cloth – do not press too 

hard. Dry with a soft cloth. Do not use any 

abrasive materials, scouring sponges or 

rough cleaning cloths. Dry with a soft cloth. 

Do not use any abrasive materials, scouring 

sponges or rough cleaning cloths. Otherwise, 

you may scratch the surface

Childproof 

lock (optional)

If a childproof lock has been fitted on the 

oven door, it must be removed before clean-

ing. Soak all plastic parts in warm soapy 

water and clean with a sponge. Dry with a soft 

cloth. If it is very dirty, the childproof lock will 

not work properly.

Hob

Refer to the hob instruction manual for infor-

mation about care and cleaning.

%

$

%

$

%

$

&

Содержание HB539.3M

Страница 1: ...Register your product online siemens home com welcome en Instruction manual Built in oven HB539 3M ...

Страница 2: ......

Страница 3: ...eplacement parts and services can be found at www siemens home com and in the online shop www siemens eshop com Important safety information Read these instructions carefully Only then will you be able to operate your appliance safely and correctly Retain the instruction manual and installation instructions for future use or for subsequent owners This appliance is only intended to be fully fitted ...

Страница 4: ... crack Do not use a glass scraper sharp or abrasive cleaning aids or detergents Risk of electric shock Incorrect repairs are dangerous Repairs may only be carried out by one of our trained after sales engineers If the appliance is faulty unplug the mains plug or switch off the fuse in the fuse box Contact the after sales service Risk of electric shock and serious injury The cable insulation on ele...

Страница 5: ... adjacent units could be damaged over time Very dirty door seal If the door seal is very dirty the appliance door will no longer close properly when the appliance is in use The fronts of adjacent units could be damaged Always keep the door seal clean Appliance door as a seat shelf or worktop Do not sit on the appliance door or place or hang anything on it Do not place any cookware or accessories o...

Страница 6: ...ake cakes pizza bis cuits small cakes and puff pastry on two levels at the same time A fan with a ring heating element on the back panel of the oven ensures that the heated air is dis tributed evenly Pizza setting For quickly preparing frozen meals without preheating e g pizza chips or strudel The lower heating ele ments as well as the round heating elements on the rear panel must be heated up Bot...

Страница 7: ...ter sales service or from specialist retailers You will find a variety of suitable products for your oven in our brochures and on the Internet The availability of optional accessories and the options for ordering them on the internet vary depending on the country Information regarding this can be found in the sales documents Not every optional accessory is suitable for every appliance When purchas...

Страница 8: ... which you can set your oven Here we will explain how you can select the desired type of heating and temperature or grill setting You can select the cooking time and end time for your dish on the oven Setting the type of heating and temperature Example in the diagram Top bottom heating at 190 C 1 Use the function selector to set the type of heating 2 Use the temperature selector to set the tempera...

Страница 9: ...ctor Note You can make changes as long as the symbol is flashing When the symbol lights up the setting has been adopted Rapid heating With rapid heating your oven reaches the temperature selected particularly quickly Use rapid heating when temperatures above 100 C are selected To ensure an even cooking result do not place your dish in the cooking compartment until rapid heating is complete 1 Set t...

Страница 10: ...n your oven correctly Notes Slight differences in the colours on the front of the oven are caused by the use of different materials such as glass plastic and metal Shadows on the door panel which look like streaks are caused by reflections made by the oven light Enamel is baked on at very high temperatures This can cause some slight colour variations This is normal and does not affect their functi...

Страница 11: ...left and right figure A 3 Close the oven door as far as the limit stop With both hands grip the door on the left and right hand sides Close the door a little further and pull it out figure B Attaching the door Reattach the oven door in the reverse sequence to removal 1 When attaching the oven door ensure that both hinges are inserted straight into the opening figure A 2 The notch on the hinge must...

Страница 12: ...out as well as you had hoped refer to the section Tested for you in our cooking studio where you will find plenty of cooking tips and tricks Risk of electric shock Incorrect repairs are dangerous Repairs may only be carried out by one of our trained after sales engineers Caution If the supply cord is damaged it must be replaced by the manufacturer its service agent or similarly qualified persons i...

Страница 13: ...m This reduces the baking time for the second cake You can also place two loaf tins next to each other For longer cooking times you can switch the oven off 10 minutes before the end of the cooking time and use the residual heat to finish cooking Environmentally friendly disposal Dispose of packaging in an environmentally friendly manner Measures to be noted during transport Secure all mobile parts...

Страница 14: ...hes are used and cakes do not brown so evenly If you wish to use silicone baking tins use the information and recipes provided by the manufacturer as a guide Silicone baking tins are often smaller than normal tins The amount of mixture and recipe instructions may differ Tables The tables show the ideal type of heating for the various cakes and pastries The temperature and baking time depend on the...

Страница 15: ...ly 10 minutes before the end of the baking time specified in the recipe stick a cocktail stick into the cake at the highest point If the cocktail stick comes out clean the cake is ready The cake collapses Use less fluid next time or set the oven temperature 10 degrees lower Observe the specified mixing times in the recipe The cake has risen in the middle but is lower around the edge Do not grease ...

Страница 16: ...tems should be of equal thickness This will allow them to brown evenly and remain succulent and juicy Only add salt to steaks once they have been grilled Turn grilled items after Z of the specified time The grill element switches on and off intermittently This is normal The grill setting determines how frequently this occurs Meat Turn pieces of meat halfway through the cooking time When the roast ...

Страница 17: ...ed in the pan and the oven is kept cleaner with rind e g shoulder 1 0 kg Uncovered 1 4 180 200 130 1 5 kg 1 4 190 210 160 2 0 kg 1 4 170 190 190 Smoked pork on the bone 1 0 kg Covered 1 210 230 80 Lamb Leg of lamb boned medium 1 5 kg Uncovered 1 4 170 190 120 Minced meat Meat loaf approx 750 g Uncovered 1 4 180 200 70 Sausage Sausage Wire rack univer sal pan 4 1 3 15 Meat Weight Accessories and ov...

Страница 18: ... a spoon test Press down on the roast with a spoon If it feels firm it is ready If the spoon can be pressed in it needs to be cooked for a little longer The roast is too dark and the crackling is partly burnt Check the shelf height and temperature The roast looks good but the juices are burnt Next time use a smaller roasting dish or add more liquid The roast looks good but the juices are too clear...

Страница 19: ...aller than this The lids could crack Only use fruit and vegetables in good condition Wash them thoroughly The times given in the tables are a guide only The time will depend on the room temperature number of jars and the quantity and temperature of the contents Before you switch off the appliance or change the cooking mode check whether the contents of the jars are bubbling as they should Preparat...

Страница 20: ...uits gingerbread cookies Fruit in one litre jars When it starts to bubble Residual heat Apples redcurrants strawberries Switch off approx 25 minutes Cherries apricots peaches gooseberries Switch off approx 30 minutes Apple purée pears plums Switch off approx 35 minutes Vegetables with cold cooking water in one litre jars When it starts to bubble Residual heat Gherkins approx 35 minutes Beetroot ap...

Страница 21: ...The liquid is then collected keeping the oven cleaner Dish Accessories and oven ware Level Type of heating Temperature in C Cooking time in minutes Viennese whirls Universal pan 3 150 170 20 30 Enamel baking tray uni versal pan 1 3 140 160 35 45 Small cakes Universal pan 3 150 170 25 35 Small cakes preheat Enamel baking tray uni versal pan 1 3 140 160 30 40 Hot water sponge cake Springform cake ti...

Страница 22: ......

Страница 23: ......

Страница 24: ...BSH Hausgeräte GmbH Carl Wery Straße 34 81739 München GERMANY 9001028262 9001028262 02 151294 siemens home com Manufactured by BSH Hausgeräte GmbH under Trademark License of Siemens AG ...

Отзывы: