background image

Familiarising yourself with your appliance

 en

7

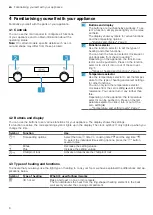
Symbol

Type of heating

What it's used for/how it works

Hot air gentle

Cook selected dishes gently on one level without preheating.
The fan distributes the heat from the ring-shaped heating element in the back
wall evenly around the cooking compartment. The food is cooked in phases us-
ing residual heat.
Select a temperature of between 120 °C and 230 °C.
Always keep the appliance door closed when cooking.
This type of heating is used to determine the energy consumption in air recircu-
lation mode and the energy efficiency class.

Full-surface grill

Grill flat items such as steak and sausages, or make toast. Gratinate food.
The entire area underneath the grill element becomes hot.

Top/bottom heating

Traditionally bake or roast on one level. This type of heating is ideal for cakes
with moist toppings.
The heat is emitted evenly from above and below.
This type of heating is used to measure the energy consumption in the conven-
tional mode.

Other functions

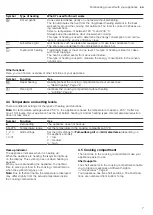
Here, you can find an overview of other functions of your appliance.

Symbol

Function

Use

Rapid heating

Rapidly preheat the cooking compartment without accessories. 

→ 

"Rapid heating", Page 10

Oven light

Illuminate the cooking compartment without heating. 

→ 

"Lighting", Page 8

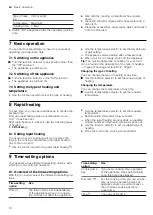
4.4 Temperature and setting levels

There are different settings for the types of heating and functions.

Note: 

For temperature settings above 250 °C, the appliance reduces the temperature to approx. 240 °C after ap-

prox. 10 minutes. If your appliance has the top/bottom heating or bottom heating types, this temperature reduction
does not take place.

Symbol

Function

Use

Zero setting

The appliance does not heat up.

50–275

Temperature range

Set the temperature in the cooking compartment in °C.

1, 2, 3
or
I, II, III

Grill settings

Set the grill settings for 

Full-surface grill

 and 

Grill, small area

 (depending on

the appliance model).
1 = low
2 = medium
3 = high

Heat-up indicator

The appliance indicates when it is heating up.
When the appliance is heating, the   symbol lights up
on the display. This symbol goes out when heating is
paused.
When you are preheating the appliance, the optimal
time to place your food in the cooking compartment is
when the symbol first goes out.

Note: 

Due to thermal inertia, the temperature displayed

may differ slightly from the actual temperature inside
the cooking compartment.

4.5 Cooking compartment

The functions in the cooking compartment make your
appliance easier to use.

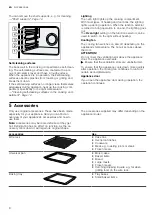
Shelf supports

The shelf supports in the cooking compartment enable
you to place accessories at different heights.

→ 

"Accessories", Page 8

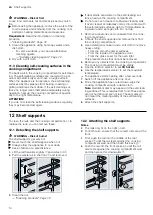
Your appliance has five shelf positions. The shelf posi-
tions are numbered from bottom to top.

Содержание HB533AB.0H

Страница 1: ...533AB 0H en User manual and assembly instructions Register your product on My Siemens and discover exclusive services and offers siemens home bsh group com welcome The future moving in Siemens Home Appliances ...

Страница 2: ... that you use the appliance correctly and safely Only a licensed professional may connect ap pliances without plugs Damage caused by in correct connection is not covered under the warranty Only use this appliance In accordance with these instructions for in stallation and use To prepare meals and drinks In private households and in enclosed spaces in a domestic environment Up to an altitude of max...

Страница 3: ...s on its temperature Do not stand too close to the appliance when opening the door Open the appliance door carefully Keep children at a safe distance If there is water in the cooking compartment when it is hot this may create hot steam Never pour water into the cooking compart ment when the cooking compartment is hot WARNING Risk of injury Scratched glass in the appliance door may develop into a c...

Страница 4: ...l in the cooking compart ment to come into contact with the door pane When the cooking compartment is hot any water in side it will create steam The change in temperature may cause damage Never pour water into the cooking compartment when it is still hot Never place cookware containing water on the cooking compartment floor The prolonged presence of moisture in the cooking compartment leads to cor...

Страница 5: ...he en ergy used by up to 20 Use dark coloured black coated or enamelled baking tins These types of baking tin absorb the heat particu larly well Open the appliance door as little as possible during operation This will maintain the temperature in the cooking compartment and eliminate the need for the appli ance to reheat When baking multiple dishes do so in succession or in parallel The cooking com...

Страница 6: ...ettings for other functions You can only turn the temperature selector clockwise from the zero setting until it offers resistance You cannot turn it any further than this Depending on the appliance the temperature selector can be pushed in Press on the tem perature selector to click it into or out of the zero setting Temperature and setting levels Page 7 4 2 Buttons and display You can use the but...

Страница 7: ...ut heating Lighting Page 8 4 4 Temperature and setting levels There are different settings for the types of heating and functions Note For temperature settings above 250 C the appliance reduces the temperature to approx 240 C after ap prox 10 minutes If your appliance has the top bottom heating or bottom heating types this temperature reduction does not take place Symbol Function Use Zero setting ...

Страница 8: ...cooling fan switches on and off depending on the appliance s temperature The hot air escapes above the door ATTENTION Do not cover the ventilation slot above the appliance door The appliance overheats Ensure that the ventilation slots are unobstructed To ensure that the appliance cools down more quickly after operation the cooling fan continues to run for a certain period afterwards Appliance door...

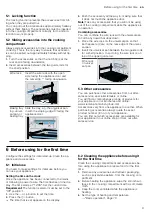
Страница 9: ... In so doing the wire rack is on top of the upper guide rod Wire rack on univer sal pan 5 3 Other accessories You can purchase other accessories from our after sales service specialist retailers or online You will find a comprehensive range of products for your appliance in our brochures and online www siemens home bsh group com Accessories vary from one appliance to another When purchasing access...

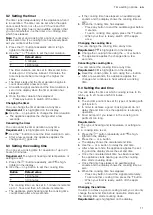
Страница 10: ...e at any time Use the temperature selector to set the required temperature 8 Rapid heating To save time you can use rapid heat up to shorten the preheat time Only use rapid heat up when a temperature of over 100 C has been set After rapid heat up it is best to use the following types of heating 3D hot air 8 1 Setting rapid heating To ensure an even cooking result do not place the food in the cooki...

Страница 11: ...nts down after a few seconds a If the cooking time has elapsed an audible signal sounds and the display shows the cooking time as zero 3 When the cooking time has elapsed Press any button to end the audible signal before it sounds To set a cooking time again press the button When your food is ready switch off the appli ance Changing the cooking time You can change the cooking time at any time Requ...

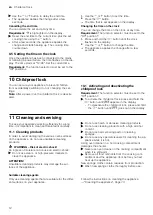
Страница 12: ...k Requirement The function selector must be set to the Off position To activate the childproof lock press and hold the button until appears in the display To deactivate the childproof lock press and hold the button until goes out in the display 11 Cleaning and servicing To keep your appliance working efficiently for a long time it is important to clean and maintain it carefully 11 1 Cleaning produ...

Страница 13: ...se a brush or steel wool Leave the appliance door open to dry the cooking compartment after cleaning it Notes Enamel burns at very high temperatures causing minor discol ouration The functionality of your appliance is not affected by this The edges of thin trays cannot be completely enamelled and may be rough This does not impair corrosion protection Food residues will leave a white coating on the...

Страница 14: ... compartment 3 Use a detergent solution and a soft cloth to remove heavy soiling From the smooth enamel surfaces From the inside of the appliance door From the glass cover for the oven light This prevents stains that cannot be removed 4 Remove any objects from the cooking compartment The cooking compartment must be empty 5 Use the function selector to set 3D hot air 6 Use the temperature selector ...

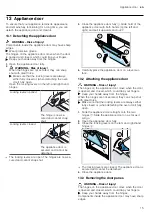
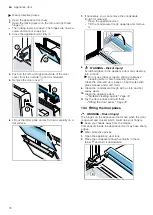
Страница 15: ...e cured and cannot snap shut 3 Close the appliance door fully Grab hold of the appliance door with both hands on the left and right and pull it upwards and out 4 Carefully place the appliance door on a level sur face 13 2 Attaching the appliance door WARNING Risk of injury The hinges on the appliance door move when the door is opened and closed which could trap your fingers Keep your hands away fr...

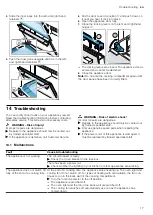
Страница 16: ...Scratched glass in the appliance door may develop into a crack Do not use glass scrapers sharp or abrasive cleaning aids or harsh cleaning products Clean the removed door panes on both sides with glass cleaner and a soft cloth 9 Clean the condensate trough with a cloth and hot soapy water 10 Clean the appliance door Suitable cleaning agents Page 12 11 Dry the door panes and refit them Fitting the ...

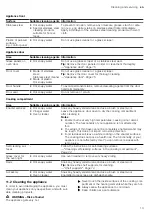
Страница 17: ...efective call Customer Service WARNING Risk of electric shock Incorrect repairs are dangerous Repairs to the appliance should only be carried out by trained specialist staff Only use genuine spare parts when repairing the appliance If the power cord of this appliance is damaged it must be replaced by trained specialist staff 14 1 Malfunctions Fault Cause troubleshooting The appliance is not workin...

Страница 18: ...f electric shock When changing the bulb the bulb socket contacts are live Before replacing the bulb unplug the appliance from the mains or switch off the circuit breaker in the fuse box Requirements The appliance is disconnected from the power sup ply The cooking compartment has cooled down You have a new halogen bulb to replace the old one 1 Place a tea towel in the cooking compartment to prevent...

Страница 19: ...es are specified for this reason Try using the lower values to start with The setting values apply to food placed in the cook ing compartment while the cooking compartment is still cold Remove any accessories that are not being used from the cooking compartment 17 2 Notes on baking When baking use the shelf positions indicated Baking on one level Height Deep baked goods or tin on wire rack 2 Flat ...

Страница 20: ...Cooking time in mins Sponge cake delicate Loaf tin 2 150 170 60 80 Sponge cake 2 levels Loaf tin 3 1 140 150 70 85 Fruit tart or cheesecake with shortcrust pastry base Springform cake tin diameter 26 cm 2 170 190 55 80 6 egg fatless sponge cake Springform cake tin 28 cm diameter 2 150 1601 30 40 Swiss roll Baking tray 3 180 2001 10 15 Shortcrust tart with moist topping Universal pan 2 160 180 55 9...

Страница 21: ...t leave it to cool in the refri gerator Yoghurt Food Accessories cookware Shelf position Type of heating Temperature in C Cooking time in mins Yoghurt Individual moulds Cooking compartment floor 1 2 Lamp 1 100 2 1 1 2 8 9 hrs 1 Preheat the appliance 17 6 Test dishes These overviews have been produced for test institutes to facilitate appliance testing in accordance with EN 60350 1 Baking Observe t...

Страница 22: ...ories cookware Shelf pos ition Type of heating Temperature in C grill setting Cook ing time in mins Toasting bread Wire rack 5 31 0 5 1 5 1 Preheat the appliance for five minutes Do not use the rapid heating function 18 Installation instructions Observe this information when installing the appliance 18 1 General installation instructions Follow these instructions before you start with the installa...

Страница 23: ...here 18 3 Installation below a worktop Observe the installation dimensions and the installation instructions when installing below a worktop To ventilate the appliance the intermediate floor must have a ventilation cut out In combination with induction hobs the gap between the worktop and appliance must not be sealed using additional strips The worktop must be secured to the built in unit Observe ...

Страница 24: ...ctive contact socket that has been correctly installed Insert the plug into the protective contact socket When the appliance is installed the mains plug of the power cord must be freely accessible If free ac cess to the mains plug is impossible an all pole isolating switch must be integrated into the perman ent electrical installation in accordance with the in stallation regulations Electrically c...

Страница 25: ......

Страница 26: ......

Страница 27: ......

Страница 28: ... 9001577518 9001577518 000806 en Manufactured by BSH Hausgeräte GmbH under Trademark License of Siemens AG ...

Отзывы: