background image

Gigaset SL 100/SL 150 / deutsch / A31008-L150-B102-1-19 / covers_0.fm / 28.07.2003

s

Be inspired

Содержание Gigaset SL100 colour

Страница 1: ...Gigaset SL 100 SL 150 deutsch A31008 L150 B102 1 19 covers_0 fm 28 07 2003 s Be inspired ...

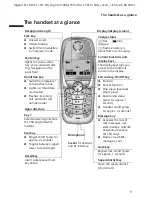
Страница 2: ...ll automatic last number redial Star key Ringer on off press for approx 2 seconds Toggles between upper lower case and digits Charge status flat U fully charged flashes battery is almost flat or is charging Control key Opens the menu direc tory voice activated dial ling Navigation in the input field Current functions and display keys The display keys give you access to the functions shown in the d...

Страница 3: ...ing wrong input 13 Idle status 14 Menu operation with Handsfree Volume setting as an example 14 Date and Time 15 Setting the date and time 15 Setting the alarm clock 15 Setting an appointment 16 Viewing missed appointments anniversaries 17 Making calls 18 Making external calls and ending a call 18 Answering a call 18 Calling Line Identification 18 Handsfree 20 Muting 20 Using the directory and oth...

Страница 4: ...chine via the handset 55 Recording memos 62 Operating the answering machine with voice prompts 63 Operating the answering machine while you are away from home remote operation 64 Setting the answering machine of the SL 150 Base station 66 Ring delay and charge saving function for remote operation 66 Setting the recording time and recording quality 66 Activating deactivating call screening 67 Reset...

Страница 5: ...nd Talk mode 78 Handset settings 80 Changing the Display language 80 Activating deactivating Auto Answer 80 Adjusting the loudspeaker volume 80 Changing the ringer 81 Sound Manager 84 Activating deactivating advisory tones 85 Restoring the handset factory settings 86 Setting the base station 87 Protecting the telephone from unauthorised access 87 Emergency numbers 88 Changing the name of the base ...

Страница 6: ...stions and Answers 93 Service Customer Care 95 Specifications 97 Answering machine remote operation SL 150 only 98 Character set chart 98 Predictive text 100 PC Interface 101 Balloon Shooter Game 102 Accessories 103 Menu Tree 106 Main menu 106 Directory key and speed dial list key 108 Calls List Answering Machine List SL 150 only 108 Index 109 ...

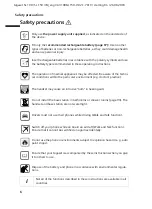
Страница 7: ...onditions within the particular environment e g doctor s practice The handset may cause an intrusive hum in hearing aids Do not install the base station in bathrooms or shower rooms page 93 The handset and base station are not watertight Drivers must not use their phones while driving Walk and Talk function Switch off your phone while on board an aircraft Walk and Talk function Ensure that it cann...

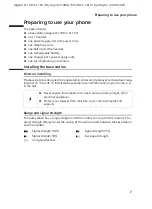
Страница 8: ...station is designed to be operated in enclosed dry areas at temperatures rang ing from 5 C to 45 C Install the base station at a central location in your home e g in the hall Range and signal strength The base station has a range of approx 300 m outdoors and up to 50 m indoors The signal strength display shows the quality of the radio contact between the base station and the handset W Never expose...

Страница 9: ...it 230V with power cord SL 150 Back of the base station Outlet Phone outlet Fit the small jack on the phone cord into the socket in the base station it clips into place Place cord in cable recess Fit phone jack into phone outlet Insert the small jack on the power cord into the socket on the underside of the base station Place cord in cable recess Plug the power supply unit into your power outlet 2...

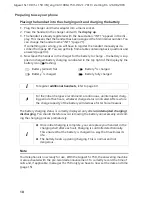
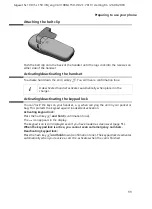
Страница 10: ...n i Keep the power supply unit plugged in at all times to ensure your phone is ready for use whenever you need it If you ever purchase a phone cord from a store ensure that the phone conductors are correctly connected 3 4 connection The display is protected by a plastic film Please remove the protective film W Use only the rechargeable battery recommended by Siemens on page 97 Never use convention...

Страница 11: ...g status is correctly displayed only after uninterrupted charging discharging You should therefore avoid removing the battery unnecessarily and end ing the charging process prematurely Note Your telephone is now ready for use With the Gigaset SL 150 the answering machine is also activated with the pre recorded announcement To correctly record the time of calls and if applicable messages SL 150 onl...

Страница 12: ... handset e g when carrying the unit in your pocket or bag This protects the keypad against inadvertent activation Activating keypad lock Press the hash key R and hold confirmation tone The Ø icon appears in the display The keypad icon is still displayed even if you have loaded a screensaver page 51 When the keypad lock is active you cannot even call emergency numbers Deactivating keypad lock Press...

Страница 13: ... display keys are the horizontal rocker keys just below the display Their function changes depending on the particular operating situation The current function is shown in the display directly above the key to which it relates Example Control key In the idle status In lists and menus In an input field t Initiate voice activated dial ling long press Scroll up Move the cursor up a line s Open direct...

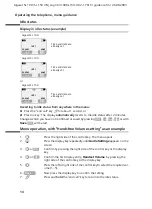
Страница 14: ...ow enter the correct character Inserting characters to the right of the cursor If you have omitted a character use the control key to go to the place where you want to insert the character and key it in Overwriting characters to the right of the cursor When entering Cost per Unit the number of digits is fixed and the field is preset Use the control key to move the cursor to the left of the incorre...

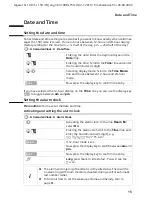
Страница 15: ...09 45 SMS Gigaset SL 100 Time and date are already set Ð V INT 1 20 05 03 09 45 SMS Gigaset SL 100 Time and date are already set Gigaset SL 150 Ð V INT 1 20 05 03 09 45 SMS OK OK 1 v Press the right side of the control key The menu opens 2 s Press the display key repeatedly until Audio Settings appears on the screen 3 v or Confirm by pressing the right side of the control key or the display key 4 ...

Страница 16: ...ear in the Date line s Entering the time Scroll to the Time line and enter the hours minutes 4 digit s r Selecting display mode Scroll to the Time Mode line and choose between 12 hour and 24 hour mode RRRRRRRRRRRRRRRRRRRRR Save Now press the display key to confirm the entry r Activating the alarm clock In the line Room M select On s Entering the alarm call Scroll to the Time line and enter the hou...

Страница 17: ...appointment 1 5 and confirm r Setting an appointment In the line Room M select On s Enter the date Scroll to the Date line and enter the day month 4 digit Example For 20 05 enter 2QQ5 s Enter the time Scroll to the Time line and enter the hours minutes 4 digit Example For 9 05 enter QOQ5 RRRRRRRRRRRRRRRRRRRRR am pm With 12 hour display page 15 Switch between am and pm R RRRRRRRRRRRRRRRRRRR s Edit ...

Страница 18: ... Missed Dates s Appoint 2 Select the appointment 1 5 and confirm r Select Off RRRRRRRRRRRRRRRRRRRRR Save Now press the display key to confirm the setting OK i When an appointment is displayed you can use the display key SMS to open the SMS menu and write and send a text message s Select the appointment anniversary Information about appointment anniversary is dis played A missed appointment is indi...

Страница 19: ... charger to take the call Calling Line Identification When you get a call you will see the caller s number and or name displayed on the screen Preconditions 1 You have asked your network provider for the caller s number CLIP or name CNIP to be displayed on your handset screen 2 The caller has asked the network provider for his number to be identified CLI 3 Your network provider supports CLIP CLI a...

Страница 20: ... The screen displays Withheld if the caller withholds his or her number or Unavailable if he or she has not requested CLI Screen display with CNIP If you have CNIP then the name town that is registered with your network provider for the calling number will also be displayed on your handset The screen displays External if the number is not identified The screen displays Withheld if the caller withh...

Страница 21: ...sfree mode A call is in progress and handsfree d is activated Muting You can mute your handset during external calls e g if you wish to talk confidentially to another person in the room The external caller cannot hear your conversation during this time hold melody You do not hear your caller either d Activate while dialling Enter the number and press the handsfree key instead of the talk key c d A...

Страница 22: ...telephone numbers and prefixes of network providers so called call by call numbers You open the speed dial list with the C key You create the directory email directory and speed dial list for your individual handset You can send the lists individual entries to the other handsets if you want them to be available at other handsets as well page 24 The speed dial list is operated in just the same way ...

Страница 23: ...e telephone number s Scroll to the next line and enter the name either Storing an entry Press the display key to open the menu Save Confirm The entry is stored or Entering an anniversary before storing s Scroll to the Annivers line if you want to enter an anniversary as described on page 25 Then RRRRRRRRRRRRRRRRRRRRR Back up Now press the display key to confirm the entry then a Long press back to ...

Страница 24: ...put field Enter the 2nd letter e g i You will now see the name coming closest to this combination The entry field now contains Ni Continue entering letters up to 10 until you see the name you want c Press the talk key The number is dialled à OK Display Menu function Display Number You can change or add to a stored number and then dial it or use other functions by pressing Edit Entry Change a selec...

Страница 25: ...ntical telephone numbers are not overwritten during transfer The number of entries that are stored in the receiving handset may therefore differ from the number of entries that you have sent to it The transfer is cancelled if the phone rings or if the memory of the receiving handset is full The last entry to be transferred appears in the display Adding a displayed telephone number to the directory...

Страница 26: ... after another display change press Save Anniversary reminder call The handset sounds a reminder call with the selected ringer melody The display shows the directory entry with either Press the display key to open the menu s Directory Select the menu item and confirm s Select the entry and confirm or s Open the directory s Select the entry and confirm à OK OK OK R RRRRRRRRRRRRRRRRRRRR s Edit Scrol...

Страница 27: ...ge the voice pattern you have to delete it page 27 and then record it again Using voice activated dialling The display prompts you to speak Select the voice pattern e g Anna If the name matches the recorded voice pattern it is repeated The telephone number is dialled Step 1 Open the directory for voice activated dialling s Open the directory R RRRRRRRRRRRRRRRRRRR s Voice Select the entry and press...

Страница 28: ...rns of the other users Open the directory for voice activated dialling see Step 1 page 26 Now Changing a user name Ext Calls Confirm You hear the current volume s r Scroll to the Announce line and activate deactivate name announcement RRRRRRRRRRRRRRRRRRRRR Save Now press the display key to confirm the setting a Long press back to idle status OK s Select the entry with RRRRRRRRRRRRRRRRRRRRR Play Pr...

Страница 29: ...is dialled i If a name is displayed use display key View to show the corresponding number Þ Display Menu function Automatic Redial This function dials the number automatically every 20 seconds The talk key flashes and the loudspeaker is acti vated If the other person answers press the talk key c If the call is not answered ringing stops after about 30 seconds The function is cancelled after ten fa...

Страница 30: ...te the entry New Entry Confirm Enter the address for text input see page 98 During entry Press the display key to open the menu either Insert period s Insert Select the menu item and confirm or Insert s Insert Select the menu item and confirm or Activating deactivating predictive text page 100 s Predictive Text Select the menu item and confirm then Store the email address Press the display key to ...

Страница 31: ... all the lists is displayed s v Select an entry and open the menu either Deleting an email address s Delete Entry Select the menu item and confirm or Copying an email address s Copy and Edit Select the menu item and confirm Change the address if necessary Press the display key to open the menu Save Entry Confirm The entry is stored then a Long press back to idle status OK OK à OK s v Select any en...

Страница 32: ... entries you will see the first new entry in that list handelt es sich um Einträge in einem persönlichen Postfach wird die zugehörige Liste angezeigt If several lists have new entries those lists are offered for your selection If there are no new messages in any of the lists then all the lists are offered for your selection If calls are stored in the network mailbox you will see a message if the c...

Страница 33: ... Calls List 01 02 Number of new entries in the list Number of old read entries in the list Number of new entries messages in the list Number of old played entries messages in the list Ans M 01 02 First call first message of a total of two calls two messages date and time Telephone number or name This entry shows the status of a call message The call is new in the list The call is old in the list T...

Страница 34: ...d confirm a Long press back to idle status OK OK i The currently set list type is shown in the calls list display heading Changing the list type does not affect the existing entries in the list f Press either Open the calls list s Calls List Select the menu item and confirm The entry received last is displayed s Select entry or Opening the answering machine list s Ans M 01 02 Select the menu item ...

Страница 35: ... only Open the calls list answering machine list and select an entry page 33 Now s Select entry either RRRRRRRRRRRRRRRRRRRRR Call Press the display key or c Press the talk key once calls list or twice answering machine list s Scroll to the Name line and enter the name for text input see page 98 If you have got CNIP the first 16 characters of the name sent will be displayed Press the display key to...

Страница 36: ...f the SMS centres You can receive text messages from any of the SMS centres whose number you have entered Of course you have to be registered to receive text messages with those SMS centres Sending text messages to email addresses If you wish to send text messages to email addresses you have to make additional set tings for the send centre on your phone page 37 Ask your service provider if it sup ...

Страница 37: ... figured for automatically by sending a message or by a special registration proce dure Sending and receivingtext messages To send and receive a text message you have to enter the call numbers of the SMS cen tre of your service provider These numbers may be preconfigured at the factory Activating and deactivating the send message and receive message functions The text message send and receive func...

Страница 38: ...Settings Service Centres s Service Centr 3 Select and confirm e g Service Centr 3 v If necessary select Yes in Active send to activate Service Centr 3 as send centre The previously selected send service centre is automatically deacti vated R RRRRRRRRRRRRRRRRRRRR s Edit Scroll to the SMS line and press the display key Enter the call number of the SMS centre and open the menu Save Entry Confirm R RR...

Страница 39: ...s Greek or Cyrillic characters If you have set Greek or Russian as your display language you will need to change the input language before you write a message When you have opened the input window for the text message press display key From the menu select Select Language and then press to confirm your choice Now select an input language that uses the Roman character set e g German or English Pres...

Страница 40: ...ut field is open i Please refer to the Character Set Chart page 98 to see how to enter text correctly Use 1 to insert a space and P to toggle between upper case lower case and digits page 98 You can find out how to correct text on page 13 If you receive a text message that is incomplete e g because your phone s memory is full you will see a message à OK Press the display key to open the menu s Sav...

Страница 41: ...enter the character using the hash key R press 2x the colon using the Q key press 8x and the space with 1 press once If predictive text is on enter by giving the hash key R 1 long and 1 short press Use s Save Entry to save what you have written so far Precondition You are writing a text message page 38 and the input field is open Entering the text of the message i The recipient s number always has...

Страница 42: ... you were writing the message These messages are stored until you delete them v SMS Enter the number of the email service if necessary Press the display key to open the menu Send Confirm Send e mail to W If the number of the send centre s email service is entered page 37 then this number is offered à OK s Mailbox 2 If more than one mailbox is activated page 48 select a mailbox and confirm e g Mail...

Страница 43: ... an SMS message The options are 3 templates I am late Let s meet Congratulations 15 pictures 10 sounds You can also insert an email address that is stored in your email directory page 29 Templates pictures sounds and email addresses are inserted where the cursor is q Select SMS either Reading SMS RRRRRRRRRRRRRRRRRRRRR Read Press the display key Use s to view the continua tion of the text message i...

Страница 44: ...s not been transferred completely it will be split into individual messages and stored in the incom ing message list Opening the incoming message list The incoming message list shows you All received messages Messages that could not be sent despite several attempts These messages are all stored with an error status page 53 The message list is displayed for example as follows Press the display key ...

Страница 45: ...SMS 01 05 Select the mailbox if necessary and enter the mail box PIN page 48 The incoming message list is opened and the first new message is displayed OK Total number SMS Serial number of the displayed SMS ______SMS ____ New 01 02 1234567890 12 07 03 09 45 Delete Read v Open the menu SMS Confirm Mailbox Confirm If more than one mailbox is activated page 48 select a mailbox and confirm If required...

Страница 46: ...e service pro viders do not allow the forwarding of SMS messages with attachments In this case select the function Use Text to forward the SMS without attachments Confirm the prompt New SMS will not contain picture melody Proceed RRRRRRRRRRRRRRRRRRRRR Yes Press the display key to confirm the prompt a Long press back to idle status Press the display key to open the menu either Replying to an incomi...

Страница 47: ...y to Directory Select the menu item and confirm s Scroll to the Name line and enter the name max 16 characters for text input see page 98 Press the display key to open the menu Save Entry Confirm The entry is stored a Long press back to idle status Hi Sabine here is my new number 1234567890 W The number is highlighted with a black background à OK à OK i The number has to be stored in the directory...

Страница 48: ...up to three persons to have their own SMS mailbox The options are 1 general mailbox 3 private mailboxes Open the SMS list with the message key You will see All the mailboxes that have been activated All the mailboxes which contain at least one new message Access to private mailboxes can be protected with a PIN 4 digits This is not possible with the general mailbox s v Select the SMS and open the m...

Страница 49: ...e 49 If you have forgotten your PIN you can reset it by restoring the factory settings of the base station This will delete all mes sages from all mailboxes If you deactivate a mailbox in the line Call Director line set Off messages sent to that box will be lost The messages stored for that box are deleted If you deactivate the PIN protection the PIN is reset to 0000 s Mailbox 2 Select and confirm...

Страница 50: ... delivered if the sender has used an invalid ID or the mailbox has been deactivated The message will go to your general mailbox if the sender has not entered the ID either Changing the name of the mailbox R RRRRRRRRRRRRRRRRRRRR s Edit Select the mailbox and press the display key R RRRRRRRRRRRRRRRRRRRR Save Now enter the new name and press the display key to store the entry or Changing mailbox ID a...

Страница 51: ...h calls will be notified Missed calls from the calls list and or Messages from the answering machine SL 150 only v SMS Settings Notify Type Enter the number e g of your mobile phone and press the display key Save Entry Confirm The entry is stored a Long press back to idle status à OK either Activating deactivating missed calls v In the line Missed Calls select On or Off or Activating deactivating ...

Страница 52: ...es the idle state display page 14 which may then conceal the date time and name You can load only one screensaver The screensaver may temporarily disappear if You press any key There is a low battery appointment reminder or alarm call tone You remove or return the handset from or to the base station charging unit Loading a new ringer tone or screensaver You will now see You have new messages Û in ...

Страница 53: ... centre If you do not receive the message send another one this time without the access code When you send messages your sender number may be sent without your extension number The recipient cannot reply to you directly in this case Text messages can only be sent and received through ISDN exchanges with the MSN number assigned to your base station i After loading the melody or logo will remain in ...

Страница 54: ...LIP service Calling Line Identification Presentation is not activated for your phone line Call diversion is activated with When All Calls Call diversion All Calls is activated for the network mailbox The memory incoming and draft message lists is full Error Code Description E0 Calling Line Identification permanently withheld CLIR Calling Line Identification is not enabled FE Error occurred during ...

Страница 55: ... stopped receiving messages You have changed the ID of your mailbox Tell your SMS contacts your new ID or undo the change page 49 You receive no messages You have not activated your mailbox Activate your mailbox page 49 The message is played back The display call number serv ice is not activated Ask your network provider to activate this service there is a charge for this Your terminal is stored i...

Страница 56: ...tching the answering machine on off Note The answering machine uses the standard announcement stored until you record your own announcement 1 v Answer Machine Ans Machine In the line On Off activate or deactivate the answering machine Save press the display key to save the setting 2 After activating the answering machine it will tell you how much memory time is left The icon appears in the display...

Страница 57: ...er Machine Ans Machine Changing the number of mailboxes To do this 1 v Answer Machine Ans Machine 2 When you try to change the number of activated mailboxes you will be prompted to delete all the messages first see page 61 After this you will be asked whether you want to change the announcement for the answering machine 3 Then change the number of mailboxes by repeating from step 1 r In the On Off...

Страница 58: ...nouncement v Answer Machine Announcements Deleting announcements messages v Answer Machine Announcements Del Announce Press the display key to confirm the prompt v Answer Machine Announcements Del Anc Only Press the display key to confirm the prompt either Recording a personal announcement Rec Announce Confirm or Recording an announce only message s Rec Anc Only Select the menu item and confirm th...

Страница 59: ...h answer and record is to switch to announce only e g from 6 p m to 8 a m In the period from 8 01 a m to 5 59 p m the answering machine automatically switches back to the answer and record mode you set Precondition You have set the time page 15 v Answer Machine Announcements Set Ans Mode Ans Mode Time either With Answer and Record message Ans Record Confirm On or No Answer and Record message s Ann...

Страница 60: ...l announcement is deleted The pre recorded announcement is used Deleting the announce only message deactivates the alternate answer and record and announce only setting The answering machine will remain in answer and record mode all the time if the On Off Announce Only line has been set The answering machine deactivates itself i Selecting a different announce mode or deleting the announce only mes...

Страница 61: ...k You hear the ready tone a short tone Now speak the command Back or Forward page 63 f Open calls list answering machine list s Ans M 01 02 Select the menu item and confirm The loudspeaker activates The playback starts or If several mailboxes have been activated s Mailbox 2 Select and confirm e g mailbox 2 OK OK i If several mailboxes have been activated If you notice after pressing the f key that...

Страница 62: ...es only the messages on the currently selected one will be deleted Deleting all old messages During playback or pause v Del All Old Msgs Deleting individual old messages While playing back the message to be deleted The loudspeaker activates You hear the ready tone a short tone Now speak the com mand Delete You will hear the ready tone again when prompted to repeat the com mand Repeat Delete page 6...

Страница 63: ...rom the answering machine While the answering machine is recording a call you can pick it up by pressing the talk key c Recording stops and you can speak to the caller If 2 seconds of the call have already been recorded when you pick it up the call will be displayed as a new message The f key flashes when the call ends If several mailboxes have been activated s Mailbox 2 Select a mailbox and confi...

Страница 64: ... voice patterns in the above order With activated voice control page 64 you can then control the answering machine via the handset and also away from home or the office remote operation see page 64 using the voice commands Recording voice commands Record your voice pattern in quiet surroundings v Answer Machine Voice Prompts Record Command The loudspeaker activates You will hear the ready tone a s...

Страница 65: ...alling has tone dialling DTMF i e you hear differ ent tones when you press the keys Alternatively you can use a code transmitter available from your mobile phone retailer Calling your answering machine and playing messages The answering machine tells you whether any new messages have been recorded The messages are now played back You can remote operate your answering machine in one of two ways wit...

Страница 66: ...vate it remotely Call your own number with a mobile phone or tone dialling phone and let the number ring for about one minute You will hear Please enter PIN Precondition The system PIN must not be 0000 page 87 Your answering machine is activated It tells you how much memory time is left If sev eral mailboxes have been activated you will be prompted to enter the number of the mailbox you want to li...

Страница 67: ...ng machine would have already activated There will be no call charges if you hang up now Please remember Only ringer melodies 1 3 are the same as the call tones during a call With all ringer tones the first ringer tone is suppressed You can cancel the suppression of the first ringer tone page 84 v Answer Machine Ring Delay Setting the recording time and recording quality You can set the maximum le...

Страница 68: ...setting v Answer Machine Set Key 1 Once you have selected the answering machine or network mailbox simply hold down the 1 key You will then be connected directly If you have activated several mailboxes enter the number of the mailbox you want to listen to after pressing the 1 key The setting for fast access applies to all registered handsets Handset Confirm On a Long press back to idle status OK i...

Страница 69: ...ox number and configuring the network mailbox for fast access v Answer Machine Set Key 1 This setting is now valid for all registered handsets To find out how to reset fast access on the Gigaset SL 150 to the answering machine refer to page 67 Calling the network mailbox Press 1 and hold This connects you directly to the network mailbox If you now press the handsfree key d you can open listen to t...

Страница 70: ...t will be assigned the lowest free number Manual registration Gigaset 1000 to 4000 and other handsets with GAP functionality This section describes how to connect handsets belonging to the Gigaset families hand sets A 2 C 1 S 1 or handsets of other devices with GAP functionality to your SL 100 SL 150 1 On the handset Start to register the handset as described in its operating instructions 2 On the...

Страница 71: ...on with the best reception Best Base This setting will automatically select whichever base station has the best reception v Settings Select Base u Open list of handsets s v Select the handset you wish to de register your own handset is marked with and open the menu s De reg H Set No Select the menu item and confirm Enter the current system PIN the factory setting is 0000 and confirm RRRRRRRRRRRRRR...

Страница 72: ... characters maximum The changed name is dis played in the list of every handset u Open list of handsets Your own handset is marked with either Call a specific handset s c Select the handset and press the talk key or enter the number of the handset e g u 2 or Call all handsets group call P Press the star key All handsets are called then End the call a Press the end call key i To call a specific han...

Страница 73: ...mber 1 6 and confirm The handset s old number is overwritten RRRRRRRRRRRRRRRRRRRRR Save Now press the display key to confirm the entry a Long press back to idle status OK i You will hear the error tone if you assign an internal number twice a fall ing tone sequence Repeat the process with an unused number u Open list of handsets The external caller hears the wait melody s Select the handset or Cal...

Страница 74: ...actory setting Off Activating deactivating internal listening in v Base Settings Add Features Listening In Internal listening in On your handset you see In use You wish to listen in to this external call either Cancelling internal call accepting external call RRRRRRRRRRRRRRRRRRRRR Accept Press the display key The internal call is ended You are connected to the external caller or Reject external ca...

Страница 75: ...o speak to Mr Jones press 1 to speak to the secretary press 2 If you do not want to speak to anyone in particular press the star key v Base Settings Call Director i If the dialled party does not take the call the answering machine will accept it provided it is switched on If the ring delay of the answering machine is set to 0 sec page 66 then the call director announcement will not be played Call ...

Страница 76: ...e microphone must be directed towards the baby When the room monitor is activated incoming calls to the handset which is near the baby are indicated without a ring tone they are just shown on the display The display and the key pad are not illuminated When entering an external telephone number make sure The handset in the baby s room is not barred for outgoing calls The number to which the alarm c...

Страница 77: ... mode Step 1 Open the entry field for the room monitor v Open the menu s Add Features Select the menu item and confirm Room Monitor Confirm The input field is opened Step 2 Activate the room monitor r In the line Room M select On Step 3 Enter the telephone number R RRRRRRRRRRRRRRRRRRR s Edit Scroll to the Call to line and press the display key The input field for the telephone number is opened eit...

Страница 78: ... call to number only the last 4 digits will appear in the input panel OK R RRRRRRRRRRRRRRRRRRRR s Edit Scroll to the Call to line and press the display key Delete the number either Enter the external telephone number Enter the new telephone number Press the display key to open the menu Save Entry Confirm The entry is stored or Enter the internal telephone number RRRRRRRRRRRRRRRRRRRRR INT Press the...

Страница 79: ...Example You go on holiday and take two handsets with Walk and Talk functionality with you Set the Walk and Talk function on both handsets You can now communicate using the handsets Precondition Both handsets have been registered to the same base station or Both handsets are registered to different base stations and both are set to Best Base page 70 or One of the handsets is not registered to any b...

Страница 80: ...and Talk mode RRRRRRRRRRRRRRRRRRRRR Off Press the display key i The speaking volume and advisory tones are set in exactly the same way as if your handsets at home were in range of the base station page 80 and page 82 Ringer tones cannot be set in Walk and Talk mode Activate deactivate ringer page 83 and Activate deactivate keypad lock page 11 are available in the Walk and Talk mode To open the men...

Страница 81: ... do this while an external call is in progress v Audio Settings s Language Select the menu item and confirm The current lan guage is marked with factory setting English s Select a language and confirm a Long press back to idle status OK OK i If you set the wrong language by mistake press v M 2 Now select the correct language with s and confirm your choice with When you change the display language ...

Страница 82: ...nalled You can also set the time control for the volume of a call e g quieter during the night v Audio Settings Ringer Settings Ringer Echo Confirm On a Long press back to idle status OK Setting the melody and volume Ext Calls Confirm You hear the current volume r Select the volume in the entry field s r Scroll to the next line and select the melody You will hear the current melody and the name of...

Страница 83: ...back to idle status either For internal calls s Internal Calls Select the menu item and confirm or For appointments already set page 16 s Appointments Select the menu item and confirm or For a preset wake up call page 15 s Alarm Select the menu item and confirm or To set all the functions the same s All Select the menu item and confirm then r Set the required level 1 5 in the entry field s r Scrol...

Страница 84: ...hear a short tone beep instead of the ring tone Vibration alarm Incoming calls and other messages are signalled with a vibration This setting is inde pendent of the ringer settings v Audio Settings Cancelling the ringer permanently P Press the star key and hold until the ringer cannot be heard any longer The ringer is now permanently cancelled The Ú icon appears in the display Re activating the ri...

Страница 85: ...16 melodies Recording a melody v Audio Settings Sound Manager v Open the menu N O 1 O Press keys either You want to hear the first ring Q Press the key or You do not want to hear the first ring 1 Press the key Confirm OK i If you accept a call on the first ring and if this ring has signalled a text mes sage then the message will be lost New Sound Confirm Record Sound Confirm RRRRRRRRRRRRRRRRRRRRR ...

Страница 86: ...rrect input End of menu tone when scrolling at the end of a menu Battery tone The battery needs recharging v Audio Settings Advisory Tones s Select the melody either Playing back the melody RRRRRRRRRRRRRRRRRRRRR Play Press the display key or Changing an entry Press the display key s Scroll to the Volume line to change the volume s Scroll to the Edit Entry line to change the name s Scroll to the Vi...

Страница 87: ...set RRRRRRRRRRRRRRRRRRRRR Yes Press the display key to confirm the prompt a Long press back to idle status Base station selection Best Base station page 70 Earpiece volume 1 page 80 Handsfree volume 3 page 80 Ringer volume 5 page 81 Time control for ringer deactivated page 81 Ringer melody Classic Ring page 81 Name announcement deactivated page 27 Auto answer activated page 80 Battery tone Key cli...

Страница 88: ... PIN Assigning authorisation perhandset You can prevent individual handsets from dialling external numbers You can assign the following authorisations Internal and external The handset can be used without restriction Ext incoming The handset can be used to make internal calls External calls can be accepted Internal only The handset can only be used for internal calls If necessary enter the current...

Страница 89: ...al dialling page 87 page 117 directly or as follows Enter the system PIN factory setting 0000 and con firm Enter or change the emergency number and press the display key Save Entry Confirm The entry is stored OK à OK i You can delete a stored emergency number with fC The handset is barred for external dialling c Press the talk key RRRRRRRRRRRRRRRRRRRRR EmerCall Press the display key The available ...

Страница 90: ... to factory settings Resetting does not affect the system PIN and handsets are still registered v Base Settings Base Reset RRRRRRRRRRRRRRRRRRRRR Edit Select the base station and press the display key Enter a new name up to 16 characters for text input see page 98 RRRRRRRRRRRRRRRRRRRRR Save Now press the display key to confirm the setting i The name of the base station is handset specific i e the b...

Страница 91: ... SMS message message number deactivated deleted page 50 page 50 List type missed calls page 33 Access code none page 91 pause after access code 3 s page 92 Pause after recall key 800 ms page 92 Pause after line seizure 3 s page 92 Recall 250 ms page 91 Dialling mode DTMF page 91 Answering machine functions only S 150 Answering machine activated page 55 Messages on the answering machine deleted pag...

Страница 92: ... Recall Storing the access code outside line code Precondition Your PABX requires you to enter an access code before the telephone number when making an external call e g 0 v Base Settings Add Features Access Code The access code will be automatically inserted before any of the numbers chosen from the calls answering machine list i You cannot send or receive text messages on PABXs that do not supp...

Страница 93: ...ng is 3 seconds Change pause after Recall key You can change the length of the pause if your PABX requires this refer to the operating instructions for your PABX the factory setting is 800 ms Changing the dialling pause pause after access code Precondition You have stored an access code page 91 Factory setting 3 seconds Switching temporarily to tone dialling DTMF If your PABX still operates with d...

Страница 94: ...ss The keypad lock is activated Press the hash key R for about 2 sec to deactivate the lock page 11 Base station x flashes in the display The handset is outside the range of the base station The base station is not switched on Move the handset nearer to the base station Check the power connector at the base station page 8 Base Search flashes in the display The handset is set for Best Base But no b...

Страница 95: ...time are not set Set the date time page 15 the answering machine says PIN is incorrect during remote operation The entered system PIN is incor rect or still set to 0000 Enter the system PIN again or set a PIN that is different from 0000 page 87 the answering machine does not record any messages or has automatically switched over to announce only Its memory is full Delete old messages Play back new...

Страница 96: ...22 Greece 0 80 11 11 11 16 Hong Kong 28 61 11 18 Hungary 06 14 71 24 44 Iceland 5 11 30 00 India 01 13 73 85 89 98 Indonesia 0 21 46 82 60 81 Ireland 18 50 77 72 77 Italy 02 66 76 44 00 Ivory Coast 80 00 03 33 Jordan 0 64 39 86 42 Kenya 2 72 37 17 Kuwait 2 45 41 78 Latvia 7 50 11 14 Lebanon 01 44 30 43 Libya 02 13 50 28 82 Lithuania 8 22 74 20 10 Luxembourg 43 84 33 99 Macedonia 02 13 14 84 Malays...

Страница 97: ...lease contact your specialist dealer or network provider The CE mark attests to the phone s compliance with the essential requirements of the R TTE directive Excerpt from the original declaration We Siemens AG declare that the above mentioned product is manufactured according to our Full Quality Assurance System certified by CETECOM ICT Services GmbH in compliance with ANNEX V of R TTE Directive 9...

Страница 98: ...arging time hours 700 min 250 10 days approx 15 approx 2 5 Feature Value DECT standard is supported GAP standard is supported No of channels 60 duplex channels Radio frequency range 1880 1900 MHz Duplex method Time multiplex 10 ms frame length Channel grid 1728 kHz Bit rate 1152 kbit s Modulation GFSK Language code 32 kbit s Transmission power 10 mW average power per channel Range up to 300 m outd...

Страница 99: ... relevant key repeatedly or hold it down To begin A Pre vious B Stop Cont 3 Next Dial your own tele phone number You hear your answering machine D E F 9 Press key and enter the system PIN Control the answering machine with the digit keys G H 9 Voice prompts Activate the answering machine Allow phone to ring for about 1 min new 0 Clearing the mail box Changing the mail box Enter system PIN The answ...

Страница 100: ...f that key appear in the bottom display line and are highlighted one after the other When you release the key the highlighted character is inserted into the input field You can see in the display whether upper case lower case or digits are selected A or a appears on the bottom display line when you make an entry in the directory When entering a text message you will see Abc abc or 123 in the top r...

Страница 101: ...letter appears reverse highlighted in the display line and is transferred to the text area Key functions with activated predictive text Activating deactivating predictive text Predictive text is activated and deactivated according to specific functions Even if you have deactivated predictive text when entering a name in the telephone for instance it is still available for writing text messages Pre...

Страница 102: ...alking on the phone Data transfer Some functions involve the transfer of large volumes of data between the handset and the external device In this case the handset switches to data transfer mode Data Trans fer appears in the display In this mode you cannot make any entries via the keypad and incoming calls are ignored In the following situations the handset switches to data transfer mode Read writ...

Страница 103: ...n Shooter Game Try to hit as many balloons as you can v Add Features Balloon Shooter To move the sights press To shoot the balloon press 5 either Starting the game RRRRRRRRRRRRRRRRRRRRR Start Press the display key or Other options Press the display key to open the options menu à p 1 2 I 4 L MNO or ...

Страница 104: ... PC interface Caller based ringer melody setting for VIP calls Melodies can be downloaded by SMS Polyphone call tone melodies 16 chord Recording call tone melodies via the handset Room monitor Walk and Talk Voice selection for 29 names Announce name when calling Balloon Shooter game preinstalled Vibration alarm Gigaset Handset S 1 Large illuminated graphic display with date and time Directory for ...

Страница 105: ...1 A108 with PTT Push To Talk button You can use the mobile handsfree set to telephone without using your hands EDC 510 charger unit Best Nr L36880 N5601 A101 You can use the charger unit to recharge the telephone and an additional battery Gigaset Handset C 2 Graphic display with date and time Directory for about 100 entries Handsfree SMS precondition you have CLIP EATONI predictive text Caller bas...

Страница 106: ... available from your mobile phone retailer Or you can order direct online from the my siemens Online Shop www my siemens com shop The Online Shop also has the latest product information Only use original accessories This will avoid possible health risks and dam age and also ensure that all the relevant regulations are complied with ...

Страница 107: ...sage 1 2 Incoming 00 00 or 1 3 Outgoing You have activated an SMS mailbox oder 2 4 Mailboxen with a PIN 1 SMS 1 1 Mailbox 1 1 1 Write Message 1 1 2 Incoming 00 00 1 1 3 Outgoing 1 2 bis 1 4 Mailbox 1 Mailbox 2 Mailbox 3 1 2 1 bis 1 4 1 Write Message 1 2 2 bis 1 4 2 Incoming 00 00 1 2 3 bis 1 4 3 Outgoing 3 Add Features 3 1 Room Monitor 3 2 Walk and Talk 3 3 Balloon Shooter 4 Calendar Clock 4 1 Set...

Страница 108: ...ure 7 6 Reset Handset 8 Base Settings 8 2 System PIN 8 3 Base Reset 8 4 Add Features 8 4 1 Dialling Mode 8 4 1 1 Tone 8 4 1 2 Pulse 8 4 2 Recall 8 4 2 1 80 ms 8 4 2 to 8 4 2 8 800 ms 8 4 3 Repeater Mode 8 4 4 Access Code 8 4 5 Add Emerg No 8 4 6 Listening In 8 5 Preselection 8 5 1 Preselect No 8 5 2 With Preselect 8 5 3 Without Presel 8 6 Call Director SL 150 only 8 6 1 Call Director 8 6 2 Rec Ann...

Страница 109: ... 9 3 1 Handset 9 4 Record Memo 9 5 Announcements 9 5 1 Rec Announce 9 5 2 Play Announce 9 5 3 Del Announce 9 5 4 Rec Anc Only 9 5 5 Play Anc Only 9 5 6 Del Anc Only 9 5 7 Set Ans Mode 9 5 7 1 Ans Record 9 5 7 2 Announce Only 9 5 7 3 Ans Mode Time 9 6 Message Set 9 6 1 Message Length 9 6 2 Record Quality 9 7 Ring Delay 9 8 Voice Prompts 9 8 1 Record Command 9 8 1 1 User 1 9 8 1 to 9 8 1 4 User 4 9 ...

Страница 110: ...ce SL 150 only deleting for Call Director 74 personal announcement 55 playing for Call Director 74 75 playing deleting for ans m 57 recording for Call Director 74 Announce only answering machine 55 Announcement recording 57 selecting for answering machine 58 Announcement mode see Answering machine Answering machine 55 announcement mode 55 memos 55 messages 55 operating with the handset 55 Answerin...

Страница 111: ...r 34 Calling back from calls list 34 Calling Line Identification 18 Calls list 31 delete a single entry 34 opening the 33 settings 33 Cancel operation 13 Care of the telephone 93 Carrying clip 11 Change call to number 77 a handset s internal number 72 base station name 89 Dialling mode 91 dialling mode 91 Display language 80 Emergency numbers 88 handsfree volume 20 loudspeaker volume 80 name of a ...

Страница 112: ...e number 25 Display 12 24 hour display 15 anniversaries not kept 17 appointments not kept 17 Calling the network mailbox 68 changing language 80 Changing the display language 80 display keys 12 Emergency numbers 88 in idle status 14 memory 30 name CNIP 18 number CLI CLIP 18 removing protective film 9 DP dial pulsing 91 Draft message list SMS 38 39 41 E Earpiece mode 1 20 EATONI predictive text 100...

Страница 113: ... volume 20 key 1 Hash key 1 11 Hearing aids 6 I Icon for new messages 60 61 Idle status display 14 Incoming message list SMS 38 43 44 51 opening the 44 Internal consultation 72 listen in 73 making calls 71 K Key 1 fast access 1 67 Keys Activating deactivating keypad protection 11 cancel 13 control key 12 delete key 13 display keys 12 escape 13 hanging up 18 Key click 85 key press confirmation tone...

Страница 114: ...o 55 Notification see SMS Notify number see SMS Notify type see SMS Number see telephone number or entry 22 O OK key 13 On Off key 1 Open directory 12 menu 12 Operating time of the handset 97 Operation preparing to use your phone 7 Order in directory 99 P PABX 91 pause after access code 92 set dialling mode 91 set recall 91 Setting pauses 92 Storing an access code 91 switch to tone dialling 92 Pac...

Страница 115: ...g a 81 deactivating the 83 melody settings 81 set volume 81 suppress 35 suppressing 84 time control for volume 81 Ringer echo 81 Ringer tone see SMS Room monitor 75 activating the 76 Setting the sensitivity 79 setting the sensitivity 76 using in Walk and Talk mode 79 S Safety precautions 6 Saving access code for a PAXB 91 directory entry 22 SMS 39 Screensaver see SMS Select menu option 12 Select o...

Страница 116: ...n 35 saving the 39 Selecting an email address 42 self help with error messages 54 send 39 send centre 37 sending and receiving 36 sending as email 35 40 sending editing 42 setting to a personal mailbox 49 SMS centres 35 Storage capacity 35 Templates 42 to a PABX 52 SMS centre 35 changing a number 37 Sound Manager 84 Special functions 73 88 89 91 Specifications 97 Speed dial key 21 Speed dial list ...

Страница 117: ...ng 27 recording 26 Voice prompts 63 64 Voice activated dialling 12 26 dial 26 Volume handset volume 80 loudspeaker volume 80 ringer volume 81 settings 81 W Wait melody 20 Wake up call deactivate 16 setting ringer 82 Walk and Talk mode 79 activating the 79 deactivate 79 settings 78 using a handset as a room monitor 79 Warning tone see advisory tones Writing a text message 38 Wrong input correcting ...

Отзывы: