background image

15

Changing the nozzles 

of the large, medium 

and small burners on 

the cooktop

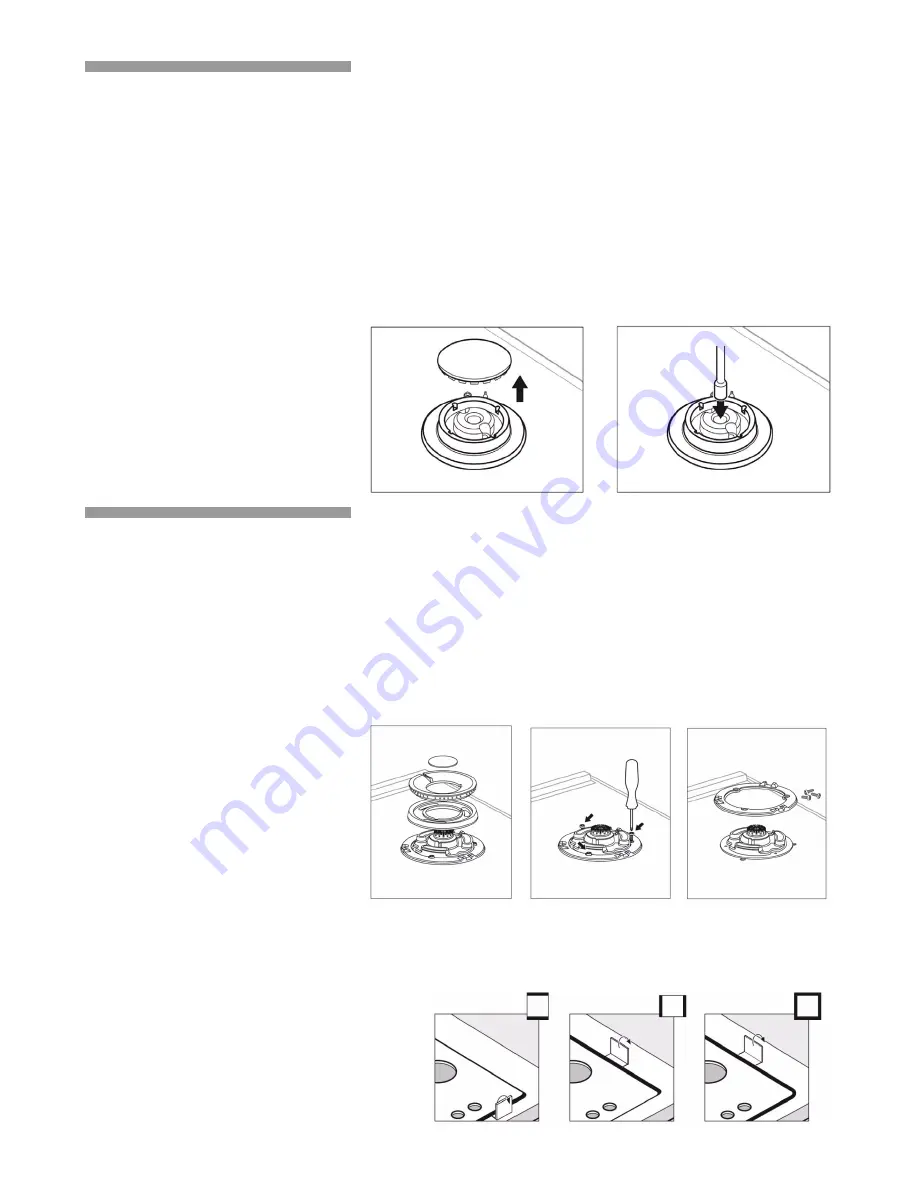
- Remove the pan supports, burner covers and 

diffusers.Fig. 7
- Change the nozzles using the spanner provided by our 

Service Centre (code 424699), taking special care to 

ensure that the nozzle does not fall when it is removed 

from the burner or when fitted. Fig. 8.
Ensure that it is completely tightened in order to 

guarantee the seal. Primary air adjustment is not 

necessary with these burners.
Note: it is not necessary to adjust the primary air control 

on these burners.

Changing double-

flame burner tips

The glass panel and frame are fixed to the rest of the 

cooktop using a clip mounting system. The following 

steps must be taken to remove the glass panel and 

frame:
- Remove all the burner covers and pan supports. Fig. 9a.
- Release the front clip fixing the appliance to the kitchen 

unit by removing the screw. Fig. 9b.
- Loosen the screws on the burners, Fig. 9c, and remove 

the control knobs from their respective housings.

Use the disassembly lever 483196 available from our 

Service Centre. To release the front clips, apply the lever 

in the area shown in figures 10 according to the cooktop 

model.

Fig. 7

Fig. 8

Fig. 9b

Fig. 9a

Fig. 9c

Fig. 10

Содержание ER326AB70A

Страница 1: ...Siemens Electrogeräte GmbH 81739 München Carl Wery Straß e 34 This cooktop is for use with Natural Gas and propane gas ER926SB90A ER626PB90A ER326AB90A ER326BB90A Cod 9000432107 A ...

Страница 2: ...on the cooktop 15 Changing double flame burner tips 15 Changing the outer flame nozzle 16 Changing the inner flame nozzle 17 Adjustment of the taps 17 Operating instructions 17 Burner locations 19 The gas burners Operation 19 Switching on automatically 20 Safety system 21 Switching off a burner 21 Power levels 21 Warnings 22 Suitable pans 23 Accessories 23 Additional wok pan support 23 Additional ...

Страница 3: ...s which are strictly necessary to guarantee efficient protection during transport These materials are 100 recyclable thus reducing the environmental impact You can also contribute to caring for the environment by following the advice below dispose of the packaging in the appropriate recycling bin before you get rid of an old appliance make sure you disable it Contact your local authority to find o...

Страница 4: ... person Warnings Do not allow the flame to extend beyond the edge of the cooking utensil This instruction is based on safety considerations Do not forget that the unit becomes hot when in use Common sense is important Just because the flame is out does not mean parts cannot still be hot This appliance shall not be used for space heating This instruction is based on safety considerations Be sure to...

Страница 5: ...th fat or oil e g chips Never pour water on burning fat or oil DANGER OF BURNS Cover the receptacle to smother the flames and turn the cooktop off In the event of a fault cut the gas and electricity supplies to the appliance Call our Service Centre to repair the fault Do not use unstable or uneven based receptacles on cooking plates or burners They may accidentally tip over If a gas supply knob va...

Страница 6: ...ave been given supervision or instruction concerning use of the appliance by a person responsible for their safety Make sure you keep these instructions for use and assembly in a safe place so that you can hand them on with the appliance if it ever changes owner Note To avoid jeopardising the electrical safety of the appliance it is forbidden to use high pressure or steam jet cleaning devices SHOU...

Страница 7: ...g Code Ø Local Electrical Regulations Ø Any other statutory regulations Preparing to install Refer to AS NZS 5601 1 for piping size details These built in cooktops are intended to be inserted in a benchtop cutout Do not stick the cooktop onto the worktop with silicone Only an officially authorised technician should connect the appliance Before you begin turn off the gas and electricity supply Inst...

Страница 8: ...9 Before connecting the unit check whether the local Fig 1b Fig 1c ...

Страница 9: ...0 mm is required for a range hood and 750 mm for an exhaust fan Any adjoining wall surface situated within 200 mm from the edge of any hob burner must be a suitable non combustible material for a height of 150 mm for the entire length of the hob Any combustible construction above the hotplate must be at least 650 mm above the top of the burner and no construction shall be within 450 mm above the t...

Страница 10: ...ith clauses 6 10 1 2 of AS NZS 5601 1 1 For cutout dimensions and clearances refer Fig 1 2 The clips and the adhesive seal underside of the cooktop are factory fitted do not under any circumstances remove them The seal ensures that the entire work surface will be watertight and prevents water seepage In order to fit the appliance into the kitchen unit first place the cooktop in the correct positio...

Страница 11: ...llation of the cooktop When making this connection make sure that the lead cannot come into contact with hot parts of the cooktop Important This appliance must be earthed When connecting the cooktop ensure that the earth wire is connected first and that all wires are connected to the correct terminals Fig 4 Gas During the planning stage consider the position of supply connections The cooktop must ...

Страница 12: ...be is moved or twisted There are two ways to carry out the connection to the main gas line A The hotplate can be connected with rigid pipe as specified in AS NZS 5601 1 B Flexible Hose If installing with a hose assembly install with a hose assembly that complies with AS NZS 1869 AGA Approved 10 mm ID class Bor D no more than 1 2 m long and in accordance with AS NZS 5601 1 Ensure that the hose does...

Страница 13: ...nnot accept any liability for direct or indirect damage caused by wrong connection leakage or improper installation When being repaired the appliance must always be disconnected from the mains supply if required notify our customer service Converting the cooktop from Nat Gas to Propane Gas To change injectors All work involved in installation setting and adaptation to a different gas type must be ...

Страница 14: ... the primary air control on these burners Changing double flame burner tips The glass panel and frame are fixed to the rest of the cooktop using a clip mounting system The following steps must be taken to remove the glass panel and frame Remove all the burner covers and pan supports Fig 9a Release the front clip fixing the appliance to the kitchen unit by removing the screw Fig 9b Loosen the screw...

Страница 15: ...ame nozzle Fig 11 Loosen the clamp screw to release the bushing by moving it backwards to access the main nozzle easily Fig a1 Remove the outer flame nozzle by turning it towards the left Fig a2 a3 Screw in the new outer flame nozzle Fig a3 a4 Adjust the distance of the airflow adjusting bushing L2 according to the value Z Fig a5 Tighten the clamp screw Fig a6 Fig 10a Fig 11 ...

Страница 16: ... Fig b3 b4 Remove the inner flame nozzle M4 from part M2 Fig b5 b6 Screw in the new inner flame nozzle M4 Fig b6 b7 Refit all the components proceeding in the reverse order to removal Adjustment of the taps Set the control knobs to minimum Remove the control knobs from the taps Fig 13 It has a flexible rubber valve reinforcing ring Simply press on this seal with the tip of a screwdriver to allow a...

Страница 17: ...e small flame position Screw the adjustment screw anti clockwise to estabilish a minimum stable flame position The flame should remain alight and not burn back to the injector when the valve is turned quickcly from Full On to the Minimum flame position and back a few times To adjust the minimum flame position for ULPG the screw must be fully tightened down clockwise Refit the control knobs Never r...

Страница 18: ... installed for the appliance to work correctly Fig 16 17 18 19 20 21 Control knob Pan support Burner up to 1 9 kW Burner up to 2 8 kW Control knob Double flame burner up to 6 kW Pan support Pan support Burner up to 1 9 kW Burner up to 1 1 kW Control knob Burner up to 2 8 kW Burner up to 1 9 kW Pan support Burner up to 2 8 kW Control knob Burner up to 1 1 kW Burner up to 1 9 kW Burner up to 1 9 kW ...

Страница 19: ...es it is no longer necessary to press down the control knob 2 Turn the control knob to the required setting If it does not come on turn the control knob to the off setting and repeat the steps above This time press and hold the control knob for longer up to 10 seconds Warning If after 15 seconds the flame does not ignite switch off the burner and open a nearby window or door Wait at least one minu...

Страница 20: ...ding control knob clockwise to the 0 setting Power levels The progressive control knobs can be used to control the power needed from minimum to maximum power Thermocouple Ignition sparker Fig 22 Setting Ú Control off Large flame Maximum capacity or aperture and electricity on Economy flame š Minimum capacity or aperture For double flame burners the inner and outer flames can be controlled separate...

Страница 21: ...lated either keep the natural ventilation apertures open or install a ventilation system extractor hood If using the appliance intensively for prolonged periods you may require additional ventilation e g by opening a window or more effective ventilation e g by increasing the cooktop s ventilation if possible If the burner flames are accidentally blown out switch off the burner operating control kn...

Страница 22: ...m in diameter roasting dishes earthenware pots etc and with pans with a concave base Fig 24 Additional coffee maker support Only for use on the small burner with pans which are no more than 12 cm in diameter Fig 25 The chart below gives the correct pan usage for each burner Burner Recomended pan diameter Minimum pan diameter Medium burner 140 200 mm 140 mm Large burner 220 260 mm 220 mm Wok burner...

Страница 23: ...gs hot and making tasty casseroles Small burner Casseroles rice pudding and caramels Defrosting and slow cooking vegetables fruits and frozen products Melting butter chocolate and jelly Do not place anything eg flame tamer asbestos mat between pan and pan support as serious damage to the appliance may result Do not remove the pan support and enclose the burner with a wok stand as this will concent...

Страница 24: ...ook without using a lid and make sure the lid is properly fitted to avoid wasting energy Always place the pan right over the burner not to one side Otherwise it could tip over Do not place large pans on the burners near the control knobs These may be damaged by the very high temperatures Place the pans on the pan supports never directly on the burner Pans should be placed on the cooktop carefully ...

Страница 25: ...rners make sure the burner covers are correctly placed on the burner flame diffuser Unsuitable products Never slide pans across the glass surface as you may scratch it In addition try not to drop heavy or sharp objects on the glass Never strike any part of the cooktop Do not use steam cleaners This could damage the cooktop Never use abrasive products steel scourers sharp implements knives etc to r...

Страница 26: ...ner covers are not correctly positioned The appliance is not earthed is not correctly connected or the earth wire is faulty The space between the ignition sparker and the burner must be clean Dry the burner covers carefully Check that the covers are correctly positioned Contact the electrical installer The burner flame is not uniform The burner components are not correctly positioned The grooves o...

Страница 27: ... in Spain GMK10013 E Nr ER326AB90A C FD Gas type NG LP 1 0 2 75 HGC MJ Preinstalled NG CIF A 28 893550 Siemens Electrogeräte GmbH Test point pressure kPa In compliance with AS NZ 3100 and AS 4551 Made in Spain E Nr ER326BB90A F R GMK10014 Gas type LP 2 75 HGC MJ Preinstalled NG CIF A 28 893550 Siemens Electrogeräte GmbH Test point pressure kPa In compliance with AS NZ 3100 and AS 4551 Made in Spai...

Отзывы: