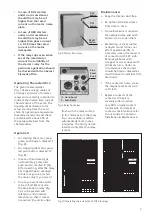
Table 5: Installation
Starter
MLFB
Mode of Relay
mounting
Procedure
DOL 1/2
3TW7493-2A..
Direct mounting on
contactor
1.
Unscrew contactor terminals and put the relay terminals under contactor terminals.
3TW7494-2A..
2.
Engage the relay hook in contactor slot.
3TW7495-2A..
3.
Push the relay towards contactor as much as possible, so that the relay edge is flush
with the contactor ribs.
ASD 2
3TE7493-2A..
4.
Tighten the contactor terminal screws.
3TE7494-2A..
3TE7495-2A..
DOL 3
3TW7496-2A..
On the terminal
carrier
1.
Replace the terminals of relay by those provided in the hardware kit along with the
starter.
3TW7497-2A..
2.
See the diagram given in the Operating Instructions of accessory for independent
mounting.
3TW7498-2A..
3.
Loosen the screws of accessory for independent mounting.
ASD 3
3TE7497-2A..
4.
Put the relay terminals below the pin type lugs of the cable terminations.
5.
Hold the relay the way it is shown in the Operating Instructions of terminal carrier
and engage the relay hook in the slot of the terminal carrier.
6.
When the relay edge is flush with terminal carrier edge, clamp the relay with termi-
nal carrier using the clamps in the hardware kit.
7.
Tighten the terminal carrier screws.
DOL 6
3TW7499-2A..
Direct mounting on
contactor
1.
Engage the relay hook in contactor slot.
3TW7590-2A..
2.
Align the contactor terminal holes to relay terminal holes.
3.
Fix the relay to the contactor using the hardware already fitted at the contactor
terminals.
4.
Fix the terminals provided along with the relay to the other side (outgoing side) of
the relay and use the hardware provided for cable connections.
5


