background image

Colour monitor 43B1-M

2 - English

A26361-K883-Z100-1-5E19

Notational conventions

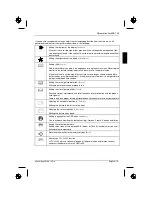
The meanings of the symbols and fonts used in this manual are as follows:

!

Pay particular attention to text marked with this symbol. Failure to observe this warning
endangers your life, destroys the device, or may lead to loss of data.

i

Supplementary information, remarks, and tips follow this symbol.

Ê


Text which follows this symbol describes activities that must be performed in the order shown.

"Quotation marks" indicate names of chapters or terms.

Texts in italics

 indicate filenames and menu items.

Important notes

!

In this chapter you will find information regarding safety which is essential to take note of
with your monitor.

Safety

This device complies with the relevant safety regulations for data processing equipment, including
electronic office machines for use in an office environment. If you have any questions, contact your
sales outlet or our Help Desk.


Use only a type "CH-1204" or "STD-1204" power adapter.


The display surface of the LCD monitor is sensitive to pressure and scratches. You should
therefore be careful with the display surface so as to avoid lasting damage (Newton rings,
scratches).


If the device is brought into the installation site from a cold environment, condensation can
form. Before operating the device, wait until it is absolutely dry and has reached approximately
the same temperature as the installation site.


During installation and before operating the device, please observe the instructions on
environmental conditions in the "Technical data" chapter as well as the instructions in the
"Installing an ergonomic video workstation" chapter.


To ensure sufficient ventilation, the monitor may only be operated with the monitor base, swivel
arm or wall bracket.


Ensure that the power socket on the device or the grounded mains outlet is freely accessible.


The ON/OFF switch does not disconnect the device from the mains voltage. To completely
disconnect the mains voltage, remove the power plug from the socket.


Lay all cables so that nobody can stand on them or trip over them. When attaching the device,
observe the relevant notes in the chapter "Connecting the monitor".


No data transmission cable should be connected or disconnected during a thunderstorm.


Make sure that no objects (e.g. jewellery chains, paper clips, etc.) or liquids get inside the
device (danger of electric shock, short circuit).

Содержание 43B1-M

Страница 1: ... 5 Disposal and recycling 5 Checking the contents of the consignment 6 Installing an ergonomic video workstation 7 Connecting the monitor 7 Tilting and turning area 9 Operation of the monitor 9 Switching the monitor on off 10 Notes on power management 10 Changing the monitor settings 11 Notes on ergonomic colour adjustment 14 Technical data 15 VESA DDC compatible VGA interface 16 Supported modes 1...

Страница 2: ......

Страница 3: ...e spacing plug play capability power management for reducing power consumption when the computer system is not in use compliance with the recommendations in accordance with TCO 99 compliance with the ergonomic standards ISO 13406 2 In normal screen mode dark characters against a light background the monitor satisfies the ergonomic requirements for the GS symbol This Operating Manual contains impor...

Страница 4: ...e careful with the display surface so as to avoid lasting damage Newton rings scratches If the device is brought into the installation site from a cold environment condensation can form Before operating the device wait until it is absolutely dry and has reached approximately the same temperature as the installation site During installation and before operating the device please observe the instruc...

Страница 5: ...e monitor are free The display surface of the LCD monitor is sensitive to pressure and scratches Clean it only using a soft slightly moistened cloth Wipe the monitor casing with a dry cloth If the monitor is particularly dirty use a cloth which has been moistened in mild domestic detergent and then carefully wrung out Transport Transport the monitor with care and only in its original packaging or ...

Страница 6: ...The use of shielded I O cables is required when connecting this equipment to any and all optional peripheral or host devices Failure to do so may violate FCC rules Declaration of Conformity This device complies with Part 15 of the FCC Rules Operation is subject to the following two conditions 1 this device may not cause harmful interference and 2 this device must accept any interference received i...

Страница 7: ...ty and that this is growing rapidly If all desktop computers and peripherals enter a low power mode when not in use the overall savings in electricity could amount to 2 thousand million annually These savings could also prevent the emission of 20 million tons of carbon dioxide into the atmosphere the equivalent of 5 million automobiles As an Energy Star Partner Fujitsu Siemens Computers GmbH has d...

Страница 8: ... the delivery note The complete LCD monitor package includes a monitor with permanently connected data cable a power adapter with power adapter cable one power cable one floppy disk one Warranty Booklet this Operating Manual Should you discover that the delivery does not correspond to the delivery note notify your local sales outlet immediately i It is recommended not to throw away the original pa...

Страница 9: ...ighting Position the keyboard where it is easiest to reach 30 30 65 65 0 60 0 permissible viewing sector preferable viewing sector permissible viewing sector approx 90 and more approx 90 Position the monitor for optimum viewing The viewing distance to the monitor should be approximately 50 cm Keep ventilated areas clear Remember to maintain correct posture Connecting the monitor Information on the...

Страница 10: ...graphics card the monitor port for the separate graphics card is usually active Ê Connect the power adapter cable of the power adapter firmly to the power connector of the monitor 2 and check whether the socket is securely seated Ê Connect the power cable to the power adapter 3 Ê Connect the plug on the power cable supplied to the monitor socket of the computer 4 Ê Plug the power connector of the ...

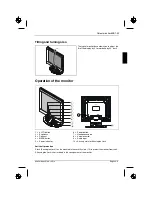
Страница 11: ... of the monitor 1 2 3 4 5 6 7 8 9 10 1 AUTO button 2 Brightness 3 Contrast 4 MENU button 5 Power indicator 6 Power button 7 Headphones port 8 Volume control 9 Audio input 10 Security slots for Kensington Lock Anti theft protection A lock Kensington Lock can be mounted in the security slots 10 to protect the monitor from theft A Kensington Lock is not included in the consignment of the monitor ...

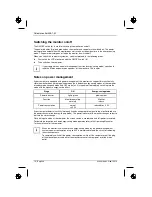
Страница 12: ... the computer standby mode suspend mode and OFF mode as it is capable of immediately switching into the mode with the highest energy saving effect Stage ON Energy saving mode Power indicator lights green glows amber Function Monitor operating normally Monitor is dark Power consumption normal 42 W reduced to 3 W If your computer detects inactivity no input it sends an appropriate signal to the moni...

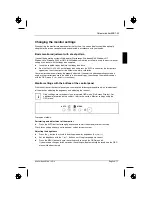
Страница 13: ... the screen display then change the monitor settings with the OSD menu Focus and Clock functions Monitor settings with the buttons of the control panel With the buttons of the control panel you can make the following settings directly auto adjustment of the monitor adjusting the brightness and adjusting the contrast i Other settings are carried out via an integrated OSD menu On Screen Display For ...

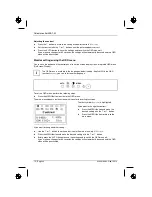
Страница 14: ...lish With the OSD function Language you can select another language MENU AUTO To set the OSD menu perform the following steps Ê Press the MENU button to activate the OSD menu The main menu appears on the screen with icons for the setting functions The first symbol Contrast is highlighted If you want to change the contrast Ê Press the MENU button and make the desired setting with the 3 or 4 button ...

Страница 15: ...lack value is too low it is not possible to distinguish between dark shades Setting the focus picture definition Focus Eliminate picture noise and improve focus Setting the clock picture width Clock Eliminate vertical interference with local fuzziness synchronisation with the graphic card signals There is only one proper setting per resolution and refresh rate for these parameters Adjusting the ho...

Страница 16: ... ergonomic colour adjustment If you select colours for the display in your application programmes take note of the information below The primary colours blue and red on a dark background do not produce the minimum required contrast of 3 1 and are therefore not suitable for continuous text and data entry When using several colours for characters and background and giving the primary colours full mo...

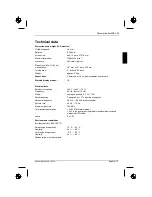
Страница 17: ... cable Storable display modes 18 Electrical data Rated mains voltage Frequency 100 V 240 V 10 50 Hz 60 Hz 3 Hz Video analogue positive 0 7 Vpp 75 Ω Synchronisation Separate Sync TTL positive or negative Horizontal frequency 30 kHz 80 kHz multi scanning Refresh rate 55 Hz 75 Hz Maximum pixel rate 135 MHz Total power consumption 42 W ON Normal mode 3 W in the energy saving mode standby mode suspend ...

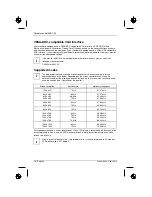
Страница 18: ...odes listed below Depending on the screen controller used it may be necessary to adjust the display position and scanning In this case you can change and save the settings see Operation of the monitor Screen resolution Refresh rate Horizontal frequency 720 x 400 70 Hz 31 47 kHz 640 x 480 640 x 480 640 x 480 60 Hz 66 6 Hz 75 Hz 31 47 kHz 35 00 kHz 37 50 kHz 800 x 600 800 x 600 60 Hz 75 Hz 37 88 kHz...

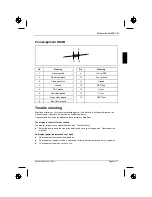
Страница 19: ...owing points If the distortion is still not eliminated the monitor should if possible be checked on another computer If you are unable to solve the problem please inform our Help Desk The display is too small or not centred The monitor recognises an undefined mode see Technical data Ê Adjust the position and the size of the display and save your settings see Operation of the monitor No display pow...

Страница 20: ...be present The maximum permitted number of pixels faults is stipulated in the stringent international standard ISO 13406 2 Class II Example a 17 flat screen monitor with a resolution of 1280 x 1024 has 1280 x 1024 1310720 pixels Each pixel consists of three subpixels red green and blue so there are about 4 million dots in total According to ISO 13406 2 Class II a maximum of 6 pixels and 7 subpixel...

Отзывы: