SHOWTEC 50412 Скачать руководство пользователя страница 1


LED SPI-2 Install 

Highlite International B.V. – Vestastraat 2 – 6468 EX – Kerkrade – the Netherlands 

Product code: 50412 

USER MANUAL 

ENGLISH 

V1 

Содержание 50412

Страница 1: ...LED SPI 2 Install Highlite International B V Vestastraat 2 6468 EX Kerkrade the Netherlands Product code 50412 USER MANUAL ENGLISH V1...

Страница 2: ...ice Non observance of the instructions in this user manual may result in serious injuries and damage of property 2021 Showtec All rights reserved No part of this document may be copied published or ot...

Страница 3: ...er Supply 12 5 Setup 13 Warnings and Precautions 13 DMX Connection 13 DMX 512 Protocol 13 DMX cable connection 13 DMX Cables 14 Setup LED SPI 2 DMX 14 DMX Addressing 15 Art NET Connection 15 Setup LED...

Страница 4: ...Channels 33 UID number 33 7 Troubleshooting 34 8 Maintenance 35 Safety Instructions for Maintenance 35 Preventive Maintenance 35 Basic Cleaning Instructions 36 Corrective Maintenance 36 9 Deinstallati...

Страница 5: ...01 Intended Use This device is intended for professional use as a DMX to SPI converter It is suitable only for indoor installation This device is not suitable for households and for general lighting...

Страница 6: ...situation which if not avoided may result in minor or moderate injury Attention Indicates important information for the correct operation and use of the product Important Read and observe the instruct...

Страница 7: ...ble is sufficient for the required power consumption of the device Attention General safety Do not block the ventilation openings Without proper heat dissipation and air circulation the internal compo...

Страница 8: ...hlite International dealer for more information Instructed persons have been instructed and trained by a skilled person or are supervised by a skilled person for specific tasks and work activities ass...

Страница 9: ...raphic display and buttons on the front or via the remote web interface which can be accessed within the network Each group output can handle up to 960 pixels The din rail mounted SPI 2 converts DMX A...

Страница 10: ...ge 2 0525 mm Wide range input voltage 2 x 960 pixel outputs Remote setup interface Art Net sACN and DMX512 control DIN EN43880 form factor DIN EN60715 rail system DIN Rail Spacing 35 mm Input Protocol...

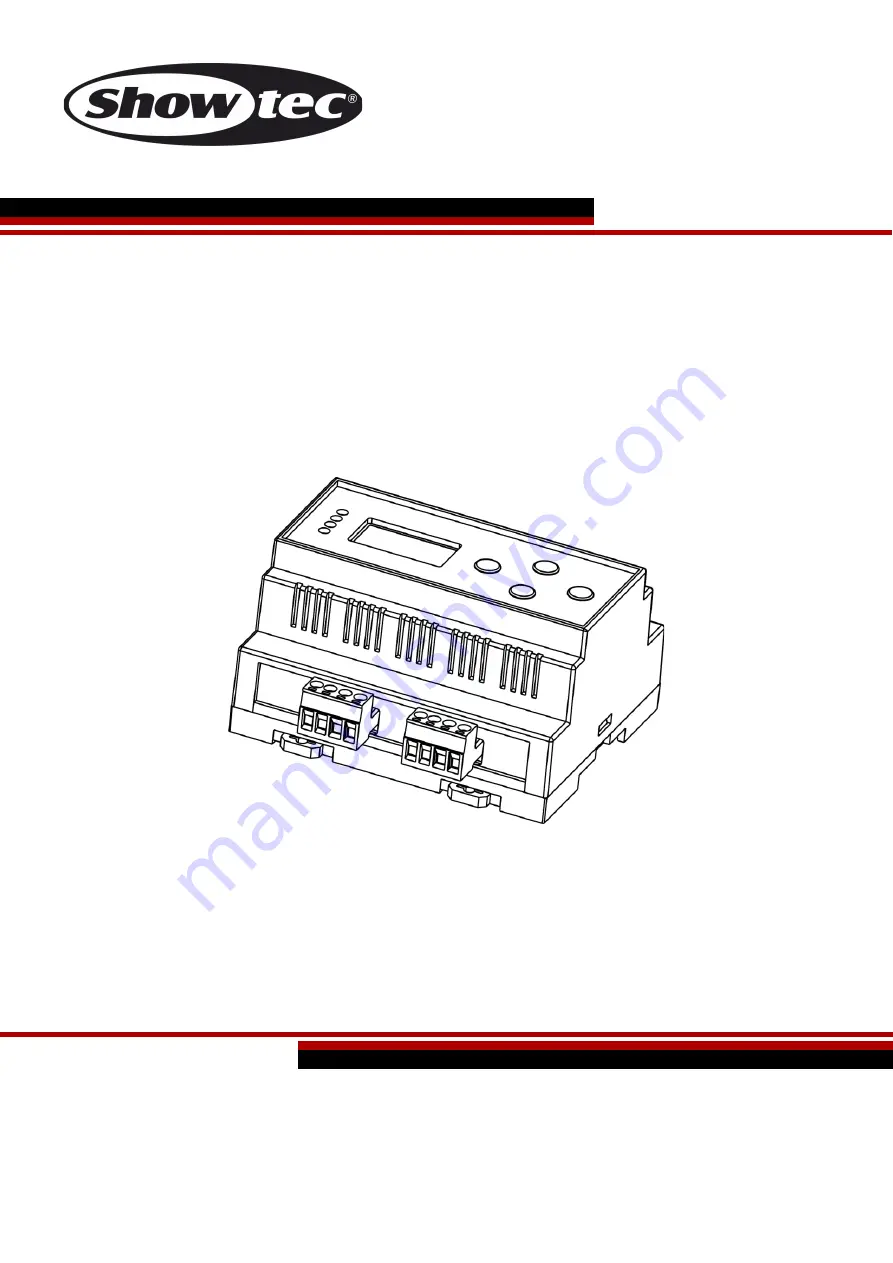
Страница 11: ...10 LED SPI 2 Install Product code 50412 Dimensions Fig 03...

Страница 12: ...ation Site Requirements The device must be installed only indoors The device can be mounted on a 35 mm DIN rail The maximum ambient temperature ta 40 C must never be exceeded The relative humidity mus...

Страница 13: ...n the information label on the device Make sure that the cross sectional area of the power cable is sufficient for the required power consumption of the device Remove the 2 pin Phoenix terminal power...

Страница 14: ...devices set in a master slave operating mode The LED SPI 2 has 3 pin DMX signal IN and OUT connectors The pin assignment is as follows 3 pin pin 1 ground pin 2 pin 3 Note Maximum recommended DMX data...

Страница 15: ...MX cables make sure that you connect the pins and wires correctly as shown in Fig 07 Fig 07 Setup LED SPI 2 DMX To connect multiple devices on one DMX data link follow the steps below Use a 3 pin DMX...

Страница 16: ...079 as 35 34 79 04 Continue assigning the starting addresses of the remaining devices by adding each time 34 to the previous number Make sure that you do not have any overlapping channels in order to...

Страница 17: ...set the universe of the second LED SPI 2 to 1 and its DMX address to 001 05 When connecting multiple devices you can repeat steps 1 to 4 up to 255 times each time inserting ascending universe numbers...

Страница 18: ...an be used to replace the data cable required to transmit the data Please follow the instructions below in order to create an extra network cable Take a standard network cable CAT 5 5E 6 and connect i...

Страница 19: ...DMX 512 sACN Art Net 17 34 512 channels For more information about how to connect the devices refer to 5 Setup on pages 13 17 To operate the device manually as a stand alone device Adjust the colors i...

Страница 20: ...N buttons to navigate through the menus or to increase decrease numeric values Use the ENTER button to open the desired menu to confirm your choice or to set the currently selected value Start up Upon...

Страница 21: ...20 LED SPI 2 Install Product code 50412 Menu Overview...

Страница 22: ...ain Menu Options Upon start up the display will show software version and the current settings The main menu has the following options Press the UP DOWN buttons to navigate through the main menu 02 Pr...

Страница 23: ...e Personality Press the ENTER button to enter the menu The display will show Press the UP DOWN buttons to select one of the 3 personality modes 17 Channel 34 Channel Pixel Press the ENTER button to co...

Страница 24: ...ent range is 000 255 Press the ENTER button to confirm your setting If you have chosen LED Quantity press the UP DOWN buttons to set the LED Quantity The adjustment range is 000 960 Press the ENTER bu...

Страница 25: ...he UP DOWN buttons to set the LED brightness The adjustment range for each color is 0 255 from dark to brightest Press the ENTER button to confirm your setting You can combine Red Green and Blue to cr...

Страница 26: ...e ENTER button to confirm your setting If you have chosen SPEED press the UP DOWN buttons to set the built in program s speed The adjustment range is 1 100 from slow to fast Press the ENTER button to...

Страница 27: ...u you can set the DHCP IP This means the LED SPI 2 will automatically search for the right IP configuration when your controller has also been set to DHCP Static IP In this menu you can set the Static...

Страница 28: ...5 255 000 Press the ENTER button to confirm your desired Netmask LCD Backlight In this menu you can choose the desired LCD Backlight While in the main menu press the UP DOWN buttons to choose Set LCD...

Страница 29: ...nuously ON If you choose the option Inverted the display will flip 180 Press the ENTER button to confirm your setting Factory Reset In this menu you can choose to reset your device While in the main m...

Страница 30: ...de 50412 Firmware version In this menu you can view the current firmware version of your device While in the main menu press the UP DOWN buttons to choose Firm Version Press the ENTER button to enter...

Страница 31: ...0 20 Hz 091 140 Synchr strobe from low to high frequency 0 20 Hz 141 255 No Function 10 Foreground Program 000 020 Auto 0 021 040 Auto 1 041 060 Auto 2 061 065 Auto 3 066 080 Multi color Program doesn...

Страница 32: ...equency 0 20 Hz 051 090 Random Strobe from low to high frequency 0 20 Hz 091 140 Synchr strobe from low to high frequency 0 20 Hz 141 255 No Function 10 Foreground Program 000 020 Auto 0 021 040 Auto...

Страница 33: ...140 Synchr strobe from low to high frequency 0 20 Hz 141 255 No Function 27 Foreground Program 000 020 Auto 0 021 040 Auto 1 041 060 Auto 2 061 065 Auto 3 066 080 Multi color Program doesn t respond t...

Страница 34: ...0 7 Pixel 3 Red 000 255 From low to high intensity 0 100 8 Pixel 3 Green 000 255 From low to high intensity 0 100 9 Pixel 3 Blue 000 255 From low to high intensity 0 100 505 Pixel 169 Red 000 255 From...

Страница 35: ...the controller The signal is reversed The 3 pin 5 pin DMX OUT of the controller does not match the DMX IN of the device Install a phase reversing cable between the controller and the device The contro...

Страница 36: ...at least 15 minutes before servicing or cleaning Preventive Maintenance Attention Before each use examine the device visually for any defects Make sure that All screws used for installing the device o...

Страница 37: ...w Disconnect the device from the electrical power supply Allow the device to cool down for at least 15 minutes Remove the dust collected on the external surface with dry compressed air and a soft brus...

Страница 38: ...is side up Fragile Storage Clean the device before storing Follow the cleaning instructions in chapter 8 2 1 Basic Cleaning Instructions on page 36 Store the device in the original packaging if possib...

Страница 39: ...38 LED SPI 2 Install Product code 50412...

Страница 40: ...2021 Showtec...

Отзывы: